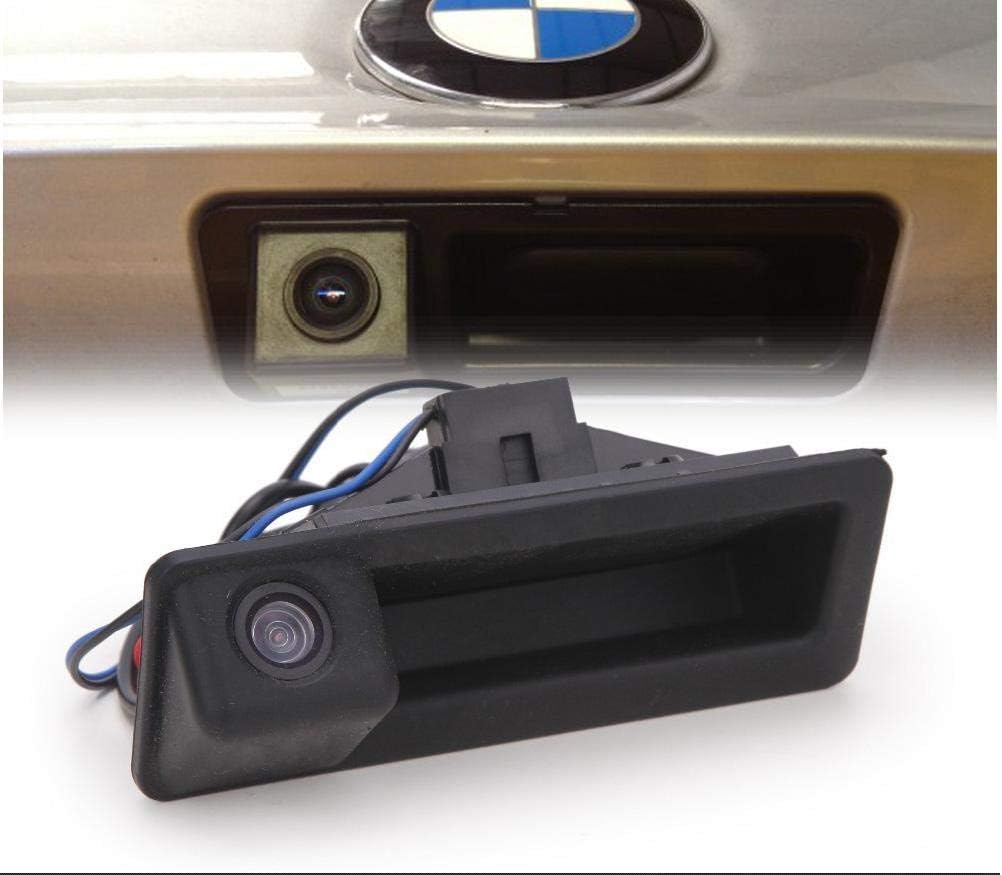
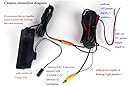
The media could not be loaded. I've added a video to show the reverse camera in action on my 9" Xtrons PE9890BIPL. The camera in daytime is good and the night time view is okay.I purchased this camera as it was cheaper but also looked exactly the same as others which was more expensive.Installation will more than likely require a 4 pin 12v fused relay which I purchased from Halfords for just over £6. If you've looked at reviews and read that they get a "black screen" or "lines on the screen" this will all be down to insufficient power from the reverse light. Without the engine started you probably do get 12v, but with the engine started I've "heard" it can drop to 11.3v hence the issues.So the relay allows you to supply a dedicated 12v direct from the battery but this 12v supply is only supplied when the "switch" on the relay is triggered.The 4 pin relay will have:1 pin for power (direct from battery)1 pin for trigger (reverse light)1 pin for ground1 pin for cameraWhen the reverse light is detected by the relay it will pass the 12v power from the battery and when reverse is de-selected it will close the 12v power supply.Installation:Installing this camera took a long time, you will need to remove the boot lid liner to access the boot handle and also the reverse light. On my 2006 e90 the light connector had a number of wires, the thick brown wire is ground and the wire to the right of it (black and blue striped) is the reverse wire. These wires provide both the "trigger" and "ground" pins for the relay.I connected a wire from the battery and ran it into the boot lid and then connected this to the power pin of the relay, that's 3 pins connected.The 4th pin is simply the red wire from the reverse camera itself and that's the relay side of things sorted.To run the reverse camera phono connector (the yellow connector) you will need to post it down the boot lid to the rubber grommet, unforntately the rubber grommet will not have space for the phono lead so I had to bypass the grommet and put it straight into the hole and I then cut a little piece out of the rubber grommet so there was space to push the rubber grommet back into place while the reverse camera wires protruded out of the side.Once in the boot I passed it down and tucked it behind the fabric, I then put the wire across the floor to the left side of the boot because it is much easier to pass the wire through to the radio on the passenger side. So with the lead now on the left hand side of the boot I removed the rear seats completely and you will find a wiring loom on the rear passenger section which I simply followed as well with the reverse camera wire. The plastic trim piece from the rear passenger to front passenger side all pull off except the rear passenger piece which has one clip holding it in place, but this comes off the same way as the boot lid trim.Once you get down by the front, the glove box can be dropped and the wire can then be fed behind it and into the radio.A few notes on my installation, the yellow phono has a red wire, this appears to be a trigger wire but with the relay installed you may as well use the reverse light wire as the "trigger" otherwise you would need to run a wire from the little red trigger wire all the way to the boot lid.On the first section of the reverse camera in the boot lid theres the power wire (red and black) I separated this wire and connected only the red wire to the accessory part of the relay, I didn't mean to not add the black wire to the ground part of the relay but the camera works fine without the black wire attached to anything.Installation is very hands on for certain, I wouldn't say it was hard as it was only really the understanding of a relay which I found hard but the rest is pretty easy, it just takes a long time.Overall, my car now has a reverse camera for under £30 which would have cost £100's a while back. I've had the car jet washed and there doesn't appear to be any issues.