

⚙️ Upgrade your desktop storage game with sleek, speedy, and solid mounting power!
The SABRENT BK-PCBS is a robust 2.5” SSD/HDD to 3.5” SATA bay converter kit featuring a solid aluminum frame, full SATA 3.0 compatibility (6Gb/s), and universal fit for desktop drives including Apple Mac Pro trays. Designed for easy installation and optimal cooling, it transforms your compact drives into desktop-ready powerhouses.


| ASIN | B00UN550AC |
| Best Sellers Rank | #19 in Mounting Brackets |
| Customer Reviews | 4.6 4.6 out of 5 stars (6,367) |
| Date First Available | March 13, 2015 |
| Finish Type | Black |
| Global Trade Identification Number | 00819921011886 |
| Is Discontinued By Manufacturer | No |
| Item Depth | 7 inches |
| Item Weight | 3.99 ounces |
| Item model number | BK-PCBS |
| Manufacturer | SABRENT |
| Mounting Type | Embedded |
| Product Dimensions | 7.03 x 0.59 x 4.2 inches |
| Set Name | Single Unit |
| UPC | 819921011886 |
P**G
Metal, strong, accurate hole locations, fits perfectly
This is the best SSD holder I have ever had. I thought it was plastic but it's metal and has a great feel about it. Fit's like a glove. I enjoyed installing it. If I need another SSD for my enclosure I will order this item again.
C**E
Great for Sabrent 5 bay hard drive docking station
I just bought the Sabrent 5 bay hard drive docking station and it only takes standard 3.5 hard drives. This is why I needed this conversion kit. So I can use SSD's instead. I works just perfectly. It is made of solid metal and the connectors work flawlessly. Now I can hot swap any drive I need. Ease of installation: Just screw on your SSD and plug it in Screws: Comes with 4 SSD screws and 6 mounting screws if placing in a case
G**D
Super high quality and durable
These were purchased to add 2.5” SATA SSDs to a Jonsbo N3 case, which doesn’t support this size drive in the main cage. The sleds are much higher quality than expected, using what feels like aircraft grade aluminum. The fitment was perfect with the drives and slots for the drive bays. Nothing rattling or loose. Zero flex. Comes with a full set of screws but used the grommetted ones provided with the case to make sliding in the rails easy. Really no complaints about the product at all. Compared with 3D printed ones, these definitely feel more durable and solid, especially if swapping drives is a common thing you will need to do. If you are just going to set it and forget it, then 3D printed will be fine. But, if you have the budget, these are well worth the cost to ensure you have the best way to mount 2.5” drives in the main bay. Recommended
R**R
PERFECT bracket when replacing a 3.5" hdd with a 2.5" ssd
Sabrent 2.5" SSD & SATA Hard Drive to Desktop 3.5" SATA Bay Converter Mounting Kit (BK-PCBS) This review is for both mounting brackets listed on this product page. The BK-PCBS is the sturdy aluminum bracket that retains the same connector position and mounting holes as the original drive. The stamped steel BK-HDDH changes the connector position relative to the original drive, and does not have all the same mounting holes. First the BK-HDDH stamped sheet metal bracket. I bought this mount for my first ssd replacement. I had a large PC desktop tower with plenty of room and plenty of extra cable length. This BRACKET must be mounted by the side mounting holes (in the same place as a 3.5" drive), because it has no bottom mounting holes. It's somewhat flimsy, but ssd's are not heavy, and in fact, bolting the ssd to the bracket, and bolting the bracket into your desktop case rails, will result in a very stable and sturdy mount. The fact that it's stamped sheet metal no longer matters. The only advantage to this bracket, other than cost, is that it has enough mounting holes to accommodate two ssd's. You can mount each ssd by its side holes, or you can use the bottom holes for the bottom drive and the side holes for the top one. But the BK-PCBS is the real hero here. I love this thing! I've bought two of them so far. If you're replacing an existing 3.5" hdd with a 2.5" ssd, and your cables are barely long enough for the existing drive, you want this mounting bracket. It maintains the same overall footprint of your old drive, including the mounting holes, and positions the connectors EXACTLY where they were! It's rock-hard sturdy (machined aluminum, not stamped steel), and it has threaded mounting holes in the exact same places on both the sides AND the bottom as they were on the original 3.5" drive. I bought this bracket to replace the 3.5" hdd with a 2.5" ssd in my new mini-desktop. The BK-HDDH would NOT have worked for this smaller computer case. There was just no extra cable length to accommodate moving the drive to the center of the bay. (Of course I could have purchased the cable extension kit.) But the other consideration was that I needed the bottom mounting holes, because this case had none on the side. I bought a second aluminum bracket to replace the hdd in my external USB drive with an ssd. Again the bottom mounting holes were required for this box, so the stamped steel bracket would not have worked. However, the aluminum BK-PCBS is 0.040" longer than the Western Digital drive it replaced. This is less than 1/16" of an inch, but if your application requires something EXACTLY as long, or shorter than a standard drive, you may have a slight interference problem.
Y**?
Love it. If you want a quick install of a 2.5 inch SSD, this is the ticket! HIGHLY RECOMMENDED
This worked GREAT. I am so pleased. I was doing a brand new PC build, my Thermaltake Chasar A41 ATX case has toolless drive bay "inserts" or "slideout" units. STEPS: 1. I first attached my Samsung 2.5" SSD drive onto the connector of this Sabrent template/frame device. (You slide the drive a half inch onto the Sabrent card connector, slight pressure needed, no drama). 2. I snapped the Sabrent template/frame into my Thermaltake drive bay slideout unit and then... 3. I snapped the drive bay slideout unit that now contains the Sabrent template/frame & SSD drive into my ATX case. 4. VOILA! I was ready to cable up in less than 2 minutes start to finish and some of that was just briefly looking things over. I've never had a drive install this easy in the 19 or so years I've been building computers. CAVEAT: Now, half of that ease-of-use depended on the engineering of my particular case design. If you had an older school case, you will probably have to get out the screw driver and deal with screws. Those will tool-less cases will be in heaven. I do like that this Sabrent template/frame presents an interface right to the edge of of a 3.5" format. Cables went on very easy. _________________________________________________________________________________________ *** HIGHLY RECOMMENDED *** if you have a case that supports spaces for 3.5 inch hard drive units and you want to get a 2.5 inch drive installed in that 3.5 inch space quickly and painlessly.
T**S
As described.
ム**ン
Using it for changing my 2011 iMac 27” hard disc drive to Crucial 2.5” SSD. Fitted perfectly and seems pretty sturdy.
A**I
Fits and slots into the HDD bay perfectly
H**T
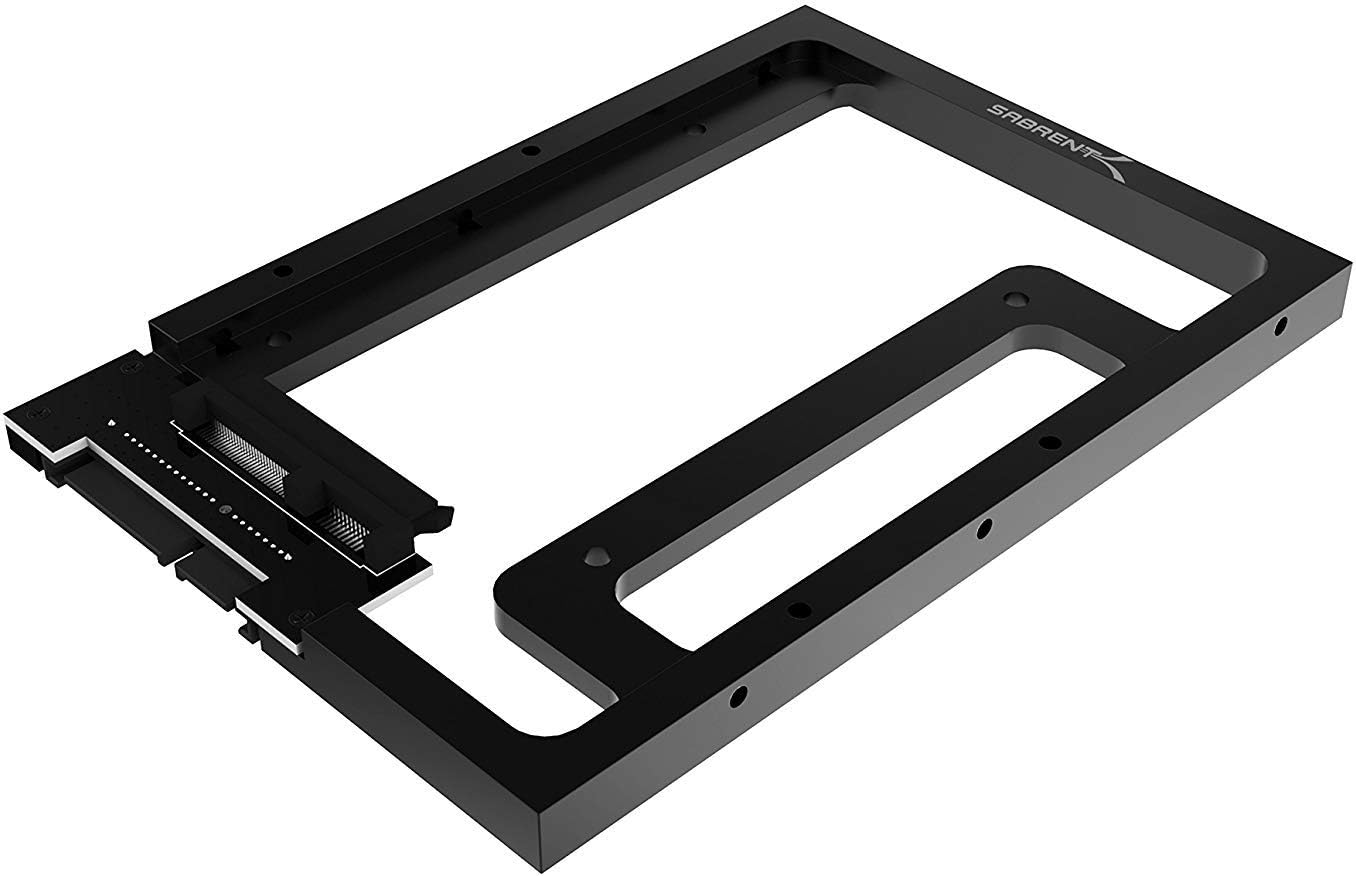
Ich benutze für meine Arbeit unter anderem einen iMac von 2009. In letzter Zeit häuften sich diverse Hänger, Ausfälle sowie andere unangenehme und Zeit raubende Unregelmäßigkeiten. Meine Analysen deckten die interne, noch originale Festplatte als Verursacher auf, welche sich laut S.M.A.R.T. bereits in einem kritischen Zustand befand, bald zu versagen drohte und offenbar am Ende ihres Lebens angekommen war. Ich beschloss, die somit notwendig gewordene Reparatur zu nutzen, um ein Upgrade auf eine SSD vorzunehmen, deren Vorteile gegenüber einer gewöhnlichen Festplatte ja in vielen Bereichen unabstreitbar sind. Im ersten Durchgang - zu einem Zeitpunkt, als ich noch nie einen iMac von innen gesehen hatte - demontierte ich die alte 3,5" HDD und erstattete diese mit der neu gekauften 2,5" SSD. Da letztere aber natürlich nicht in die Montagehalterung der wesentlich größeren HDD passte, befestigte ich sie zunächst nur mit Klettpunkten. Mit einem gewissen unguten Gefühl, schlampig vorgegangen zu sein, machte ich mich auf die Suche nach einem geeigneten Montagerahmen, welcher eine sichere und professionelle Montage gewährleisten sollte. Ich fand und bestellte diesen nach längerer intensiver Suche schließlich hier bei Amazon. Die Lieferungszeit hielt sich in Grenzen und letzte Woche hatte ich dann einen ruhigen Vormittag, der es mir gestattete, den Umbau vorzunehmen. Was soll ich sagen, der Einbau des Rahmens gestaltete sich (auch aufgrund meiner ersten Erfahrungen beim Öffnen des iMac) reibungslos. Der Montagerahmen passt 100%ig. Er ist stabil, aus Aluminium gefräst, nicht nur aus Billigblech gepresst, hat keine scharfen Kanten und macht insgesamt auch einen sehr hochwertigen Eindruck. Alle nötigen Gewinde sind vorhanden und leichtgängig, die benötigten Schrauben liegen bei. Die SSD wird innen im Montagerahmen an eine dort vorhandene Steckverbindung angeschlossen, auf der anderen Seite steckt man die beiden Kabel des iMac an. Zur Befestigung des Montagerahmens im iMac benutzte ich die speziellen Schrauben und die Halterung der alten HDD. Völlig problemlos, der Umbau war in wenigen Minuten beendet. Da der original an der HDD angeschlossene Temperatursensor bei Benutzung einer SSD keine Verwendung mehr hat und am Montagerahmen dafür auch kein Steckplatz vorhanden ist, befestigte ich dessen Kabel an einer geeigneten Stelle mit einem kleinen Kabelbinder, falls ich es irgendwann doch mal noch brauchen sollte. Bei offen gelassenem Messkreis ohne Wärmesensor geht die zuständige Überwachungssoftware jedoch von einer starken Erwärmung der HDD aus und lässt den Lüfter ständig auf vollen Touren laufen, was nervt und ihn vorzeitig verschleißen lässt. Dieses Problem habe ich mittels Macs Fan Control 1.4.12 gelöst, damit kann man alle internen Lüfter des iMac nach Belieben konfigurieren. Fazit: Der Montagerahmen hat meine Erwartungen nicht nur erfüllt, sondern übertroffen. Wer eine ähnliche Problematik zu lösen hat, ist mit diesem Teil auf der sichern Seite und wird keine Schwierigkeiten haben. Eine absolute Kaufempfehlung von meiner Seite!
S**O
Me han servido mucho, de buena calidad, primero compre 2 y me fueron tan útiles y de buena calidad que compre otros 2.
Trustpilot
2 weeks ago
2 weeks ago