Desertcart purchases this item on your behalf and handles shipping, customs, and support to Tunisia.
🏖️ Shade in Style, Stability, and Speed—Own Your Beach Day!
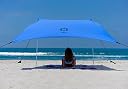
The Neso Portable Beach Tent is a lightweight, 7x7 ft sun shelter designed for families and outdoor enthusiasts who demand premium sun protection and easy portability. Crafted from a breathable nylon/lycra blend with rust-proof aluminum poles and patented reinforced corners, it offers UPF 50+ protection endorsed by the Skin Cancer Foundation. Its innovative sand anchor system ensures stability in winds up to 20 MPH, while the quick setup and compact pack size make it the perfect companion for beach outings, picnics, and camping adventures.


| ASIN | B015LUM5C4 |
| Best Sellers Rank | #3,009 in Patio, Lawn & Garden ( See Top 100 in Patio, Lawn & Garden ) #12 in Outdoor Canopies |
| Brand | Neso |
| Brand Name | Neso |
| Color | Periwinkle Blue |
| Coverage | SPF 50+ and water-resistant |
| Customer Reviews | 4.1 out of 5 stars 6,504 Reviews |
| Floor Area | 4.41 square_meters |
| Frame Material | Aluminum |
| Item Dimensions L x W x H | 81.89"L x 79.92"W x 66.14"H |
| Item Type Name | sun-shelters |
| Item Weight | 1.8 kg |
| Manufacturer | Neso |
| Manufacturer Part Number | FBA_NT1ALL |
| Material | Aluminum Nylon |
| Material Type | Aluminum Nylon |
| Model Number | FBA_NT1ALL |
| Occupancy | 4 Person |
| Pole Material Type | Aluminum |
| Product Dimensions | 81.89"L x 79.92"W x 66.14"H |
| Recommended Uses For Product | Camping & Hiking, Picnic |
| Size | Dimensions: 208 cm x 203 cm x 168 cm |
| UPC | 602003974045 |
| Ultraviolet Light Protection | 98 |
| Unit Count | 1 Count |
| Water Resistance Level | Water Resistant |
L**Y
Tips for success!
We’ve had our Neso canopy for five years now, and it’s been one of our best beach purchases. It’s lightweight, packs down small, and gives a nice shaded area without hauling a massive pop-up tent across the sand. I’m a petite female, and I can set this up by myself in about 10 minutes. We’ve used ours in sustained winds around 15 mph without any issues. I think a lot of the negative reviews come down to setup, so here are some tips we’ve developed over the years. Pack a garden shovel and a beach bucket. This will make the setup fast and easy. 1. Pull the sandbags tight. Lay the canopy flat, fill all four sandbags, and pull them out in a big X pattern. Get the corners as far apart as practical so the canopy is nice and taut, but don’t overstretch it. The tension is what gives the canopy its stability. 2. Bury your sandbags. This is the key step. Dig a hole, place the filled sandbag in the hole, then pile sand over the top. Otherwise, the bags will drag across the surface in strong winds and the canopy will collapse. For best results, use wet sand. Get a bucket full of water, dump it over the buried sandbags, pile more sand on top, and stamp it down. The extra weight and compression make a difference. Digging the holes and carrying the water takes just a few minutes and is well worth the extra effort. 3. Work with the wind. The breeze must blow into the open side of the canopy, not hit the backside of the canopy. When you raise the poles, don’t keep them vertical. Lean them slightly into the wind for extra stability. Skip the extra poles. It’s tempting to turn it into a four-pole canopy, but this makes the setup less stable. The standard two-pole setup works best. 4. Be prepared to adjust during the day. You’re on the beach. The wind will change. Sometimes you’ll need to remove a pole and open another side to face the new wind direction. If you’ve buried the sandbags and pulled everything tight, this is quick and easy. For the most shade, you want the sun shining on the low side of the canopy, not the open side. Of course, the sun and the wind don’t always cooperate, so sometimes you have to choose between the perfect shade angle and the most stable setup. That’s just beach life. 5. Fabric care. We wash the canopy at the end of every beach season to remove any sunscreen oils, salt, and sand that could degrade the fabric over time. With a little care and the right setup, this canopy has easily lasted us five years.
C**S
Buy it- worth the investment
We’ve absolutely loved our Neso tent. It’s incredibly quick and easy to set up, which is a huge win when you’re hauling kids and beach gear. We’ve used it on breezy days, windy days, and calm days, and it’s held up great in every condition. The shade coverage is fantastic, and because the fabric allows airflow, it stays much cooler underneath than traditional beach tents. One of my favorite things is how lightweight and portable it is. It packs up small and doesn’t hold onto sand, so you’re not bringing half the beach home with you (at least in the tent 😉) If you’re looking for a beach shade that’s easy, practical, and actually enjoyable to use, the Neso is worth every penny.
A**Z
Great tent, may have UV filtering issues in the fabric
Worked as expected, I honestly don’t understand a few dudes and dudettes complaining they couldn’t install or make the tent work. Its super easy to setup in a windy beach, it may fall a few times when the wind shifts direction but for the most part it’s solid. Packability is great and it doesn’t weight anything. The only downside and the reason for the 4 start rating is because we spent most of the day underneath the canopy and still managed to get super sunburned, so my doubt is on the UPF50+ rating of the fabric, it may cause shade but the UV rays are filtering through the fabric. Something to think about
M**W
Short-tempered man falls in love....
By far....the BEST sun shade I've ever owned. I've owned umbrellas and pop up canopies. But, hands down, this wins all around best choice. The concept is so simple, yet so effective. The fact that you can use beach sand for the anchor method, means you're not toting extra weight or additional supplies to secure this on the beach. It's easy to carry, super lightweight......I'll say that again, SUPER LIGHTWEIGHT. No more sweating your balls off carrying some big, cumbersome, heavy sun shade. Literally, my 5 year old could carry this in one hand. Don't think the low total weight makes this a cheap product. The poles didn't bend or feel weak or cheap. The material is stretchy and seams are well made. The wind was whipping and this thing held up fine. However, if you're an idiot, don't buy this. You want to set the "front" towards the wind (even though most of the time I was at about a 45 degree angle from the wind. Set it up facing the wind (for the most part) and it'll stay up all day. Guys umbrellas were blowing over, people's pop-ups were caving in on the sides, but ours held fast. Set up and take down is soooooo quick. Again, best sun shade by far in this category as well. Aside from all this, it looks bad ass. As soon as we'd set it up, people would start looking and pointing at it. You'd see them grabbing their smartphones to google the web address that's printed on the side. Think about it....you see a family walk on the beach and in a matter of a minute, they've got a sun shade up and functional. Worth the money. Best experience I've had ever with this. You won't be sorry. Let me further elaborate on some specifics: Set up: Spread canopy on the ground (I found aligning/stretching out the front two anchors generally was all I needed to begin). Fill these two anchors with sand. Make front taught, but also realize you want to leave a slight angle on each anchor for best support (not straight out to sides, not straight in front). Then, with the front semi-set in place, do the same for the two back anchors. Then, lock up your two poles and place one under each of the two front corners. I found about 10-12" in was ideal (tee hee). From here, it simply takes some minor positioning of the anchors and poles, but by no means should send you into a 10 minute positioning rage. In a mid to heavy wind, it helps if you bury the anchors in the sand. If you take a break from sipping your beer, you may notice that the anchor bag shows signs of dragging in the sand, this would be an indicator that burying the bag is needed. But remember, dig the hole where the bag was, not where it is or behind it, as this will loosen your setup. Again, common sense, dig hole, drop bag, cover. I did notice throughout the day that I had to make a minor tweak to a pole position or two, but I simply very slightly angled the pole AGAINST the direction it looked like it was going to fall, and voila....instant magic - a stable structure. Some reviews are blowing this up - but again, I am willing to make a no-brainer adjustment if necessary in between beers or building sandcastles. This "trade-off" of tweaking doesn't even register on my radar as it happens so infrequently and it's so minor.......compared to watching the plastic washers and spacers bust or crack off the old-style canopies in a heavy wind, killling small children as a rogue wind lifted a four-legged metal spider off the ground, or have the metal bars on the old-style just bend altogether. How many messed up, broken canopies to you see next to the trash cans on the beach? It's like a freakin' cemetery sometimes. Also, if you have a few beach chairs or little kids, this is a great little setup. It is the perfect height to fit your chairs underneath, a cooler, wagon, and small beach mat. If you're expecting to mingle while standing, or have a rave keeping your hands in the air like you just don't care, then go to a club. I also found the way the anchors spread out, creates a buffer for "your area". And, the fact that the anchor lines are black (contrasts most beach sands or other backgrounds), plus the overall really unique design that draws your eyes down to the anchor points, I have a hard time believing this will ever be a tripping hazard, unless you're drunk, trying to tan in the moonlight, or a teenager texting while walking, or a combination of the three. People on the beach also apparently feel you want to "see all that", so this anchor system at least puts them at some sort of distance where you can't see their pulse through their clothes. Take down is a breeze. Take down the poles (10 sec), dump the bags (20 sec), give it a shake, shove it in the bag. I found it was also really easy to rinse off after use. Seriously, just leaving this review makes me want to go use my Neso again.
C**E
Worst Beach Canopy EVER
If I could give it a negative rating, I would. We are avid beach goers, and this tent would not stay up if our lives depended on it. Not even a little. After 15 minutes of trying all options to get it to stay up, I gave up. Shortly after our fiasco, another family came to the beach with the EXACT SAME tent. Brand new out of the bag like mine. I watched them struggle, thinking maybe they had a better idea to get it to stay in place. After 10 minutes of these men struggling, I walked over to tell them that I had the exact same problem. They were grateful they weren't alone in this matter. Needless to say, pay the extra money to get a better beach canopy.
R**S
Great tent, cute pattern. Just so overpriced!
These are great Beach tents, and this particular one had a wonderful blue wavy pattern which looked really great. And the poles are nice with flat bottoms so that they don't sink into the sand. So all in all very happy with it. However, it does not include a shovel and really for the limited amount of little fabric that they are. They are extremely overpriced. This should be only like a $40 item. I also don't think it blocks the UV very well, you can still feel it coming through when you're underneath it, so these aren't for high sun, And don't provide hard shade, But they are super portable, lightweight easy to set up. Once you know a few tricks to lay it out, flat first, should come with a shovel or scoop. Would be a good deal for 40 bucks, for 100 bucks it's quite overpriced, I think. But looks pretty!
S**R
Beach umbrellas are out, this shade is in!
Great product. Light weight, easy to setup, provides great shade, stays put even in windy beach conditions. If you are thinking about getting one, do it! Should have gone with a bigger size but the regular was just find for me any my two kids.
J**N
Easy, Packable for Family Beach Trips
This shade has been great for our family and allowed us to stay out on the beach longer. There is plenty of room underneath for our young kids to play in the sand, and I love that it’s easy to throw in the trunk or a suitcase for trips. Especially on breezy days, make sure to follow the directions on the bag and stretch out as much as possible before filling with sand (use more than you think).
S**O
The best beach shade
We like the wild beach kind of holiday, and always found the need for self-made shade to hide under during the peak harmful sun hours. After years of trying different pop-up tents and umbrellas, we finally decided to splurge on this rather expensive item, and we're so happy we did. It's super compact, easy to setup and pack up again, has minimum parts to assemble, and very cleverly designed. You really do have to stretch it while it's flat to make it work the best! The material is pleasant to touch, and super easy to fold back into the carry bag. The poles are stable enough to stay upright even in mild wind, although we had some troubles with the side wind, but nothing a few more stones in the bags and digging the poles deeper into the ground couldn't solve. The pole positioning can really affect the stability and the amount of both the shade that it creates and the space under it. We really did like the airiness of the shade this tent provides - you still get all the breeze, with all the protection. The material also blocks out the UV, and it's a massive added bonus. We also used it to extend the cover on the boat, and didn't put it down for the ride back, and this tent held up - so bonus points for durability! Overall, it's a fantastic piece of holiday equipment, and is an absolute must have on wild beaches. It's not cheap, but it's worth every penny.
D**B
Niet geschikt bij de minste wind
Ik ben helaas teleurgesteld in deze strandtent. Ze kan eigenlijk alleen gebruikt worden als er helemaal geen wind staat. Zodra er wat wind is, waait de tent voortdurend weg, zelfs met de zandankers. Ik heb ze één keer proberen op te zetten op het strand, maar door de wind is dat niet gelukt. Daardoor heb ik ze ook niet echt kunnen gebruiken. Voor wie alleen bij volledig windstil weer naar het strand gaat, kan dit misschien volstaan, maar voor normale strandomstandigheden vind ik dit geen goede aankoop. Jammer genoeg kon ik het product niet meer terugsturen. Voor mij was dit een miskoop.
P**K
Perfecte strandtent - makkelijk op te zetten.
De NESO schaduwtent heeft al mijn verwachtingen overtroffen. Hij is licht, compact en ontzettend makkelijk op te zetten – zelfs als je alleen bent. Wat ik vooral waardeer, is dat hij ruim genoeg is om met strandstoelen onder te zitten. Je hoeft dus niet op een handdoek in het zand te liggen als je liever wat comfortabeler zit. De stof biedt uitstekende UV-bescherming en blijft zelfs op warme dagen koel aanvoelen. Dankzij de zandzak-ankers en de flexibele stokken blijft de tent stevig staan, ook als het wat harder waait. Daarbij ziet hij er ook nog eens stijlvol uit – een echte blikvanger op het strand. Al met al: een praktische, comfortabele en duurzame oplossing voor wie graag van de zon geniet, maar toch wat schaduw en comfort wil. Een aanrader!
M**G
Concept très malin et efficace
Testé quotidiennement pendant 2 semaines en Corse, par temps calme et par journées venteuses (35km/h). Vraiment satisfait du produit qui se place largement au-dessus que n'importe quel parasol en terme d'efficacité. Le concept est super malin avec 4 sacs à remplir de sable et 2 barres à embout rond qui viennent se placer sous la toile élastique. Le montage prend 3-4 minutes à tout casser et la toile permet de tenir à 3 sans problème. Par vent faible le système est idéal, c'est un peu plus délicat lorsque le vent se lève ou devient tournant. Néanmoins, il faut juste respecter scrupuleusement la notice de montage: ouverture face au vent, sacs placés en X et tendus. Si le vent est fort: bien étendre les sacs en X afin de tendre la toile au maximum, positionner les piquets, et retendre à nouveau la toile à fond en tirant sur les sacs et en les enterrant dans des trous creusés dans le sable. Le système a toujours super bien tenu en respectant ces règles simples. Lorsque le vent est tournant c'est un peu plus galère à faire tenir: les barres sont tombées 3 fois sur toute une journée de plage par vent fort tournoyant. Mais vu que ça se repositionne en 20 secondes ce n'est pas un problème, et ce n'est pas pire que ceux qui courraient après leurs parasols sur le sable. Attention cependant car une fois installée, la toile prend un peu d'espace: vos voisins de plage risquent de vous regarder de travers si vous vous installez sur une plage déjà bondée :-) Dans tous les cas, vous ferez des envieux car ce système est vraiment super bien foutu et pratique. Update: 2ème saison d'utilisation de la tente, en Bretagne et en Corse. Rien à redire si ce n'est mon entière satisfaction du produit. Tenue parfaite, qualité des matériaux OK et confort toujours aussi agréable. Je recommande ! Update 2020: Toujours aussi satisfait. Utilisée à la plage sur 2 semaines. Au bout de 4 années, la toile ne présente pas de défaut, ni d'usure. Certainement mon meilleur investissement en matière de protection solaire. Update 2022: 6 ans maintenant que j'utilise cette toile, largement rentabilisé maintenant. Pas de défaut, pas de casse. Très content de cet achat. Update 2024: les œillets commencent à tirer un peu sur les coutures, mais la tente est toujours parfaitement fonctionnelle. Update 2025 : la tente fait toujours le job. Toujours aussi pratique. Pas de déchirement, elle tient encore ! Pour la saison 2026 j'envisage un petit traitement d'entretien au produit anti-UV histoire de lui redonner un boost de protection. Je ne sais pas comment a évolué la qualité de fabrication Neso, mais ce modèle acheté en 2017 est juste génial.
K**T
Funktioniert, wenn mans vernünftig macht!
Nach Skepsis zum Kauf aufgrund mehrer Bewertungen, die Qualität und Standfestigkeit bemängelt haben, wurde dennoch eins gekauft, weil es irgendwie keine andere Option gab. Entweder ohne da stehen oder mit etwas, das mir als ungläubigem Thomas vielleicht nicht ganz optimal vorkam. Vorher habe ich mich intensiv mit Vergleichsvideos auf YouTube etc. erkundigt, wie man welches Modell am besten aufbaut und wann man wie wo was am besten macht, bis ich mir ein eigenes Bild davon gemacht hatte. Entsprechend überrascht war ich, wie falsch doch die meisten Reviews, die die Standfestigkeit bemängelten, waren. Der Aufbau geht super schnell und leicht, das Teil wackelt noch nichtmal wirklich, wenn mans entsprechend aufbaut, wie man im beigefügten Video (bei nicht allzu schwachem Wind) sehen kann. 1. Schau woher der Wind kommt und plane entsprechend den „Eingang“ vom Sonnensegel, also „vorne“ so, dass der Wind eben dort halbwegs geradlinig durchfegen kann. 2. Fülle alle 4 Säcke mit 5-6 Schaufeln Sand, sodass sie schon Gewicht haben, aber noch leicht zu bewegen sind und ziehe bereits ein wenig dran, sodass leichte Spannung entsteht. Mehr geht sowieso nicht, weil nicht alle Säcke voll sind oder zu wenig Sand drin ist. Das dient nur zur Ausrichtung und prinzipiellen Positionierung. 3. Runde Nummer 2: Gehe von Sandsack zu Sandsack und fülle Sie mit mehr Sand und ziehe sie weiter vom Segel weg, um die Spannung zu erhöhen. Die Säcke sollten jetzt schon gut gefüllt sein, nicht randvoll aber ausreichend voll, damit sie einen Zug von der Gegenüberliegenden Seite standhalten können. 4. Runde Nummer 3: Gehe von Sandsack zu Sandsack und ziehe sie jeweils nochmals weiter vom Segel weg. Dieses mal aber: Buddel an der Stelle, wo du glaubst, dass die Spannung hoch genug ist ein Loch in den Sand, sodass wie eine Art „Wand“ entsteht (dass Loch muss tief genug sein, dass der Sandsack im vollen Zustand auch reinpasst, sonst bringt das gar nichts!!!), die den Sandsack aufhalten wird, sobald das Segel von den später einzusetzenden Stangen noch mehr Zug auf den Sandsack ausübt. Dann füll den Sandsack bis zum Rand voll mit Sand, bis gar nichts mehr reinpasst(!!!) und bedecke ihn und das Loch mit Sand. 5. Sobald alle 4 Sandsäcke in ihren „Löchern“ im Boden liegen, komplett voll sind und mit Sand bedeckt sind, stell die beiden Standen rein. Achte darauf, dass beim Aufstellen der Stangen keiner der Sandsäcke verrutscht. Falls doch, habt ihr entweder nicht genug Sand drinnen oder das Loch ist nicht tief genug. 6. Stelle die Stangen im leichten Winkel (ca. 20-30°) nach Innen auf, sodass sie so stehen, als ob sie sich gegen den Wind lehnen würden. Das dient nochmal für mehr Stabilität. 9 Tage Urlaub, 9x auf und abgebaut auf obige Weise, dauert ohne Routine 5-6 Minuten, mit Routine 2-3 Minuten. Keine Naht gerissen, kein Nachgeben vom Stoff, nix. Das Ding ist immer noch ganz. Ich wollte es nicht mehr missen. Wir haben das Neso1 gekauft zum probieren. Ich wünschte, ich hätte eine Nummer größer gekauft. Für uns drei Personen war es vollkommen ausreichend, es wurde nur dann ein bisschen knapp, als unser Sohn noch im Schatten im Sand spielen wollte. Es hat noch absolut ausgereicht dafür aber war nicht üppig vom Platz her für ihn. Daher (nur um den Spiel- und Buddelraum im Schatten zu vergrößern) hätte ich wohl besser die Nummer größer gekauft. Dennoch voll und ganz zufrieden. Kein Sonnenbrand, kein Stress mit wegfliegenden Schirmen, das Ding stand immer bombenfest (siehe Video). Sind bestimmt 10 mal angesprochen worden, woher wir das Teil haben. Jedes Mal beim Aufbau hat gefühlt auch der ganze Strand zugeschaut. Fand ich irrwitzig. Alle krümmen sich unter ihren Schirmchen, während wir ne riesige Schattenfläche plötzlich hatten. Nie mehr ohne. Finds aber bisl teuer. Nicht, weil die Qualität nicht überzeugt, denn sowohl das Segel, die Sandsäcke und die Stangen mit den Stützfüßen (bitte kauft niemals Stangen ohne Stützfüße, die helfen immens bzgl. der Standfestigkeit der Stangen) sind alle sauber verarbeitet und kein billig Zeugs. Riecht zumindest nicht so und fühlt sich auch nicht so an. In diesem Sinne hoffe ich meine Rezension kann ein paar Leuten zur Entscheidungsfindung helfen. Zusatz nach 6 Urlauben: Die Aufbewahrungstasche hat's bald hinter sich und eine außenliegende Naht hat es nicht überlebt. Die Naht ist allerdings kein Problem, denn die Nutzung ist dadurch nicht eingeschränkt bzw. hat man dadurch keinen Nachteil. Funktioniert also weiterhin wie gehabt.
Trustpilot
2 weeks ago
3 weeks ago