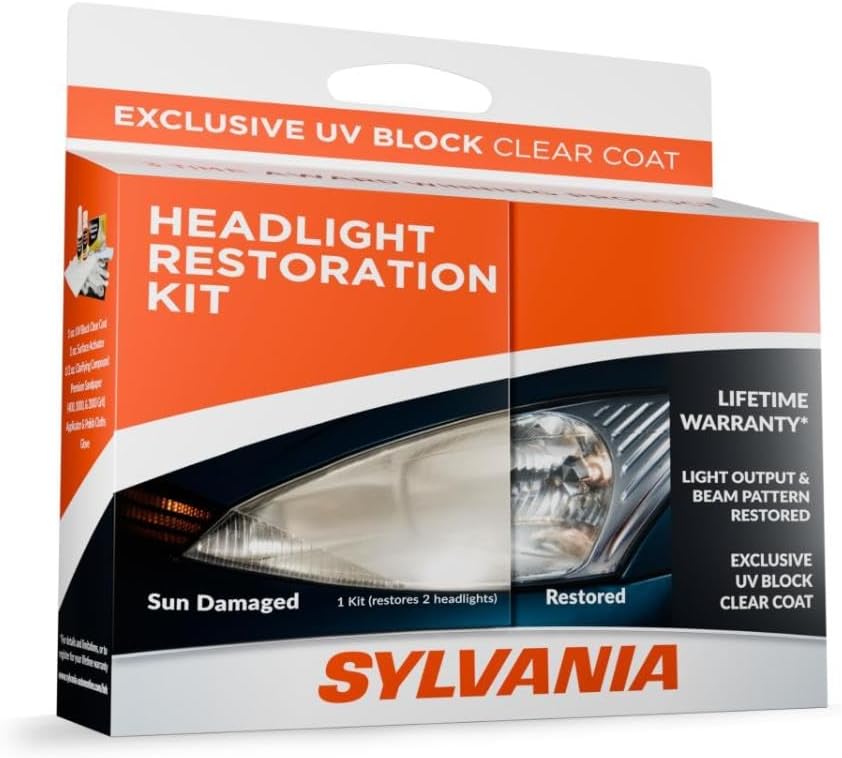

✨ See Clearly, Drive Confidently — Don’t Let Cloudy Headlights Hold You Back!
The SYLVANIA Headlight Restoration Kit offers a professional-grade, easy-to-use solution to restore headlight lenses to like-new condition in about an hour. Featuring a surface activator, premium sandpaper, clarifying compound, and an exclusive UV protective coating, this all-in-one kit requires no additional tools and delivers long-lasting clarity and improved night driving visibility. Trusted by millions and backed by over a century of lighting innovation, it’s the smart, cost-effective alternative to costly headlight replacements.


| ASIN | B00429NKWK |
| Best Sellers Rank | #634 in Automotive ( See Top 100 in Automotive ) #3 in Automotive Headlight Restoration Kits |
| Brand | SYLVANIA |
| Customer Reviews | 4.5 4.5 out of 5 stars (26,077) |
| Date First Available | September 8, 2010 |
| Exterior | Machined |
| Is Discontinued By Manufacturer | No |
| Item Weight | 4.8 ounces |
| Item model number | HRK.BX |
| Manufacturer | SYLVANIA |
| Manufacturer Part Number | HRK.BX |
| Model | 38772 |
| OEM Part Number | 38771 |
| Product Dimensions | 8 x 2 x 6 inches |
| Voltage | 12 Volts |
N**E
Clear as glass again—Pro results in an hour (Winter tested)
My headlights were completely clouded over and oxidized, significantly reducing my visibility at night. I decided to try this kit before spending hundreds on new housings, and I’m glad I did. Complete Kit: This came with everything advertised. The instructions were very clear and easy to follow. User Pro-Tip: While the kit is comprehensive, I highly recommend using a separate spray bottle with water for the wet sanding steps. Keeping the surface constantly lubricated makes the sanding much more effective and prevents the paper from loading up. Effort vs. Reward: It took about one hour to do both headlights. It definitely requires some "elbow grease" during the wet sanding stages, but don't rush it—the more effort you put into the prep, the better the final result. The Results & Durability: The transformation was night and day. The lenses went from hazy and yellow to crystal clear. Most importantly, it’s been three months since the application, and they still look brand new. It has held up perfectly through harsh winter driving (salt and slush) and several trips through the automatic car wash. Final Verdict: 5 Stars. If you’re willing to put in the manual labor for an hour, this kit will save you a fortune. The sealant actually lasts, which is the biggest factor.
C**.
Headlights you thought you'd have to replace? Nope! This makes them like new. Really!
I own a seventeen-year-old Toyota Yaris hatchback (152,000+ miles), which has been parked outside in the sun and elements all of its life. I'd already had the headlights resurfaced (by the Toyota team) many years ago—but my headlights were, by this point in time, at the stage of not passing annual inspection. Replacing both headlight units at the dealership (including labor) would have cost in excess of $700, so I figured—why not try this, and see what happens! The results are really terrific. As "like new" as you're going to get with a seventeen-year-old car which is parked outside. Here would be my observations having just done this project this morning (without access to a hose, mind you!). The instructions are worth reading a couple of times before you take-on the project. It's, actually, a lot easier than the very detailed instructions might imply. Just go step by step, doing each step to both headlights before you move on to the next step, and you'll be fine. 1) Bring lots of water, and a spray bottle (as recommended in the instructions). I filled up some clean milk-cartons I'd saved for the project, and just refilled the spray bottle from those as needed. Super easy. I used about three milk-cartons of water (1.5 gallons). You'll need lots of water-spray as you sand with the provided grades of sandpaper. I would recommend starting (with the first grade of sandpaper) with light to medium pressure, then move to more consistent medium pressure. The second and third grades of sandpaper really are very smooth and fine, and you can finish-off the third grade of sandpaper with a really light pressure. Be patient, and go for a truly smooth surface. I did the recommended circular motions both clockwise, and counter-clockwise, to ensure the smoothest possible finish. Worked like a charm. 2) Regarding the activator spray (with which you will start and, toward the end, use again): I used about 2/3rds of the spray on the first stage (both headlights), dissolving the initial oxidation and grime. I feared I'd not have enough with just 1/3rd by the end, but I had plenty. I'd bring a soft sponge, too, just to ensure that you get the lenses fully clean between steps. I found having extra soft, clean rags helpful with drying as well. 3) Painter's tape definitely protects your paint around the headlight, so take the time to mask-out your light, and protect your paint. The only thing I'd suggest, is to spray-clean your paint-surface after your remove the painter's tape following use of the polishing compound. Some of the polishing compound gets under the tape, so just give that a rinse before you dry the lenses and apply the final UV gloss-coating. Keeps things neat and clean around the lenses. 4) As for the gloss-coating: you really can be very generous applying it to the provided blue-cloth. I was a tiny bit stingy on the first headlight, fearing I might not have enough product for the second headlight. Don't worry ... you'll have plenty of UV product left over when you're done. I'd really soak the entire blue-rag well, and apply generously. I can see a *very* tiny difference between the first headlight I did (where I was more stingy applying the UV gloss-coating) and the second (where I was more generous). It's so slight you'd never see it. Just rest assured that you'll have plenty of UV gloss by the end of the project, as it spreads evenly, smoothly, and well—so be generous in applying it. The best part? If I get any haze again, this was probably the easiest headlight-repair imaginable. I'll just do it again! And I saved about $700 to boot. You just need to set aside the time to do each step well and carefully. It took me perhaps an hour and a half from start to finish (and I was moving slowly and carefully), with some time thereafter cleaning up and just standing around to ensure no falling autumn leaves fell on the UV gloss while it was still wet. Just went to check on the headlights, and they're completely dry to the touch, and very smooth and glossy. This is a terrific product! Easy to use, great instructions, and a really fine result. I look forward to seeing the longevity of the product.
M**Y
Excellent. REALLY WORKS!
I researched different products and this brand, Sylvania Headlight Restoration Kit, had the best reviews. (I paid about $23.) My headlights were pretty bad... foggy and significantly yellow. It took me about an hour and a half to complete the job. I was a little worried that I might mess it up, so I was pretty cautious and deliberate and took my time. (There are videos on YouTube showing how to use the kit, including one put out by Sylvania, but I actually found a video by a layperson to be more detailed and helpful.) I followed the directions, beginning by pre-washing the headlights to remove any foreign matter. (I used Dawn dishwashing liquid and a sponge.) I put painters tape around the headlights for some protection. First you spray the headlight with a surface activator, washing it off after 30 seconds. You then sand the headlights for 5 minutes while using each grade of sandpaper, starting with the corsist. Next, you apply a clarifying compound, rubbing it in for about 30 seconds and then washing it off. Lastly, you spray the surface activator once again, leaving it for 30 seconds, and then washing it off. You repeat the same steps on the other headlight. Once you've completed both and have washed and thoroughly DRIED them, you're ready for the final step which is to apply the UV Block Clear Coat. (The directions say that you should try to apply as thick a coat as possible for maximum protection, but not to repeat or reapply on treated areas. I found that rather difficult. I wonder if using a sponge would have been more helpful with putting on a thicker coat, rather than the cloth they provided.) I still had almost half the bottle left over when I finished, so I'm not sure how long or how well they will hold up. I'll have to update my review from time to time.) After completing the restoration, the directions say that they need to cure for 4 to 6 hours. During this time, they can't be exposed to moisture. So you have to make sure it's a nice day, (but don't do it in direct, strong sunlight or frigid temperatures), or do it in a garage or other covered area. I took these pictures just before, and then just after, I treated them. They'll need to cure overnight. I don't know if that will will improve or change their appearance. For the shape my headlights were in, I'm amazed and extremely happy at how clear they look. I'll just have to wait and see how long the clarity lasts. (The thinner layer of UV block might cause it oxidize and degrade more quickly.) I definitely recommend this product. I'm extremely happy with the end result.
D**.
This is the third time these headlights have been restored. Wait, let me rephrase that. This is the third ATTEMPT to restore these headlights. The first time the dealer cleaned them up a bit so it would pass the bi annual safety inspection. It lasted almost one year. The second time I did it myself with another brand of restoration kit. It got them clear enough to pass another safety inspection but I wasn't very pleased with the result. This time I did some more research and found this Sylvania Headlight Restoration Kit. It was highly rated and Boy! were they right! As you can tell from the before, during and after photos I've included this kit really works. Except for a couple of pretty deep stone... um dents I'll call them because they're not really chips, the headlights are as good as new. I very definitely recommend this kit to anyone that wants to have headlights that shine like new without the expense of replacing them. Now, that being said, I have some advice. Follow the instructions! They are very clear and take you through the whole process step by step. Do not try to hurry through. If it says it should take about five minutes of sanding for this step then set a timer and sand for five minutes. When it says keep it wet, keep. it. wet. I used a garden hose with the nozzle set to a heavy mist and sprayed it every 10-15 seconds. This rinses away the slurry and cleans the sandpaper so that it keeps cutting. If you don't keep it wet the sandpaper will clog up and you will just be wasting your time and energy rubbing your headlight. When you get to the last step, the UV blocker, don't skimp on it. There is lots in the kit to do two large headlights. Don't rub it on in a circular pattern. Use straight strokes from one edge to the other. Don't rub it on back and forth. Start from one side and wipe to the far side, pick the cloth up and then make your next pass slightly overlapping the first. Continue until you have completely covered the lens and then STOP! DO NOT go back over it and DO NOT TOUCH it. Let it dry four to six hours. Now enjoy the fruits of your labour. Your brand new-looking headlights for nowhere near the price of new headlights.
A**M
Excellent product for DIY. It works as it claims, need to be very careful when applying clear coat, do not over apply.
T**R
By following the instructions, this kit really works. Though intended for 1 car, I think it can do 2 cars.
P**N
Works really well. Have restored headlights to nearly new looking. Can’t comment on durability as I have only just used it.
S**.
Clean like new and protected headlights from uv
Trustpilot
1 week ago
2 weeks ago