Description
🛠️ Seal it, fix it, forget it — the ultimate radiator repair kit for pros and DIYers alike!
- PRO GRADE DURABILITY - Experience the world’s strongest bond trusted by mechanics for over 40 years.
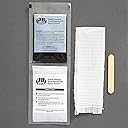
- ALL IN ONE REPAIR KIT - Includes epoxy putty, fiberglass cloth, sandpaper, and applicator for a seamless DIY fix.
- VERSATILITY THAT WORKS - Perfect for radiators, plastic tanks, PVC, composites, and more—one kit, endless solutions.
- EFFORTLESS LEAK STOPPING - Fix holes up to 3/8" and cracks up to 4" without removing your radiator or tank.
- TRUSTED BY EXPERTS DI YERS - Join thousands who rely on J-B Weld for permanent, professional-quality repairs.
The J-B Weld 2120 Radiator Repair Kit delivers a permanent, professional-quality fix for leaks and cracks up to 4" long without tank removal. Featuring a complete set of epoxy putty, fiberglass cloth, sandpaper, and applicator, it bonds strongly to plastics, metals, and composites. Trusted for over 40 years, this versatile kit is a must-have for mechanics and DIY enthusiasts seeking fast, reliable radiator and plastic tank repairs.