Desertcart purchases this item on your behalf and handles shipping, customs, and support to Tunisia.
🎞️ Digitize your nostalgia—fast, vivid, and hassle-free!
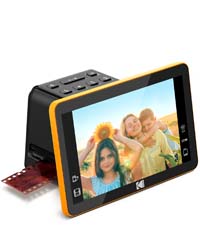
The KODAK SCANZA Film & Slide Scanner is a versatile, user-friendly device designed to quickly convert various film formats (35mm, 126, 110, Super 8 & 8mm) into high-quality JPEG digital files. Featuring a powerful 14MP sensor with optional interpolation up to 22MP, a bright 3.5” adjustable LCD for easy preview and editing, and multiple adapters for flexible film handling, it’s perfect for professionals and enthusiasts eager to preserve memories with speed and clarity. Connectivity options include USB and HDMI, and the package comes with essential accessories like a cleaning brush to ensure pristine scans.


| ASIN | B00O2BU8PK |
| Best Sellers Rank | #37,439 in Office Products ( See Top 100 in Office Products ) #15 in Slide & Negative Scanners |
| Brand | KODAK |
| Color Depth | 24 bpp |
| Connection Type | HDMI, USB |
| Connectivity Technology | HDMI , USB |
| Customer Reviews | 4.2 out of 5 stars 11,686 Reviews |
| Global Trade Identification Number | 00840102192780 |
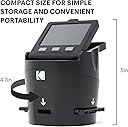
| Item Dimensions D x W x H | 4.7"D x 4.7"W x 5"H |
| Item Weight | 16 ounces |
| Light Source Type | CCD |
| Manufacturer | Kodak |
| Media Type | Negatives, Slide |
| Minimum System Requirements | Windows 7 |
| Model Name | SCANZA |
| Optical Sensor Technology | CCD |
| Product Dimensions | 4.7"D x 4.7"W x 5"H |
| Resolution | 7200 |
| Scanner Type | Film |
| Standard Sheet Capacity | 35 |
| UPC | 198869011623 840102192780 |
| Unit Count | 1 Count |
| Wattage | 250 watts |
M**R
Excellent slide scanner for casual archiving. Easy to use.
I had trouble finding a good, inexpensive scanner to archive thousands of slides dating back to the 1970s. I finally came across this product, and it was the perfect purchase for my needs. Mind you, yes, this is not a *professional* slide archiver. However, unless your parents / grandparents were photographer pros themselves, you'll just be capturing mediocre slides in higher detail. You may be able to use some fancy post-processing photo-doctoring software to fix the bad lighting, bad color, etc, but honestly... being able to see and share photos that have eluded viewing for decades, without taking up countless hours of your time -- isn't that what you are really after? The sensor is 14MP, which means each photo comes out to about 1.4MB. There is a 22MP option, but it is *software interpolation* only, so I don't even bother. Again, what is the point of upgrading something that isn't high-quality to begin with? It's like putting VHS onto Blu-Ray. The setup is very easy. There are menu-driven buttons to select slide type (it won't auto-detect), and a couple of other options. Mostly, you'll be spending your time scanning on to a standard SD Card. It seems to handle almost any type SD Card, from UHS-II speeds to 256GB capacities. You insert the guide tray into the bottom of the unit, and then start feeding it slides. The *ONLY* drawback here is that you end up one behind in terms of finishing a group of slides. I ended up having to create two "dummy" slides so that I could clear the queue. You'll see what I mean when you use it. I wish there were a less clumsy way, but it's very minor. Simply put, I've scanned thousands of slides in a short amount of time. If the shot was good when originally taken, it is captured quite well by this unit and is now digitized for enjoyment by family and friends. For the price, I don't think you'll find a better product out there that combines simplicity, quality, and just-enough functionality. P.S. This scans some types of camera film as well. I never used the feature, but it is a whole added layer of capabilities to the slide scanner component!
S**M
Good scanner for a photography class.
I purchased this for a different use case than most, so I thought it might be worth adding a little info that I didn’t see in other reviews. I teach HS photography and we wanted to add B&W developing to the curriculum. Unfortunately, we don’t have the space nor the budget for a true darkroom, so we’ve been trying to figure out how to handle a few details,. This Kodak Scanza fits a piece of the puzzle quite well, and I think this is worth mentioning. After the B&W film is developed, we wanted to be able to review the negatives with the classes and then scan for both personal and exhibition use. We can’t have a darkroom, so this has been a surprisingly difficult thing. I started by using a light box and an app called “LB Loupe” to invert the view. The app works fairly well, and display to the screen was OK, but not great. The negatives are very low contrast (HP5+), which hinders some of what we’re trying to accomplish. We can use the app to take a snapshot of the frame for online posting and then we use an Epson scanner to scan for exhibition if the negative warrants the extra time. The Scanza is miles ahead of using the app to both display and post to social media. I woudn’t say that it’s really 14MP. Yes, you get that many pixels, but it’s very blocky. My guess is that it looks more like about 4MP interpolated up. It’s more than enough for instagram and 4x6 prints, but we still need to scan with the Epson for exhibition. The one thing I’d like to add is about the HDMI out. It works well when connected to our projector and, again, beats the socks off the iPhone setup. My only issue is that once the HDMI cable (included) is attached, the built-in screen turns off in favor of the display device. Since I sit at the front of the room with the whiteboard behind me, I have to turn to view the pics on the screen. I wish there was a way to keep the internal screen on for just that reason. Also, I can’t figure out how to (or if I even can) change the date on the device. I’d love for the date stamp on the files to be the date they were “scanned,” but there doesn’t seem to be a way. I really like the device. I think the $170 asking price is a bit steep. $120ish feels more in the ballpark for it’s feature set. I agree with many other reviews that this would be a GREAT device if they upped the scan quality a bit. I would certinaly be willing to pay more for a negative scanner that performs this well and this fast with better resolution and sharpness. I scanned through a box of old negatives last night as a test and probably did about 250 in 2 hours or so. It was super easy and fast. This could easily be a 5 star product if they could just address a couple of lingering issues. For now, we’ll view the negatives on this and then continue to scan to get the quality we need. This is a wonderful way to go if you want to shoot film but forego the darkroom.
A**R
Quick setup, Easy Interface, Great Scans
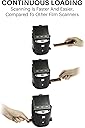
This scanner works well scanning old 35mm slides. Since I purchased it, I have scanned several thousand slides into good quality JPEG images. The images are large and clear, with good color retention. This is not a professional production scanner, but it has provided me with images better than I expected and it has help me to salvage and archive all of the old family slides. Scanning requires moving slides through the scanner using a guide. Once a slide is lined up sufficiently in the viewer, you simply press the capture button and wait a few seconds and move to the next. It is reasonably fast (under 20 seconds per slide) as they are passed thru the guide. The viewing screen is large enough to see the image sufficiently and the user menu and interface display is easy to understand and follow. The scanner requires the use of a SD memory card (Not Included). All files are stored onto that card until transferred onto a PC hard drive or other storage device via a USB cable. I am using a 64gb SD card and I am able to store just over 6000 scanned images to the card. This scanner will operate as a stand alone scanner with the USB power cable provided or it can be powered from a PC via the USB cable. It has the ability to display images to a TV or Monitor directly from the scanners SD memory card, and a HDMI to USB video cable is provided an well as a RCA type video cable. Numerous types of guides are provided for different types of film media, negatives (110, 35, etc.) slides, 8mm film and super 8mm. There are different types of guides for different thickness of slides provided also. I have not used it to scan any other type of media (negatives, 8mm, etc.) but I am sure it would scan that media just as well. I am very pleased with this scanner.
M**Z
Great unit, great price
I bought this unit not expecting much, but was pleasantly very surprised with the way slides scanned and looked on my 55" television. For slides with good exposure, contrast, dye color retention, and focus the results were great and exceeded my expectations. It should be noted that slides may degrade over time and have severe color shifts if not stored correctly. I had many slides with a blue/cyan cast that were not stored correctly, and many that were outright destroyed by wet basement storage. But if your slides are good you should get very pleasing results. If your slides are in metal frames from a previous projector be sure to check for rust deposits. If deposits are visible scrape clean with a utility knife and blow off slides with a squeeze bulb puffer. I fed a few slides with rust deposits into scanner and scans became very dirty. I found unit was very easy to clean but I DID NOT use the little scrub brush supplied, I was worried hard rust particles might scratch the scanner lens. So I decided to try my squeeze bulb air puffer in the slide slot; one or two quick puffs and all dust and debris were gone! People also complained slides are a bit tricky to load, which is true. I found my slides had bowing from being stored in the metal projector frames, and that if I manually bent them straighter they fed MUCH better. All I have done so far is to scan slides, but scanner is worth every penny to me. Scans are captured very quickly, and all I had to do was use default settings, a breeze to use. I think the editing scanner settings might help some in getting better scans, but I think you can do much better with computer software after capture. I purchased my Scanza from DBROTH and it arrived quickly, but unit was packed very poorly, loose, rattling around in a bigger box with no padding. I was lucky, unit was not damaged, but I would not buy from this source again. See sample scans
A**C
Photos seen in this review were *heavily* refined from scanning
I really want to like this scanner. Because of its cost, primarily, and because of its size and ease of use. But the in-device settings are very simplistic and the JPGs produced do not look like what the screen shows when you make adjustments for your final output. Perhaps because the lightbox provides a 'boost' to the images or something. But, it is greatly limited by being 14 megapixels despite saying it can go to 22 (which is just upsampling and not native resolution, much like simply changing the size of an image in Windows Photo Edit. Think zooming in on an iPhone picture and how it looks more like a painting than a sharp photo. I'd say I could print *maybe* 8x10s from these scans but far better quality if I go lower like 4x6. These photos attached to the review are all from Velvia 50 slide film and so are initially very high quality. I've scanned them before with a laser scanner (quite destructive unfortunately) and the quality output allowed me to make a 12x18 print no problem, looking quite perfect. So I am not really impressed with the Scanza despite its cost. I'd say "value" is lacking, therefore. I put at least an hour of Photoshop and Luminar Neo processing into each of these and at least I could get the colors right but the details are very coarse / blotchy. Oh well, I will not ever do a laser scanner again due to their destructive processing, but I may get an Epson V600 flatbed scanner as has been suggested by other reviewers due to the 2x higher quality than what this device can provide. With the Scanza, you can post to Instagram or Facebook only.. but some are still pixel peepers and will notice the low quality.
R**Y
Great Way to Convert Slides and Negatives to Digital Files
I inherited my father's voluminous collection of color 35mm slides which sat in the basement for 70 years. Reaching back to the early 1950's only a few years after my father returned from the war, he took up photography in the Army as part of the Signal Corps and then continued informally when he returned home. The problem? I have no slide projector to see any of these, and never really relished the idea of purchasing one (I do all my photography in digital). Thus, these pictures, with all the memories they hold, have stayed in the dark without anyone seeing them. That's where this handy little device comes in. I wanted to easily digitize these slides so at the very least I could look them over, and possibly even find some gems that I could print and share. The thought of the work involved in doing such a task kept me off from doing it for two decades until I ran into this little Kodak device. Yes, it still takes time, and will indeed take time, but once you learn how to do it, you can rip through slide digitization at a pretty good clip. You plug the device in, hinge the screen so it is at the correct angle for viewing, and pop in an SDXC card into the back slot. Turn it on, set a couple of quick settings to tell the machine what type of media you are using (35mm slides, film negatives, etc.) and you are ready to go. The unit comes with a number of plastic holders that you slip into the side of the unit and then you simply slide your slides or negatives into the device. When the image shows up on the screen correctly centered, you press one button and either a 14 or 22mp screen capture (depending on your settings) is made and automatically stored on the SDXC card. You just continue this process until you are finished or are ready for a break, etc. The image scan is pretty good and while I would not pretend to say this is a high-end professional scanner, it does a more than adequate job for tasks like I've described above. There are adjustments for color, sharpness, etc. if you wish to make them. The real benefit to this unit is the ease in which it allows you to conduct the conversion process, turning an unpleasant and lengthy task into something much easier. When you are done, you simply eject the SDXC card and insert it into your computer and copy off the scans. From there you can use any photo editing software to adjust the image (images are saved as jpg files). The quality of the device itself seems good and sturdy, and I don't expect to see any problems with its use over time. The unit makes no noise and does not seem to get warm during use (probably uses an LCD-based light for scanning) and looks nice enough that you can leave it off on the back of a shelf without it looking obnoxious. I'm glad I found the device and can easily give it five stars! Note: If you are in a situation like me, your slides or negatives will be dusty and dirty from years of sitting around. Do some online research on the correct way to clean slides and negatives because you will want to clean these before you scan. If you scan the slides in a dirty condition, all the dirt and dust will show up on your photos.
G**S
This is a Waste of your Time and Money
The Kodak Scanza arrived well packaged and in an undamaged box, so I didn't anticipate a problem. I scanned several old 35mm slides and soon discovered that the method provided for capturing mounted slides is marginally useless. You can try to pry apart a plastic tray which is in turn inserted in the scanner (one up), or you can try to feed them in from the end of the mounted tray to minimize handling. Of course, the latter method works, assuming the paper slide holders are in pristine condition. I don't know about your 40 year old 35mm slides, but mine have gone through a number or Kodak carousel traumas and are anything but planar. Guess what. Every one hangs up on the tray requiring removal of the tray and starting from step 1. I figured I'd give this thing a chance (for the bucks) so I thought I'd try to view a captured image on my 60" wall mounted Sony via the HDMI interface. But to my dismay, the HDMI port on the back of the Scanza sported a miniature version of the standard connector I'd liberated from my Roku to view the scanned slides. So Kodak not only doesn't supply the required SanDisk memory card (I'd scrounged one up) but they don't supply a convenient adapter for the more common HDMI interface. Did I mention that my TV is wall mounted and weighs 100 lbs, obviating the use of the included adapter cable? But wait, there's more! While in the process of trying to give this cheap plastic contraption a fair chance, I couldn't help noticing that its power would wink out at random intervals. Being curious, I finally determined that the tiny USB connector on the back of the Scanza would only supply power reliably if I applied upward pressure. I'm sorry, Kodak, but this is beyond the pale. I have returned the Scanza (who the hell named this thing anyway, the same brilliant VP that runs the QC department?) and subsequently spent $25 more on an Epson Perfection V600, which is a flatbed scanner with good specs that will hopefully serve as a great general purpose scanner long after I've digitized my old slides. There were a couple of other options in the same price range on Amazon. So there it is, for what it's worth. Don't waste your time or your money.
J**R
Works well for price, easy to use.
We have about 1500 slides from 1964 - 1975 to copy. This unit is easy enough for my mechanically disinclined wife to use. Centering is manual, but not hard to accomplish. There was some trouble with warped slides catching on the holder. Most of our slides are in trays. The spring clips in the trays seems to have kept the holders from warping. The only problem was with slides that were in their original boxes from the Kodak developer. I connected the HDMI output to a large screen TV. The images appeared to be a little overexposed, but I took the advice of other users and didn't try to correct the image. When I put the SD card in a laptop computer the image quality was much better. When I used the computer to display the images on the same TV they looked properly exposed, unlike the overexposed appearance when the image came directly from the unit. I have an expensive Nikon slide copier, but this is easier to use and the image quality is adequate for making our memories accessible in the digital age. We looked at about 500 slides, copying slightly more than 400. The time it took was about 5 hours. A lot if this was because we were reminiscing about the pictures. It would go much faster if the goal was simply to copy them as fast as possible. We the had two fun evenings of showing them to our children who were the subjects of many of the pictures. This is a good way to make your slide collection accessible to all. I have been leary of sending the slides off to a processor or even to someone local for fear of loss or damage to the originals. These photos are even more precious to us because we were able to remove them to a safe location before a forest fire destroyed our home in May 2000. Maybe if you need professional quality copies the Nikon is better, but it costs 10 times as much. The copies from the Kodak Scanza are perfectly good for us.
H**S
Je oude foto`s en dia's kun je goed digitaal maken. Bewerken met foto programma`s
Je oude dia's kun je digitaal maken en bewerken met je programma bv. Luminair of Photoshop of Inpixo
C**A
Genial para uso doméstico!
Muy contenta. Tenía miedo que la calidad fuera mala pero para el precio no está nada mal. Además es súper fácil de usar. Me encanta no tener que depender de un ordenador para pasar las fotos a la SD, así puedo usarla donde quiera de la casa (mientras haya enchufe).
C**E
Scanned functioned as advertised.
Easy to use. However, The color of the slides is slightly washed out no matter how much I tried to adjust the color.
G**.
Facile da usare per convertire foto, veloce e risultato soddisfacente
Ho comprato il Kodak Scanza per convertire delle vecchie diapositive in formato più moderno. È facile da usare, all'interno della scatola sono presenti tutti gli inserti per convertire vecchi formati (compreso il Super8). Una volta presa la mano il processo è semplice, mettendo anche una diapositiva una dietro l'altra e premendo il tasto per catturare l'immagine su schermo. Il risultato è soddisfacente e di qualità buona. IMPORTANTE: Per salvare le fotografie convertite, è obbligatorio utilizzare una microSD. L'entrata USB presente, infatti serve soltanto per collegare il Kodak alla corrente e non può essere utilizzata per mettere una penna USB o simili.
G**L
A high resolution scanner for 35mm slides, which is quick and easy to use.
This is mid-range Kodak scanner, but it produces good quality, high resolution images from old style 35mm slides. The purpose of this type of scanner is to convert 35mm analogue slides into digital files for easier viewing. I had found a large pile of slides originally taken by my late father, and this was objective for this scanner. This was a daunting batch, but needed to be converted just to view the images on modern equipment. This scanner has proved ideal for this task. It is easy to use, and scans into digital files within a few seconds. The lengthy part of the cycle time is loading individual slides, which need to be accurately mounted in a sliding frame. Like similar tasks the loading becomes easier with experience, but accuracy is important to avoid scanning the edges of the frames. There is also a range of frames to cover differing types of film size. The range is fully explained in the product descriptions, but I have only used the 35mm slide frame. The slide frame for 35mm is hinged, and clamps hold on each slide to hold the frame, and ensure it falls within the fixed focal length, so that each image accurately reflects the quality of the original slide. Don't expect it to work miracles if the original slide is out of focus or blurred by movement. However, there is a limited range of editing on the scanner, so some exposure errors can be corrected before the image is scanned. In my experience most modern software offers a wider range of editing for the image once secured to your laptop, etc. The scanner must have an SD memory card inserted, because all the scanned images are saved to the memory card. This means that you can transfer the SD card and the new files to your preferred location for saving. I have not found a method as yet to link to the computer to transfer the files without moving the SD card, but I expect that this is feasible, I have only to extend my practice. Overall I feel confident to recommend this kit, and I have been pleased with the results, which have secured my late father's photography for future generations.
Trustpilot
1 day ago
4 days ago