Desertcart purchases this item on your behalf and handles shipping, customs, and support to Tunisia.
๐ Elevate your nail gameโshine bright, stay flawless, no salon required!
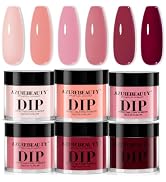
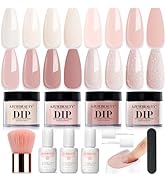
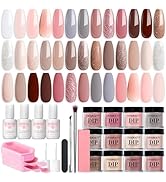
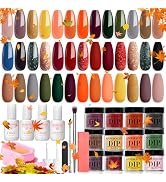
The AzureBeauty 31Pcs Dip Powder Nail Kit offers a professional-grade, lamp-free nail enhancement experience with 20 rich colors and 7 essential tools. Designed for long-lasting, chip-resistant wear of over 28 days, its non-toxic formula strengthens nails while delivering a glossy, natural finish. Ideal for busy millennials seeking salon-quality results at home, this kit unlocks endless creative possibilities with over 15,000 color combinations.


| ASIN | B0BGX75G6Q |
| Best Sellers Rank | #3,778 in Beauty & Personal Care ( See Top 100 in Beauty & Personal Care ) #1 in Dip Manicure Kits |
| Brand | AZUREBEAUTY |
| Brand Name | AZUREBEAUTY |
| Color | Red Blue Green Glitter |
| Customer Reviews | 4.2 out of 5 stars 11,156 Reviews |
| Finish Type | Glossy |
| Included Components | Dip Pow, Nail File, Top Coat |
| Item Form | Powder |
| Item Highlight | Dark Blue 20 Colors Dipping Powder Liquid Set with Top/Base Coat Activator for French Nails Art DIY Salon Christmas Gift |
| Item Weight | 0.64 kg |
| Manufacturer | AZUREBEAUTY |
| Manufacturer Part Number | YT-AZ-0373 |
| Material | Acrylic |
| Set Name | AzureBeauty Dip Powder Nail Kit Starter |
| Unit Count | 1 Count |
T**Y
Love Love Love!! did I mention that I LOVE this product?
The photo posted in my review is to show what color result is achieved with only a SINGLE dip - I was happily surprised to find them to be pastels yet highly pigmented making for such a great coverage off of the first dip. The end result is what was achieved after dipping each nail once more making it only a total of two dips per finger on every color -including the lightest colors like yellow I not only highly recommend this product but I definitely will be a returning customer as long as I have nails on my hands lol My nails are naturally short so to achieve the finished look I started by glueing on false tips to each nail. ***The tips I prefer to use are always clear (vs white tips as white tips I find can be harder to hide under dip powders as the line of where the tip meats your natural nail can be seen through the powder unless you dip each nail repeatedly until it does not -which I find not only to be a waste of time but also a waste of the powder especially when with clear tips only two dips is needed to achieve the same result*** ***Also clear tips in my opinion always seem to be a little thinner than standard white tips which makes them more flexible, bending just as your long natural nail would but yet thick enough to not break off**** After glueing on the tips and allowing time to dry - I then lightly buffed the surface to ensure that the false tips laid flesh with my natural nails to ensure each dip would result in a smooth surface allowing for no additional filing needed after dipping After buffing the tips and getting them flesh with my natural nails I take a cotton ball and wipe each nail off with nail polish remover - I believe this step is not only VERY important but also this step is what makes the difference in how long your finished nails will stay on. I personally have yet to experience any of my nails popping off on their own by accident and I have done multiple sets to not only myself but my sister as well. A typical set last just about two weeks before I decide to remove them and then redo them as by that time my natural nails have grown out. Without the step of dehydrating my natural nails with the polish remover and removing any dust /oil from the buffing I donโt believe Iโd be able to achieve a manicure to last 2 weeks as before including this step in the past I never was able to make it past 3 days before one popped off so I canโt emphasize enough how important that step is. Next I apply a thin base coat (one finger at a time as stated on instructions) and then quickly dip the nail into the powder as if you donโt do it quick enough-the base coat can begin to dry leaving you with an unpleasant dip result. Instantly after lifting the nail from the dip I brush off any excess back into the dip tray and then I apply a coat of activator before I move to the next finger and repeat until all 10 are complete. I then repeat that step of applying the base coat, dipping, brushing off the excess and then applying activator a second and final time to each finger. Once completed with the dipping I Lightly buff the surface of each nail making sure each nail feels smooth as a natural nail. Sometimes extra filing is necessary depending on the shape and length you want to achieve - I do this after dipping since the clear tips I choose to use are thinner than standard tips, but you could also shape the tip before dipping them, really itโs your preference and the order you choose will not effect the end result- just make sure anytime you file BEFORE you dip -you ALWAYS want to wipe each nail with a cotton ball of polish remover - I cannot stress this enough At this point depending on the look Iโm trying to achieve I would either decorate them or if Iโm going for more of a simple look Iโd finish by applying a top coat If you have the option to finish your nails with a gel top coat that requires a UV light to harden then I would suggest doing so as it only creates more strength to your nails -but I personally only use a regular polish top coat, one thatโs thicker in consistency giving the affect of an authentic gel polish but dries on its own and no lamp is needed, so again itโs up to what you have available to you as well as your preference The video I posted is the end result after dipping every nail into a different color - no two are the same color. I then applied a thin layer of a clear sparkly polish, to a few nails I applied some rhinestone art and then finished with a high gloss top coat Hopefully this helps any one new to using dip, when i started experimenting with dip powders years ago, despite loving the end result I could never seem to get them to last as long as a manicure I got at a salon with acrylic, but over time, with a little experimenting and practice Iโve come to finally achieve the look as well as the length of time they stay on. Iโve experienced with all DIY at home manicure products on the market, including acrylic and poly gel, and out of the three- dip powder has not only been the fastest to learn how ti use as well as the fastest process when apply a whole set, but itโs also been the easiest, the less messy as well as the most affordable. (single bottle of dip powder can last you MONTHS almost a whole year if only dipping each finger twice and having them last 2 weeks before doing it again) I HIGHLY recommend for any one whoโs new to the DIY at home manicure to try all the products available, personally I found it fun to experiment with them all but im sure youโll soon learn how simple a dip manicure is compared to the other methods, as well as how much money youโll save no longer having to spend your money on getting a set done. What it would cost me to receive a single set at the salon is more than what it cost me to buy this dip powder kit and even the tips combined.
B**E
Nice product for color & nail strength!
I received this dip powder kit and got right to it using the powder. I followed the directions included in the kit since this is the first time I've ever used dip powder on my nails and after I did my thumbs I decided to pull out my UV light because the dry time once I applied the top coat was quite long and I messed one up that I had to fix. Make sure you have the right files and buffers so you get the best surface prior to doing the top coat. If you don't like what your nails look like after putting the top coat, buff it really well and repeat the base coat & dip powder step followed by the activator step & that should allow you to fix what you don't like. You'll gently buff the surface again and apply the top coat twice. I did NOT put my fingers in the dip powder, I chose to use the cuticle pusher spoon to sprinkle the powder over each nail that had the base coat. Just use a small tupperware container to do this. I was able to save a lot of powder in the end by doing this and my nails turned out very nice considering this was my first time doing this type of manicure. The only reason I have the UV light is because I've tried the gel manicure kit and absolutely hated it. My nails have always done better with acrylic nails in terms of longevity which is probably why I had such nice results today. If you smudge the top coat because it's not fully dry, take a small amount of acetone on a paper towel and gently apply it in a parallel motion from cuticle to end of nail a few times and it will smooth out your finish. Add another layer of top coat to get that lacquer look and you're ready to go! I think my nails look better than when I get them done at the salon, so all in all, I'm very impressed and will definitely be using this method with the other colors in the kit. The bottles of applicator liquid are small and the color powder containers are also very small, but based off of the amount I used today to do my hands, there's plenty of manicures left just with that color alone. I suspect the applicator liquids will need replacing much faster than the powder, but that's to be expected. The only downside is not really being able to tell what each color truly will look like until it's on your nails. I'm not sure about the longevity of this product since I just used it for the first time today, but I do like how it applied using the sprinkle method & my nails feel great hours later. Good luck!
W**O
Great Dip Powder Kit for Beginners
Iโm very happy with this dip powder nail kit. It comes with a great variety of beautiful colors, and everything needed to get started is included. The powders are easy to apply, the finish looks smooth and professional, and my manicure lasted much longer than regular polish. Great value for the price, and I would definitely recommend it!
P**H
Very Mixed Feelings
I have very mixed feelings about this kit. This is my first time using this type of nails. They turned out great. It did not chip at all. It lasted three weeks before it was time to redo them. Iโll never use anything else I said to myself. Now the bad part - it was horrible trying to get the powder polish off my nails. I followed the directions and watched YouTube videos. It took more than two hours to get the the polish off my nails. Until they come up with a way to remove the polish, I will not use it again. Very disappointing because I love the look on my nails. Oh well, Iโll go back to regular polish until I figure out how to get the powder polish off more easily.
D**Y
High quality, easy, and fun!!
This brand is so fun and easy!! Like, easy easy. I noticed a lot of people saying the containers are small, but the kits are basically for colors you want to only occasionally use or, more likely, to figure out your favorite colors. Before I found their kits, I was using their big size of the nude pink and transparent. Last fall I was using a a nail whitener and used it too many times over a couple of months and really thinned my nails. So I was just using this brand as a protectant. But after I discovered how easy it was to use, I started looking at these color kits Amazon was prompting because of my previous purchase. I am IN LOVE!!! I noticed some people talking about lumpiness etc... So when I was using the plain ones, I got one of the little nail drills. Please be careful if you go that route. I'm a nurse and there are so many beauty products it freaks me out for people to use. Anyway, little nail drill. I don't even bother with acetone to remove, I just buff it off with the nail drill. I pretty much leave the tiniest bit on my nail rather than buffing all the way to raw nail because I'm trying to heal my nails from how thin the whitener made them. Then, once I've done the three coats- I wait a lot longer than 60 secs between each base coat and dip...I wait like 5 mins-and the activator, I let the activator hang out for awhile to fully dry. Sometimes I even finish the next day. I clean them up with the little drill. I think them a little bit towards the cuticle, but not near the tip, and give them a little buff to remove any lumps. Then I clean with an alcohol pad and do a top coat. I usually only do one top coat so after about a week I can do another one to seal any areas that might have some wear so they last longer. On the little drill I use a really low speed for my clean up so I don't take too much off. Where the drill gets dangerous is where you're close to natural nail...just be aware you can very, very easily go all the way through your nail!! Anyway, super fun high quality product!!! The powders are really well milled. You will need to buy the set of bigger bottles if you do your nails regularly. The price of these sets is really about getting to try so many different colors and figure out which ones you like .
K**N
Nice
Plenty of powder, but not enough base coat, activator, etc in bottles. Otherwise great kit and I love the finished look
N**R
Very comparable to professional dip manicure
As long as you follow the instructions youโll get results pretty close to a professionalโs! The whole kit thatโll do tons for sets, costs less than what it wouldโve cost to get my nails professionally done. Iโm pretty happy with my results and this is just my first time using it, itโs only up from here. Not sure how long theyโll last yet but they feel like theyโll last just as long as dip at a salon. The only thing thatโs a little strange is the top coat, youโll have to do 2-3 coats to get a good shine.
C**.
Works well - doesn't last long though
Overall, the AZUREBEAUTY 31 Pc Dip Powder Nail Kit is a great starter set with a beautiful variety of colors. I love that it includes 20 different shades ranging from neutrals to glitters, so there are lots of options for different looks. The powders apply nicely and the finished nails look professional and last well compared to regular polish. The only reason Iโm giving it 4 stars instead of 5 is that the product doesnโt last quite as long as I expected, and the brushes wore out faster than Iโd like, so I ended up purchasing a few extra. Other than that, itโs still a really fun and affordable kit if you want to do dip nails at home.
K**Y
Great product but needs improvement in color saturation
Another amazing set. Ill give it 4 only because I wish the color pigment was strong. The color quality starts to fade while buffing showing white undertones. Outside of that it's sturdy and once applied properly a set can last for a proper 3 weeks! So even though there is a bit of fading when buffing it is still a great purchase.
H**M
Nope nope nope
๐ท๐ท๐ท chemically strong solvents! My eyes would burn And quality is sooo poor - i put it on sunday night, wed morning i peeled it off from all of my nails. Had fun trying it but would definitely not recommend. You may be better off the old fashion nail polish
A**D
Does the job!
Great product. Worth buying if youโve purchased the dip powder kit
H**E
Cracks the next day- dont waste your money!
I liked the colours, and I was so excited when I received them, but, when I tried them, my nails cracked the next day!!! I tried different ways, nothing works. I tried different brand of dipping powder in the past, and it was much better, at least my nails lasted for a week or more. I'm so unhappy with this and I wasted my money on something that will go to the bin.
D**S
Great for my dip powders
Love this set. Great with my dip powders. Not too thick like some liquids
Trustpilot
3 weeks ago
2 weeks ago