Desertcart purchases this item on your behalf and handles shipping, customs, and support to Tunisia.
๐ฅ Stay cool, dry smart โ protect your dryer like a pro!
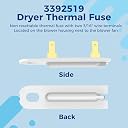
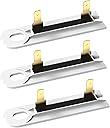
The 2026 Upgraded Romalon 3392519 Dryer Thermal Fuse 3-Pack offers a universal, high-performance replacement for Whirlpool, Kenmore, and Maytag dryers. Engineered to trip at 196ยฐF, it prevents overheating and potential fire hazards. Durable and corrosion-resistant, this kit ensures reliable, long-lasting protection. Easy to install with basic tools, itโs a cost-effective solution that saves you from expensive repair calls while keeping your dryer running safely and efficiently.


| ASIN | B0CT8L4S9Y |
| Best Sellers Rank | #11,618 in Tools & Home Improvement ( See Top 100 in Tools & Home Improvement ) #65 in Dryer Replacement Parts |
| Brand | Romalon |
| Brand Name | Romalon |
| Customer Reviews | 4.8 out of 5 stars 882 Reviews |
| Manufacturer | Romalon |
| Model | WP3392519VP |
| Mounting Type | Through-Hole Mount |
| Number of Items | 3 |
| Number of Packs | 3 |
| Part Number | WP3392519VP |
| Unit Count | 3 Count |
A**.
Better than original for fraction of the price
Working great better than original. Save $200 on service call
T**S
Very durable
Good value works well with my whirlpool dryer.
W**D
Perfect
Perfect no issues at all came very quickly within a day and had my dryer up and running within 24 hours of ordering part
L**N
Worked great for Whirlpool Cabrio dryer
My old Whirlpool Cabrio dryer (Model No. WED6600VW0) would light up and then when you push "start," nothing but a click in the back would happen. Ruled out the door switch and took a guess on this thermal fuse. Took more time to remove the back (mine has no front access door) than it did to replace the fuse. 10 minutes later and we're back in business!
K**.
Did the trick (with a slight,easy modification)
Working just fine, although it's only been used for 2 dryer loads so far. I did have to make one SLIGHT modification to it in order for it to fit, though. The problem was with the 'prong end' (not the 'screw end') of the replacement thermal fuse. The space between the 'prong' and the 'body' was not wide enough to slip over the dryer panel. (In other words, the dryer panel metal was too thick). Since the 'body' of the new thermal fuse is just plastic, the simple fix is to place a common METAL nail file in the gap and file away some material to widen the gap between the prong and the body of the fuse. As always, I only gave a 4 star rating instead of 5 because it's too early to know how long this product will last.
M**K
Just does the job
This was easy to install and a perfect fit. I've seen a few negative comments about life and durability. I have only had this installed for about a week, but I wonder about whether those comments consider what this is for. The thermal fuse for a dryer is designed for one purpose - to fail and stop the dryer when it gets too hot so it won't cause a fire. Typically that means, if the fuse blows, there is something wrong that needs to be fixed. That might mean the ducting to outside needs to be cleaned, but it might also mean that the dryer's internal ducting is clogged. Having to replace the thermal fuse is a wake-up call to check for the real problem, like the internal filter in this photo, which (1) requires some venting disassembly and (2) is only one of the internal areas that was clogged.
M**T
Great Thermal Cut-off Fuse & My Installation Instructions!
These Thermal Cut-off Fuses worked perfectly for my Kenmore 700 series Dryer. Make sure to verify your exact Dryer Model because my Fuse was behind the (not behind the back Dryer panel) Lower Front Panel which is the only panel that needs removed. Also unlike a YT Video that shows the Front Blower & Drying Tub/Belt needs removing 1st, the job is "Much Easier" if done in the following (approx. time approx. 1.5 hrs.) manner. 1.) Make sure the Dryer Power Cord is unplugged. 2.) "Pull" the Dryer away from the Wall & Remove the Dryer Vent Hose from the Dryer Exhaust Vent . MAKE sure to clean the (if needed) Dryer Exhaust Vent & Vent Hose of any seen Lint. 3.) Now remove the Lower Dryer Front Panel & Gently lay the Dryer on it's "LEFT" side. You will then have easy access to the Thermal-cut Fuse that can be seen from Rt-side (with said Panel removed) opening. 4.) Using the proper Tools , remove the "2" Wire Connectors that are attached to the "2" Thermal Fuse Tabs paying close attention (I marked the Front wire with a Permanent Marker) to their orientation for proper reattchment later. 5.) Using a 1/4" Ratchet w/short "Magnetic" extension or similer & a small Socket that fits the "Single" Attachment Screw ...remove said Screw & then pull out/remove the "Blown" Thermal Fuse. 6.) Now, install the new Thermal Fuse with a short Magnetic Extension Socket ...being careful "Not" to drop the single Thermal Fuse "Attachment Screw" down into the Dryer Cabinet. 7. Now, before reattaching the Dryer Vent Hose ...push your Dryer back closer to it's Electrical Wall Outlet & plug it in to check "IF" the Dryer runs now. If it does then unplug the Dryer again & pull it out from the Wall again to reattach the Dryer Exhaust Hose. 8.) Finally ...Pop your lower Front Panel back on & reposition your Dryer to it's normal running location & plug the Power Cord back into the Electrical Outlet.
A**R
Works
Works
Trustpilot
2 months ago
1 month ago