Desertcart purchases this item on your behalf and handles shipping, customs, and support to Tunisia.
๐ฏ Paint Like a Pro, Finish Like a Boss
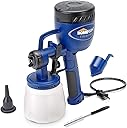
The HomeRight Finish Max C800766 is a lightweight, electric HVLP paint sprayer featuring a durable 2mm brass tip and 3 adjustable spray patterns. With a 27-ounce capacity and precise flow control, it effortlessly applies smooth, professional-grade finishes on furniture, cabinets, and trim. Designed for versatility and ease, it supports a wide range of paints and stains, backed by a 2-year warranty and US-based customer service.


| ASIN | B003VKFDEO |
| Best Sellers Rank | #2,693 in Tools & Home Improvement ( See Top 100 in Tools & Home Improvement ) #3 in Power Paint & HVLP Sprayers |
| Brand | HomeRight |
| Brand Name | HomeRight |
| Color | Blue/White |
| Customer Reviews | 4.1 out of 5 stars 5,883 Reviews |
| Global Trade Identification Number | 00012564007661 |
| Included Components | Finish Max, 27 oz. Viscosity Cup, Air Blow Nozzle, Cleaning Brush |
| Item Dimensions W x H | 9"W x 12.5"H |
| Item Type Name | Paint Sprayer |
| Item Weight | 3.1 pounds |
| Manufacturer | Home Right |
| Manufacturer Part Number | C800766 |
| Manufacturer Warranty Description | 2-year limited warranty |
| Material | Brass , Plastic |
| Material Type | Brass, Plastic |
| Model Name | Finish Max |
| Model Number | C800766 |
| Number of Items | 1 |
| Power Source | AC/DC |
| Recommended Uses For Product | Flow control, High quality brass tips and needles provide superior performance, Lightweight design, Low pressure high volume, Superior finish Recommended Uses For Product Flow control, High quality brass tips and needles provide superior performance, Lightweight design, Low pressure high volume, Superior finish See more |
| Style Name | Finish Max |
| Tank Volume | 27 fluid ounces |
| UPC | 012564007661 |
| Unit Count | 1 Count |
M**R
It does the job - BOY, am I glad I bought this thing!
I purchased this sprayer in order to minimize and to speed up the work of staining a 100+ foot long dogeared privacy fence. My wife and I stained the outer (nice and flat) face of our fence with rollers. We took 8 hours working together to stain the fence, and we had to work through the difficulties of rough, uneven lumber, deep grain, and quite a bit of unevenness of the vertical boards. It was miserable work, made worse by "premium" 3/8" roller covers that went flat really quickly. I knew nothing about sprayers. Therefore after reviewing the product reviews here at Amazon I made this "faith based" decision. :) And removed from consideration some cheaper models made by major vendors that had lower reviews. BOY, am I glad I bought this thing! I just completed the staining of the "bad" inner side of the same 100' fence - posts and cross members included - by myself - with the HomeRight sprayer in about 4 hours, start to finish. I experimented with spraying water before committing to solid color Behr stain for the actual job and reviewed the movable parts and adjustments. There are two adjustments: spray density (using a thumb screw on the trigger that limits the travel of the trigger); and spray pattern - vertical, horizontal or round/symmetric. My productivity on rough lumber surfaces like this unfinished fencing increased *dramatically*. The plain side of the fence drove me NUTS with a roller. The sprayer simply fills all visible voids - grain, splits and cracks - with NO extra work and NO time spent re-doing bare missed spots. The nature of painting is quite different with rollers vs. this sprayer. The roller painted side of the fence received a very thick coat that covers almost all of the grain pattern - mainly because we had to go over almost every square foot two or three times in some places. I prefer to apply multiple thin coats. The sprayer is the right tool for this - the stain went on in a feathered way with lots of transparency unless I slowed WAY down very deliberately. The spray stained parts dry quite quickly. On the other hand, I read that with a sprayer 20% or more of the paint or stain is wasted as overspray, and I think that's conservative. With a roller you waste stain with too heavy application - with a sprayer you waste stain from drift. So pick your poison. Bottom line: a sprayer (this one) is a great tool for applying *thin*, controlled thickness coats of stain or paint. The side I did so quickly *will* need a second coat. But two thin coats are much preferable to one gloppy thick coat. The drift of the over spray is significant - after a couple of hours the air intake filters on the top of the power unit (well in back of the direction of spraying) were colored the same red of the stain and will probably block up in the near future, which means that if you're using solvent based paints, you should probably use a respirator, and eye protection is a very good idea too. (watch out for eyewear lenses being covered by paint spray in some windy conditions.) The one hindrance is limited capacity. You're always filling the stupid little 800 ML (almost 1 qt) jar, and I fumbled the jar quite a few times and got paint on everything. And pouring paint from a 5 gal bucket into the jar is sloppy business. But it's a tradeoff. After several hours of using this sprayer I would *not* want to lift a 1/2 gallon - 1 gallon jar attached to the sprayer. :) Cleanup is straightforward. You have to take the jar hardware apart and wash everything - the feed tube and a protective cover for the air supply come out readily. The sprayer nozzle assembly is 4 pieces - the outer screw cover, spray turret, a plastic doohicky under that, and the brass needle nozzle - and it likewise all has to be rinsed. Then (for acrylic) run soapy water through the unit. I strongly recommend buying this sprayer if you have a big outside staining or painting job. Indoors - I'm not certain how it would work out.
M**L
PROFESSIONAL RESULTS
We've had this sprayer for around a year and had only used it on small projects. That is until we had a lot of extra time at home and decided to tackle painting our kitchen cabinets. And let me make one thing very clear, the only thing I know about painting was picked up by a handful of YouTube videos. We focused on the edges first and then followed with steady 50% overlapping sweeping passes across the big surfaces. I can't tell you if this is correct or not, but our results were outstanding. absolutely! It also comes with a little viscosity cup, which I'll admit, I lost a while back but we ran all our primer and paint through these paint strainers to make sure there was no clumps and everything sprayed great. https://www.amazon.com/gp/product/B000PA09V0/ref=ppx_yo_dt_b_search_asin_title?ie=UTF8&psc=1 XMA Header Image TCP Global 50 Pack of Paint Strainers with Fine 190 Micron Filter Tips - Premium"Pure Blue" Ultra-Flow Blue Nylon Mesh - Cone Paint Filter Screen amazon.com Now, before jumping right into to slinging paint, my advice would be to go WAY over the top (literally) with your masking and paint booth. Spend the time now, you'll be thankful later. And make sure to wear breathing and eye protection. My wife and I each have one of these by 3M respirators https://www.amazon.com/gp/product/B0009F5KDS/ref=ppx_yo_dt_b_search_asin_title?ie=UTF8&psc=1 and they work perfectly, while not making us overheat like our N95 masks sometimes do. Very reasonable cost when we bought them, but with COVID who knows? Ok, so we removed the doors and set up craft paper covered folding tables inside a plastic sheet room in the garage. Although I wish we would've span it over the top also because the overspray gets everywhere! Also, plan ahead because depending on the size of your kitchen, you're going to need a lot of space, or plan to paint in shifts, but we didn't want to be moving them around too much. Also, get a bunch of the little table tents to prop the panels up off the surface, so you can get a good coat all around. **one more tip for the doors - do the backs first. We primed first, but when it came to paint, we did two coats to the backs until we were happy, then flipped them all and hit the fronts with three coats and are very happy. NO BRUSH STROKES! The main reason for doing backs first is that even if the tents happen to leave small tick marks in the surface, it's on the back side and. you'll never see or focus on them.** Now back inside to do the frames. We went to the trouble of masking the inside of the cabinets and the best results I had was cutting cardboard to just bigger than each opening. I then cut a hole big enough to reach through and tape them in place. The hole is easy to cover back up before spraying. < Not sure that makes sense, but stick with me. With all of that effort yielded, we did get the results we were hoping for, but I think that if I had it to do over again, I would have bought more primer & paint and just shot them inside and out. Also, take EVERYTHING out of the cabinets...no matter which process you follow. Much less stressful, trust me. Truthfully though, this sprayer is so easy to use, and the only odd thing I ran into, was when painting over my head for extended periods of time, I opened the paint reservoir and turned the straw 180 degrees so that it pulled paint from the back instead of front. That'll make more sense when you start working with it. Hope this helps somebody.
C**7
I like it, has its pros and cons
I like this product. I have always needed to dilute paint in order for it to work (even though Glidden can said it was unnecessary). I use a combination of a little Floterol and water and the finish came out pretty well. It was just a matter of a little bit of trial and error to find the perfect amount. MAKE SURE YOUR PAINT IS DILUTED ENOUGH OR PAINTING WILL TAKE FOREVER. I made this mistake at first and not enough paint would come out so I kept having to go over sections and get superclose to the furniture. I put in a little water and it was like a whole new tool. You can add water slowly, just be aware if it seems like your project isn't getting a good coat, that may be the problem. I tried with chalk paint and it worked at first, but seemed to gum up the machine pretty quickly so I stopped. Might have just been a matter of needing to dilute it a little more, but I didn't want to push it any further at that point and possibly ruin the machine. Clean up is semi-annoying, it doesn't take too long (maybe 15 minutes, although I let the components I am cleaning soak in soapy water for a little while) just tedious to have to do every time. I also used it with Poly and that was super easy and amazing. Only thing that wasn't great, again, was having to clean it every time I used it because I was doing 4 coats and if you are waiting for than 20-30 mins in between using the machine you need to clean it. It does speed up the paint time and gets all those little details that are hard with a brush, just be aware if you are in somewhere like a garage and don't want paint spray on your walls/floors you are going to need to get protective plastic sheets/drop cloths/tarps and tape them up, which is also time consuming and annoying if they won't stay up. But if you can do it outside and just put it on top of one of those things it is super easy!
S**T
Good Quality.
Sprays well. After searching for best quality and affordability this brand was cited often. And I agree. Has adjustable paint flow and flow pattern settings - vertical, horizontal, and round.
D**4
Happy I purchased this, so why three stars?
I am happy I purchased this and I will tell you why at the end of this review. I started out with a new paint project which consisted of a set of bare wood bi-fold closet doors that I purchased here at Amazon. I used a high quality one-cost latex paint semi-gloss. The project was in my basement. The temperature was 64 degrees and the humidity was at 46 percent. I did not thin the paint because the Sprayer directions specifically states to follow the directions on the can of paint for thinning instructions. This particular paint said โDO NOT THIN.โ I started with the back of one set of doors and used the sprayer. It took me 29 minutes to complete and required back-to-back coats to cover even though I was using one-coat paint. (See the picture in Step 3 for the results.) Next a painted the back of the second set of doors using a quality painters brush. It took me 30 minutes and only one coat. (See the picture in Step 4 for the results.) Finally, a week later, I painted the fronts on both sets of doors using a high-quality smooth finish roller. The conditions in the basement were the same as the week prior. It took a total of 16 minutes to paint both sets of doors and only took one coat. (See the picture in Step 4 for the results and the final results in Step 5). WHAT I LIKE โ the HomeRight sprayer is the easiest prayer I have ever used. There are not a lot of pieces and it goes together and comes apart very easy. Is was a quick one-two step to go from box to painting. It is very light and well balanced. I did not experience any wrist fatigue while using it. The spray pattern is a very fine mist that almost dries on contact. The coverage area is about 4 inches while holding the sprayer about 6 inches above the surface. The clean-up is a breeze, however there is a clean-up step when you add clean water and operate the sprayer โ I recommend you NOT do this at the kitchen sink as I did. WHAT I DID NOT LIKE and why I rated this Three Stars. I received a misperception when reading the promotional information about this sprayer on Amazon. I was led to believe that this sprayer would save me time. It did not. As a matter of fact โ it took much longer, when you add in the clean-up, then the traditional methods. I would not recommend this sprayer for large painting jobs. You cannot paint a fence with this sprayer for example. This was the main reason I bought it. The other issue is the power cord is ridiculously short and caused my problems while using the sprayer. Another six inches in cord and a dollar more in cost would be well worth it. Iโm not unhappy with the purchase because I see huge potential for this sprayer in other applications I plan to do. I think it is of high quality, priced right, and I will get good use out of it. My next project will be to try using it with stain.
J**B
Great sprayer and a great price!
I bought this sprayer because I got tired of painting my interior doors. It was taking 2-3 hours to paint a single 6-panel door both sides, two coats. After two doors I ordered this sprayer to finish the remaining nine doors. I pulled two doors down to test with and set them outside, leaned against a stand in my grass on cardboard (in case of over spray) then commenced to paint my first two doors. Gun worked excellent, took about 3-4 minutes to paint one side and one coat was sufficient. I used the higher end Behr paint which is pretty thick so I thinned it just a bit. The sprayer came with a tool to test the thickness of the paint, I'd suggest using that if you are not familiar with spray guns and paint. Saves some headaches from paint not spraying right if you suspect you are using thicker paint. The doors were dry to touch inside of 10 minutes (weather was in the 70's, partly sunny outside) so I flipped the doors and finished them. Took about 45 minutes to do what otherwise would take 4-5 hours and that included drying time and taking them down plus re-installing them. My only criticisms would be that your project has to be fairly vertical. If you can move the item being painted then it's easy, but if it's immobile like a deck or stationary surface then you'll have trouble. This sprayer can only tilt 45% off of vertical, so a deck surface would be too far horizontal but the side of a deck would be easy. Second, it covers nicely in one coat and without streaks but it does spray a lot of paint to do so. It seems to go through about 15-20% more paint when compared to the same job with a brush, though it's well worth the trade considering the time it saves. Lastly the over spray was a little much, if you engage the trigger about half way and take your time painting, you get very little over spray. If you follow the instructions and adjust for full air flow, it will cover your project much quicker but create a decent amount of over spray, so be careful if there is a bit of wind. Clean up is a breeze. My previous sprayers cost twice as much and were a pain to clean, even easy to lose small parts. This sprayer is quick to take apart the nozzle and wash. Barely anything to clean up since I peeled the small paint film away from the nozzle while I was painting. It just took a moment to fill the tank with water and spray the water out the nozzle like it was paint, then remove the nozzle and clean it. Bonus: the instructions say to use it like an air gun to clean out keyboards and computer parts. I happen to be in IT so I do use it to clean out servers and desktops. It's mush easier than lugging around an air compressor and far more powerful than a can of air. Conclusion: If this was a $200 sprayer it would still be about 4 stars but since it's closer to $60 it's definitely 5 stars. It's a bit quieter than other sprayers I have used and even has advantages over sprayers I use on my air compressor since there is no noisy compressor and the air never runs out because it's on electric plus there is no moisture buildup to cause spitting. Even with several moisture traps on my air lines, my other sprayers have issues once the heats after long spray projects. This electric sprayer is a great value and has effortless performance!
L**E
Excellent for a first-time paint spray user!
I previously ordered a more common/expensive brand of sprayer and returned it on a whim due to the good Homeright reviews. This item does not disappoint! This was my first time using a sprayer, so I don't have any other basis of comparison; HOWEVER, this sprayer made my bathroom vanity look like a professional job. Right out of the box, it was super easy to use. Pros: *Professional finish for a novice *Ease of use right out of the box *Lightweight and ergonomically superior to another brand I tried *Sprays more types of paint than similarly priced big box brand sprayers Cons: *Not a heavy duty sprayer (and it is not advertised to be), so thinning the paint to the right viscosity is a bit annoying *Uses way more paint than rolling *Does not come with a cap for paint reservoir making it annoying between coats Time-saving tip: 32 ounce paint sprayer liners are your friends! Paint cannot sit in sprayers long enough for a coat to dry and you can go for round 2. This means that it is best to clean out your sprayer between coats. At first I was thinking man, this is annoying. This raises a problem because as I mentioned 1) the sprayer paint cup doesn't have a cap to store your paint and 2) you need clean water in the spray cup to clear your gun. *How did I solve this problem? I lined my cup with paint liners and then in between coats, twisted the top, secured it with a tie and stuck it in a larger plastic bag (backup to prevent spills - learned the hard way with gray paint all over my kitchen counter). This meant that I could easily fill my spray cup with clean water (without having to buy an extra one) and clean my gun in no time. When it was time for another coat, I just popped the bag right back in and stirred the paint and got to work! I hope this helps someone!
L**R
Makes Painting Funiture A Breeze
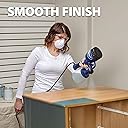
This HomeRight Finish Max sprayer is just wonderful! I bought it to spray latex paint on furniture and the end result is just what I was looking for. No brush strokes, no runs, smooth finish. I also own an HVLP type sprayer that is used with a compressor and the Finish Max was easier to use, put out a great spray and I prefer it. There wasn't much of a problem with overspray, either. Compared to painting furniture with a brush or roller, this thing had two end tables with drawers painted in under 5 minutes. I would have spent far longer had I used a brush. The hassle is the clean-up, and that is where it gets messy and a little time-consuming but no more so than cleaning up any other kind of sprayer, or a roller, brush and pan for that matter. I would say that it took me another 10-15 minutes to clean it properly. You do have to spend time cleaning any paint gun if you want to use it again. I love that this product comes with a viscosity cup/funnel thing that you can use to make sure your paint is the perfect thickness for spraying. I thinned the latex paint by adding Floetrol and water until it flowed through the cup in the proper amount of time (according to the chart in the user manual). Then I used a disposable paper cone strainer like this one: ABN Strainer Cone Funnel with Filter Top 25-Pack - Disposable 190 Micron Fine Nylon Mesh -Paint, Automotive, More that screens out any lumps or debris. For my furniture, I used the sprayer to apply 2 coats of primer, 4 coats of latex, and 2 coats of clear water-based acrylic top coat Minwax 63333444 Polycrylic Protective Finish Water Based,1 quart, Satin . The Finish Max sprayer handled all of these just beautifully. I am very happy with the results and will be using it many times in the future. SAVE YOURSELF A HEADACHE: It is VERY IMPORTANT to strain/screen/filter your paint product before putting it into the Finish Max. I am guessing that people who say it stopped spraying didn't strain the paint first. The tiniest thing can plug a paint sprayer or an airbrush. You can buy disposable paint strainers by the each at most specialized paint stores (can't find them at big box stores) if you don't want to buy a bundle of them on Amazon. But you will pay ABOUT $1 each vs. about 15 cents ea. on Amazon, although they may be included with the price of your paint purchase. They are shaped like a cone coffee filter and have an incredibly fine 190-micron mesh at the bottom. They will nestle right into the paint jar of this unit and you just pour your paint in and throw it away when you're done.
M**A
Bien
Excelente
S**L
Very good you need stepdown converter in India works on 120volts
M**T
Rubbish.
Literally pulled the trigger for ten seconds and it caught fire. I would give a 1 star but the seller was quick to act and I was fully refunded..
D**N
Not UK compatible
I excitedly ordered the HomeRight Finish Max sprayer not realising that this is manufactured for the US. The product image clearly shows the US socket, but I assumed that as it was being advertised in the UK it would be a UK compatible item. It is not. The cable is only about 20 inches long, which means that I would also have to purchase a US to UK Plug adapter and then a long length extention cable to make it work, besides the point that the voltage would be different. I contacted the seller who arranged the return.
M**A
Purchased in 2016 and Still Going Strong in 2021! Great Investment and Easy and Light Weight to Use
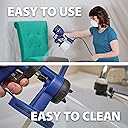
I love my Home Right Sprayer, I purchased back in 2016 and yes, I did not do a review of it till now on July 1 2021 but my Review is based on years of experience with my sprayer and not just at the point of unpacking it and one use. The sprayer is easy to use, light weight (I have arthritis in my hands and wrists), its fairly easy to clean but you need to clean it immediately and fully after each use. So read those instructions and if you've never had a sprayer before check out Youtube for videos on how to clean it. After 5 years with mine and its still going strong, I have to say cleaning it is likely what's made the difference, that and making sure my paints are diluted as advised and instructed by the manufacturer. I've used this sprayer for home use and not commercially. Though I've done repainting for family and friends.
Trustpilot
1 month ago
3 days ago