🔍 Level Up Your 3D Printing Game!
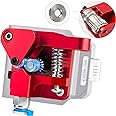
The BLTOUCH BL Touch Auto Bed Leveling Sensor is a cutting-edge tool designed to enhance your 3D printing experience. With its lightweight design, extended cable, and compatibility with various devices, this sensor ensures precision and ease of use, making it an essential addition for any serious 3D printing enthusiast.
| Brand | BLTOUCH |
| Manufacturer | ANTLABS |
| Country of Origin | USA |
| Model number | BLT001 |
| Colour | RED |
| Number of Memory Sticks | 9 |
| Item Weight | 30 g |
| Product Dimensions | 15 x 10 x 5 cm; 30 g |
| Item model number | BLT001 |
| Item Height | 5 Centimeters |
| Item Width | 10 Centimeters |
| Power Source | AC |
| Compatible Device | Laptop, Smartphone |
| Included Components | Case |
| Are batteries included? | No |
1**X
Very essential upgrade.
Almost a year ago I installed 'BLTOUCH BL Touch Auto Bed Levelling Sensor' and here I am sharing my bit of experience.For Installation you needn't be a pro but at least should have clear concept of basic circuits, wiring and should know to manipulate codes with Arduino IDE. Rest assured any good guidance from google or YouTube will sail you smoothly before you can start your first levelling with an hour or two. I needn't preach on this but its known that doing adequate online research from credible sources always helps.Once installation is done and you get friendlier you will almost forget that bed levelling was your task that couldn't be done away with. BLtouch will do its job every time perfectly. I still do the sheet of paper method once in a long while, but that doesn't feel tedious, only adds satisfaction of doing yourself that fine tuning that deviation which inevitably occurs in any mechanical or electro-mechanical setups.Its a good product and all the good things you have come across the net is true. As I use octoprint I can tell you that BLtouch plugin will make things even easier. As a tip for new user just do a bit of research and alter the sequence of default routine of home and z-axis homing before the hot-bed heats up. That will prolong the life span of the probing tip.
I**Z
Tremenda mejora para impresoras cartesianas
Hasta ahora, la más grande mejora que he implementado en mis impresoras.No tuve problemas para su instalación en una ender 3 con skr 1.3. Debo mencionar que al instalarlo en una cr10 v3, si que tuve inconvenientes, pero no tienen nada que ver en lo absoluto con el sensor vendido en esta publicación, sino con el diagrama provisto por creality para su kit de bltouch(el cableado coincidía según los datos de anticlabs y las fotos de creality pero no dejaba que arrancara la impresora). Para la cr10 v3, el cableado está invertido y no es el mismo cableado que el mostrado para el kit de la cr10 v2, aunque se supone que son prácticamente la misma impresora pero con cambios en el extrusor. Resueltos los inconvenientes con la placa de creality no hubo más problemas y funciona tal como en mi otra impresora.
D**N
Gut!
Ware wie auch Lieferung 1A !
M**T
Technical install, but the unit works!
This product works as advertised, with a few caveats. The connection from the extension cable to the mainboard is generally loose and can cause unexpected behavior if not secured. I wedged some thin cardstock in beside it to hold it tight and that finally did the trick. I won't lower the product rating for that since its a known issue in the community and doesn't reflect the actual performance of this genuine and functional BL Touch unit. Some people have attached the correct style of connector for their specific board in their install tutorials. I would not rate the install as "easy" since I do not have pin tools and opted to strip and solder the wires to connect the extension cable to the factory one. Once that was done, I fed the wires through the braided cable management compression tubes down to the mainboard and plugged it it. Having the 4.2.2 mainboard, I didn't require any additional interface equipment (transfer board). Older boards will, and you may want to look for a complete interface kit if you have an older board. This kit doesn't have a mounting bracket for the BL Touch, so I printed my own. Flashing the new firmware from creality.com/download was easy for this model of mainboard (4.2.2 or the newer 4.2.7), I simply erased an SD card, placed the new .BIN file on the SD, inserted it into the printer, and booted it up. After that finished, I wiped the card, loaded some print files, and returned the card to the printer before configuring the new setup since settings will be saved on the SD card. Overall, I am extremely pleased with the performance of the BL Touch and, having fixed my loose connection to the mainboard, the unit itself works perfectly every time. I have since upgraded to the 4.2.7 mainboard, and the unit also works perfectly with that. I have also added OctoPrint on a Raspberry Pi and the bed visualization plugin that displays the mesh data from the BL Touch in a graphical format makes it even easier to fine-tune a perfect base-level print platform so that the automatic bed leveling system has less work to do.
I**Z
Super
Realmente vale lo que cuesta.Había estado usando el 3DTouch (muy barato) por varios meses pero no me convencían los resultados al momento de nivelar la cama, ya que la repetibilidad era muy mala. Es decir, a veces la nivelación no resultaba bien. El 70% de las nivelaciones eran buenasCon este Sensor prácticamente el 100% de las nivelaciones son buenas.Tengo mas de 6 meses usándolo en una ANET A8 con RAMPS.
D**T
Made me love my 3D printer again
Absolutely the best upgrade to my 3D printer in years. Thought I was cool going to an inductive sensor a few years ago, but the BLTouch beats it hands down--I can use my ENTIRE bed surface again (rather than sticking to that 100 mm square "sweet spot" in the middle).Luckily, I already had experience upgrading the stock z-stop (from a simple micro-switch to the inductive sensor), flashing my firmware, and was also familiar with my board's servo connections (thanks to Google) ... so install took about 10 minutes including the Marlin 1.1.9 configuration tweak (9 of those minutes was just swapping the brown and red wires on the connector to match the pins on my controller board). So, I do understand some of the other reviews that state install and configuration can take some time. But it is well worth a little research and getting under the hood on your firmware. After install and firmware flash, it is a simple matter to set the Z offset (and another firmware flash) and Bob's your uncle.You will definitely need at least the 1m extension, depending on your set up (1m was perfect for my 200x200 Prusa clone) ... not sure when the included short cable would ever be useful. Thought about bumping down to 4 starts for that--but the product is just too darn good (and the options with the 1m cable is like the same price anyway). [Also, make sure you get v3.0 of the sensor--it would appear that v3.1 only works with Marlin v2--which is not fully released yet.]I don't know why I avoided the "physical" style probe (i.e. something actually touching the bed) for so long ... but this works beautifully on all bed types, is accurate anywhere on the bed, and is consistent over multiple probings.
Trustpilot
1 week ago
2 months ago