


⏰ Time is Money – Don’t Waste Either!
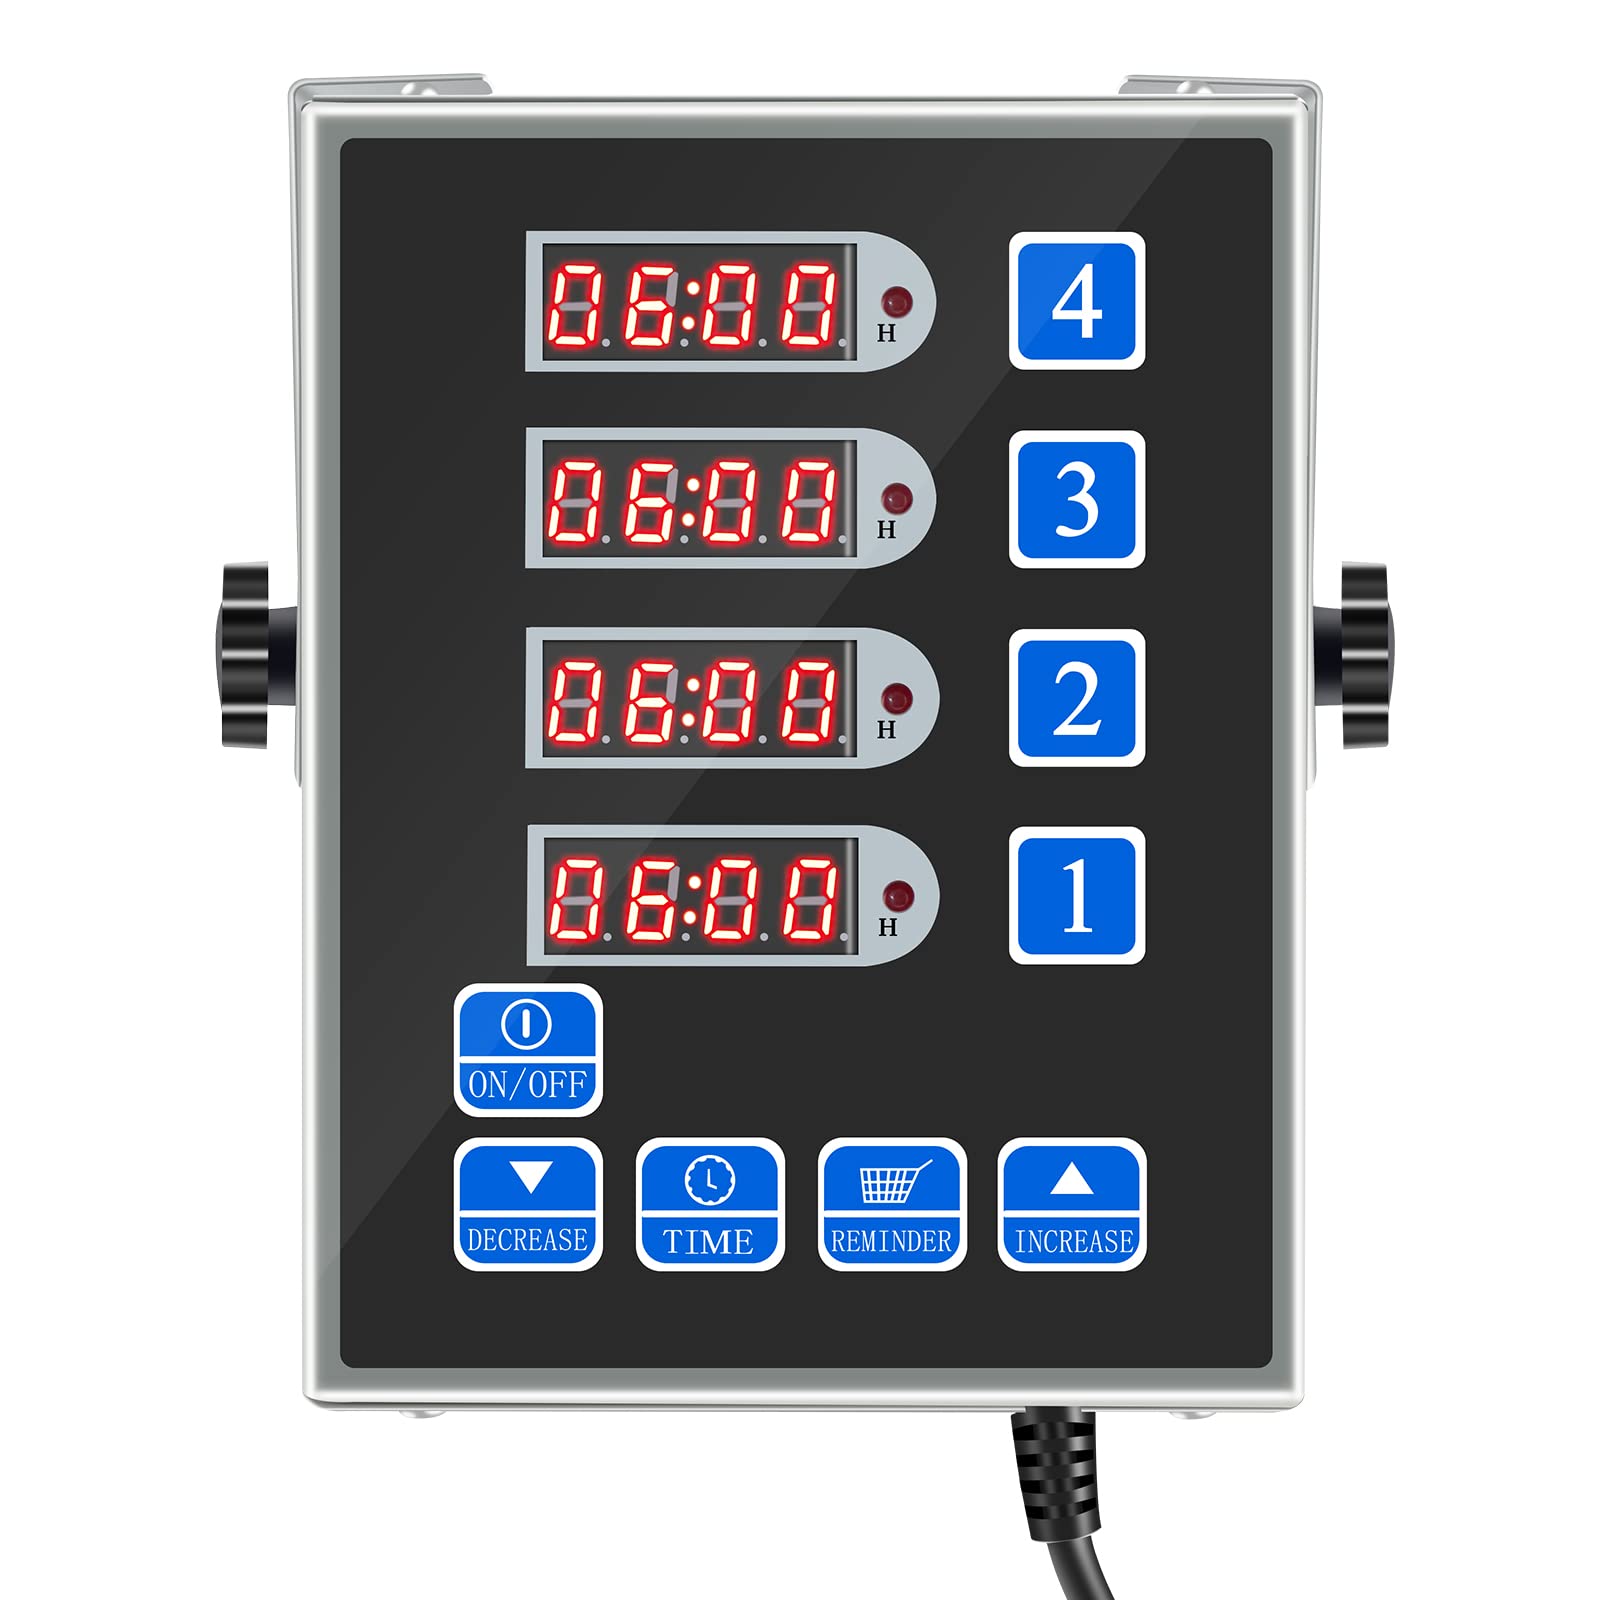
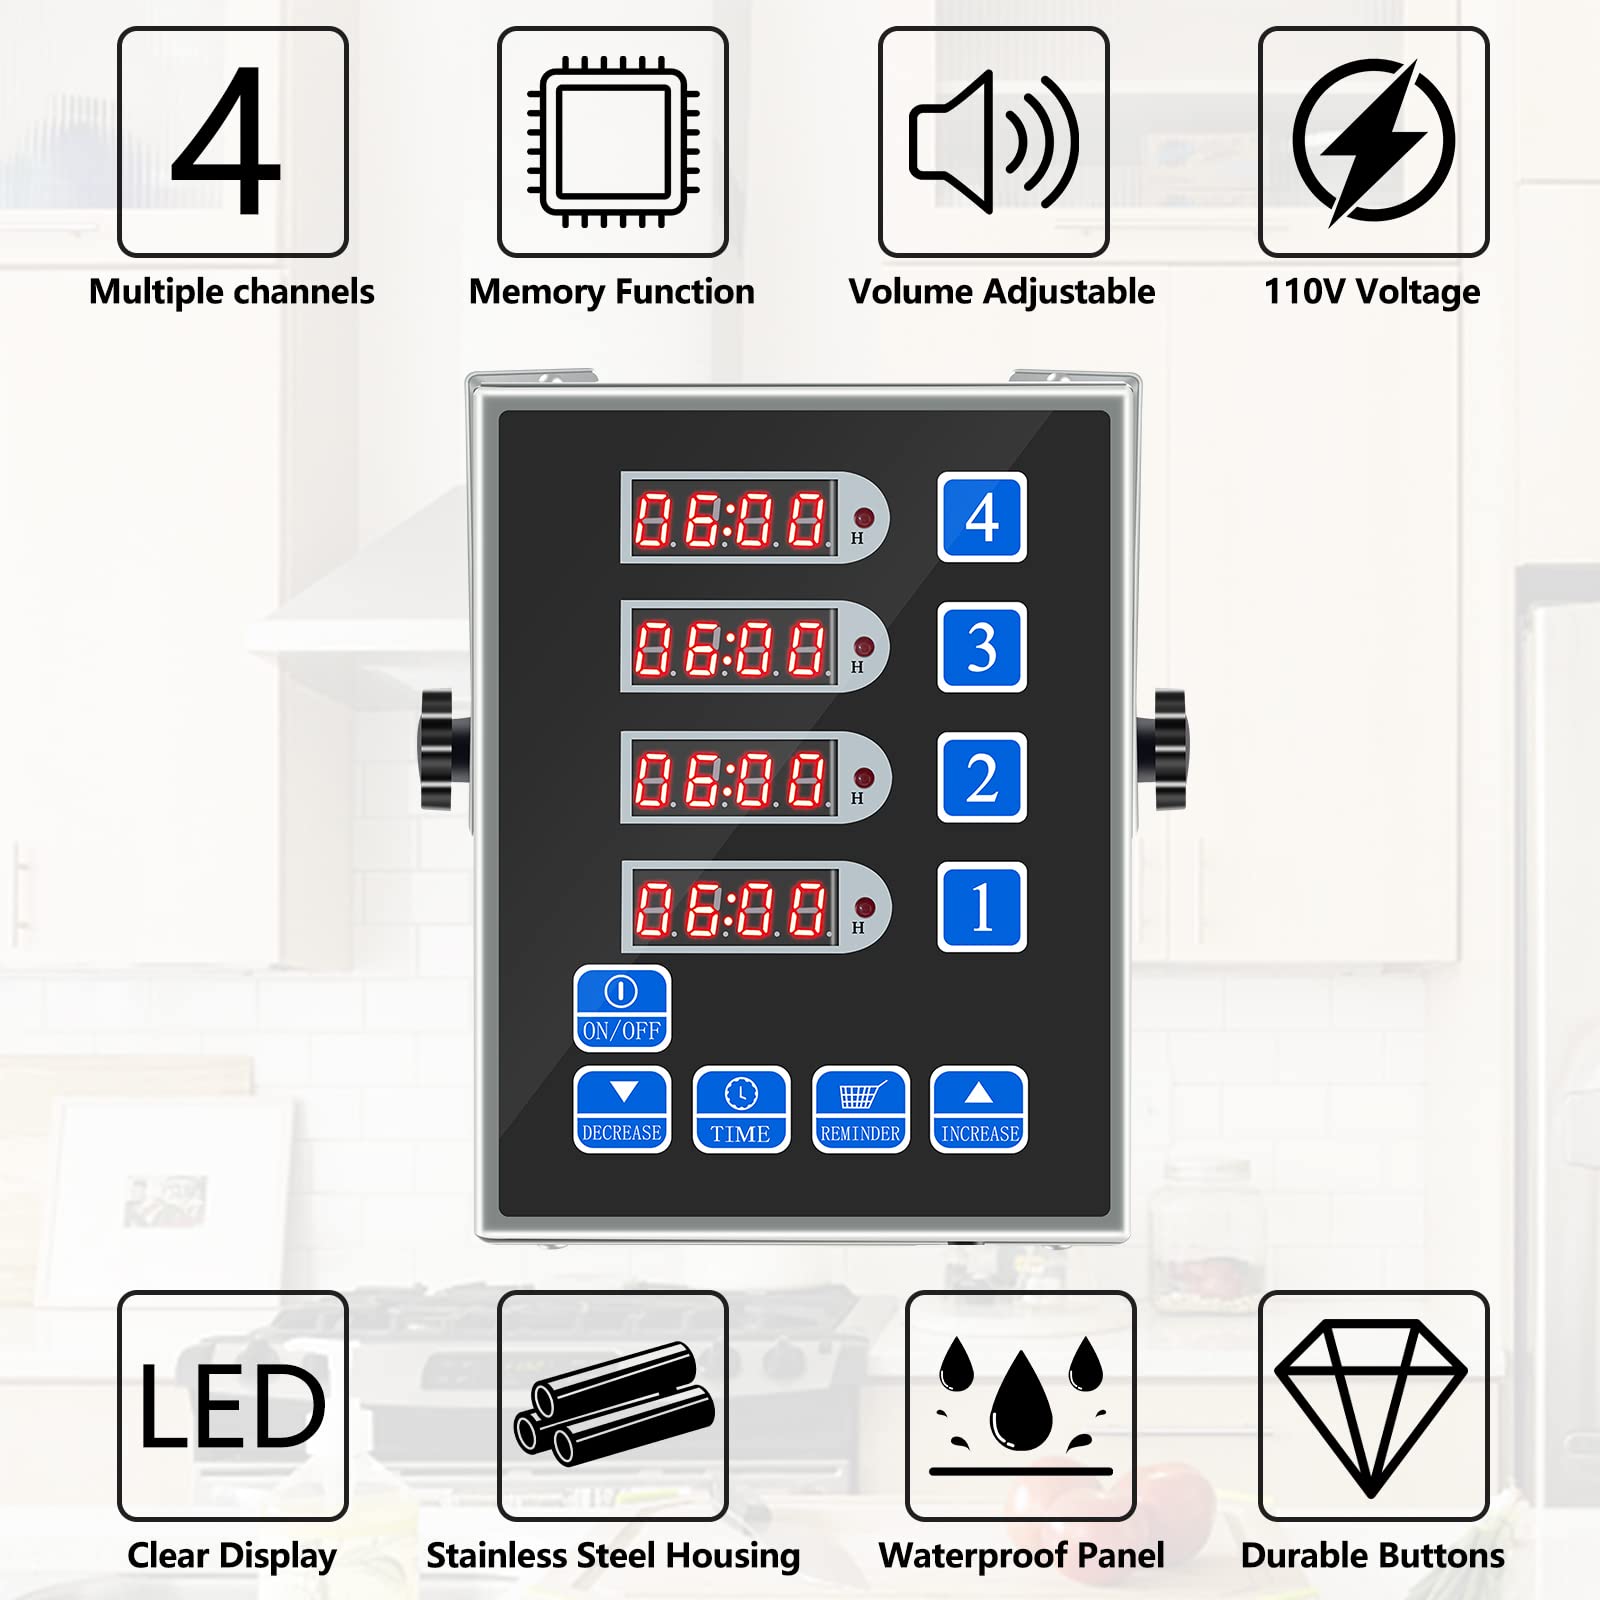
The QEERBSIN 4 Channel Commercial Kitchen Cooking Countdown Timer is designed for the bustling environment of professional kitchens. With its robust stainless steel construction, waterproof buttons, and a clear LED display, this timer is built to withstand the rigors of daily use. It features adjustable volume levels, a memory function for frequently used settings, and a versatile design that allows for easy placement. Perfect for managing multiple cooking events, this timer is an essential tool for any restaurant.
C**T
Great quality timer
Works great and perfectly loud enough! Live the multiple timers ability.
J**M
Really Loud!
I have a hearing lose and have trouble hearing a cooking timer beep unless I'm standing right next to it. I can hear this timer beep from the other side of the my downstairs basement. Excellent timer!
M**N
Fast shipping!
Took me a little bit to learn how to use it but it was pretty easy once I got it down. Fast shipping and durable!
M**E
Complicated
Takes a while to learn to use it. We haven't yet so it sits in the drawer. A timer should be simple.
K**F
If you cook often and a lot of different foods at the same time, you need this.
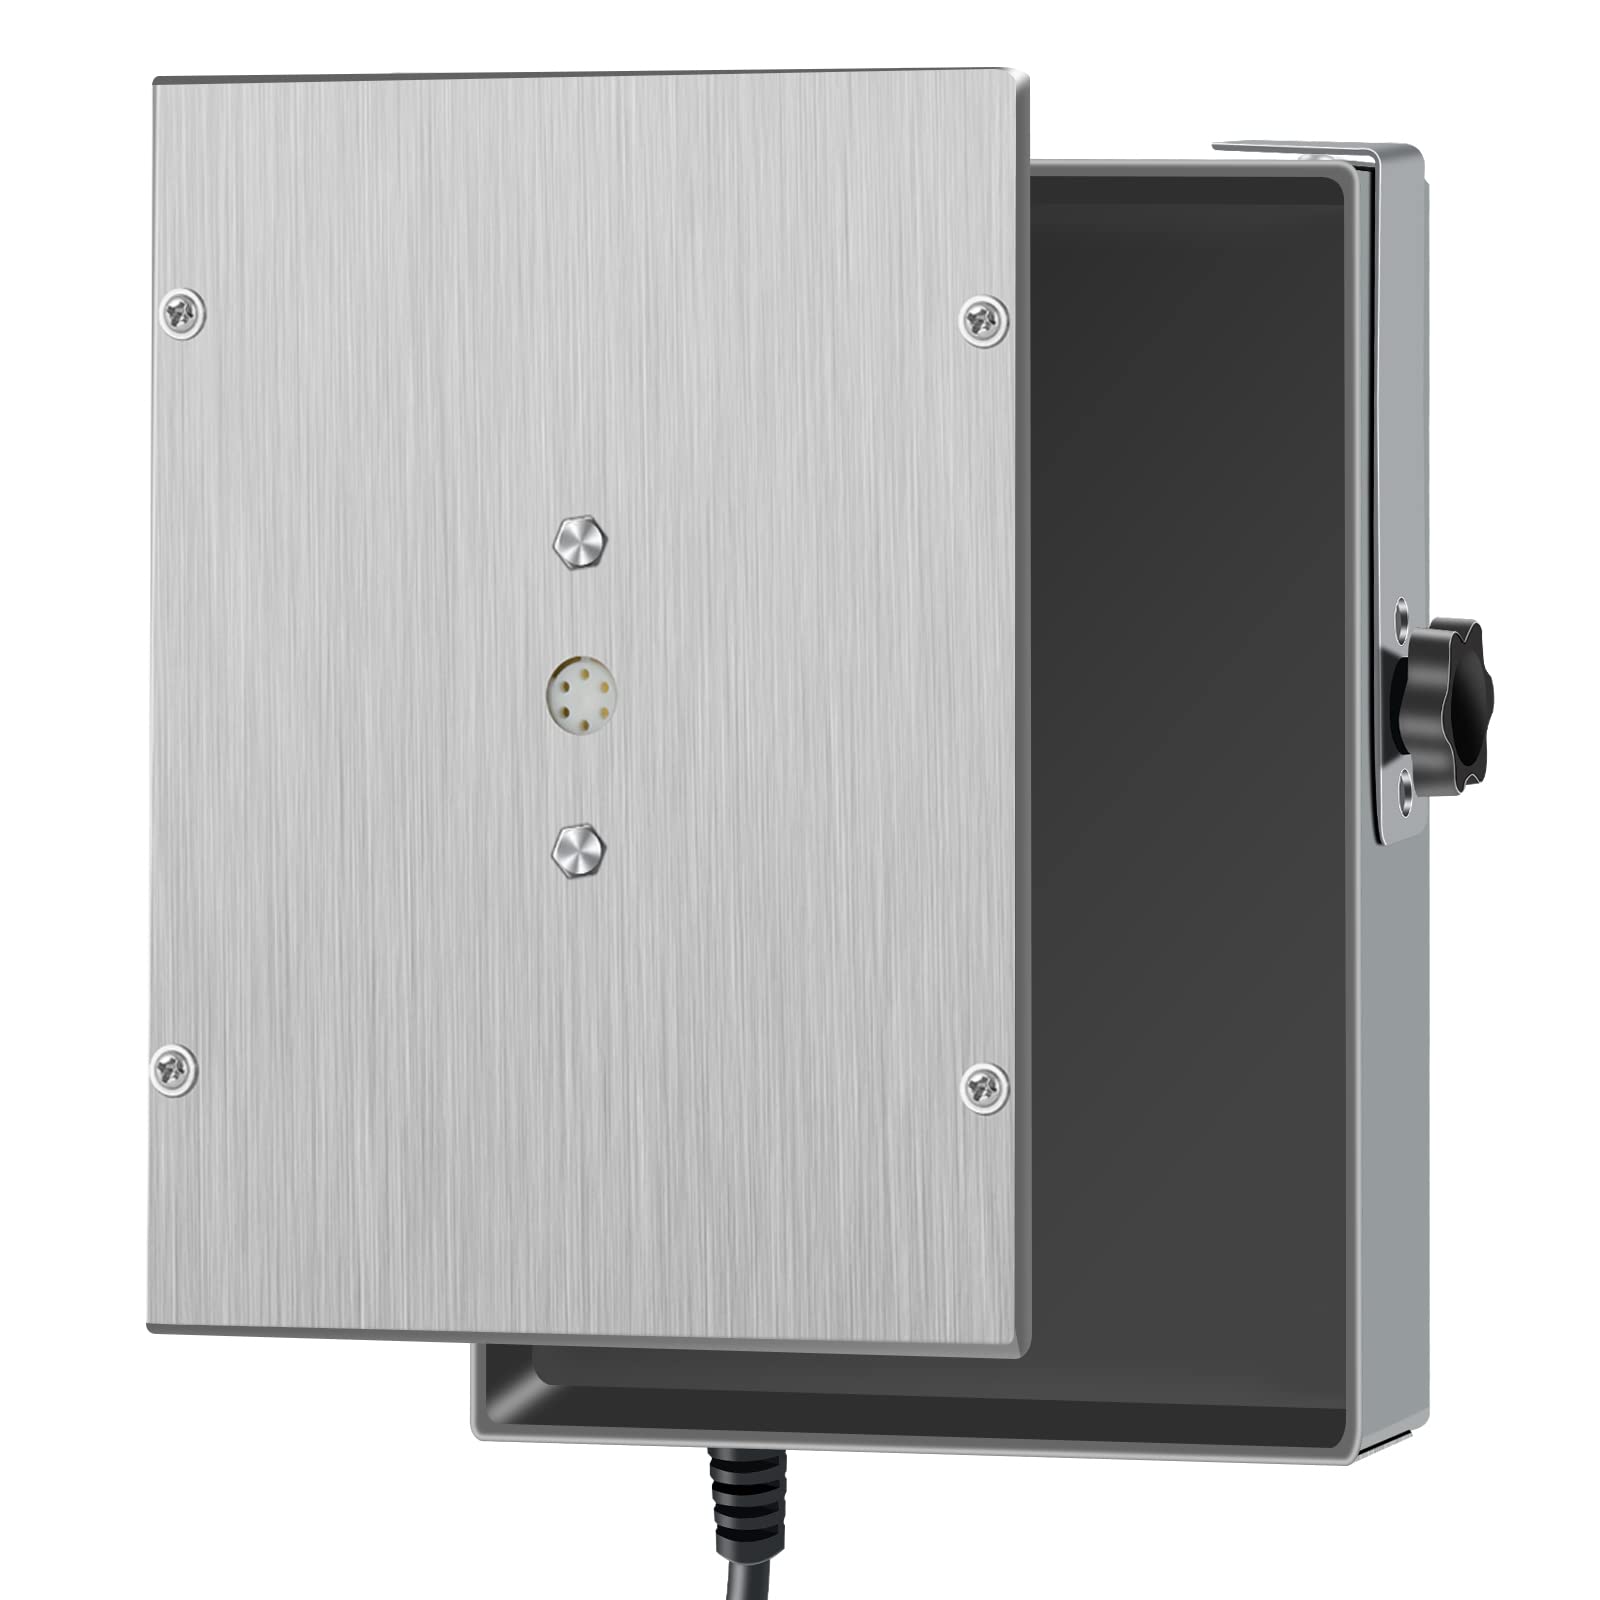
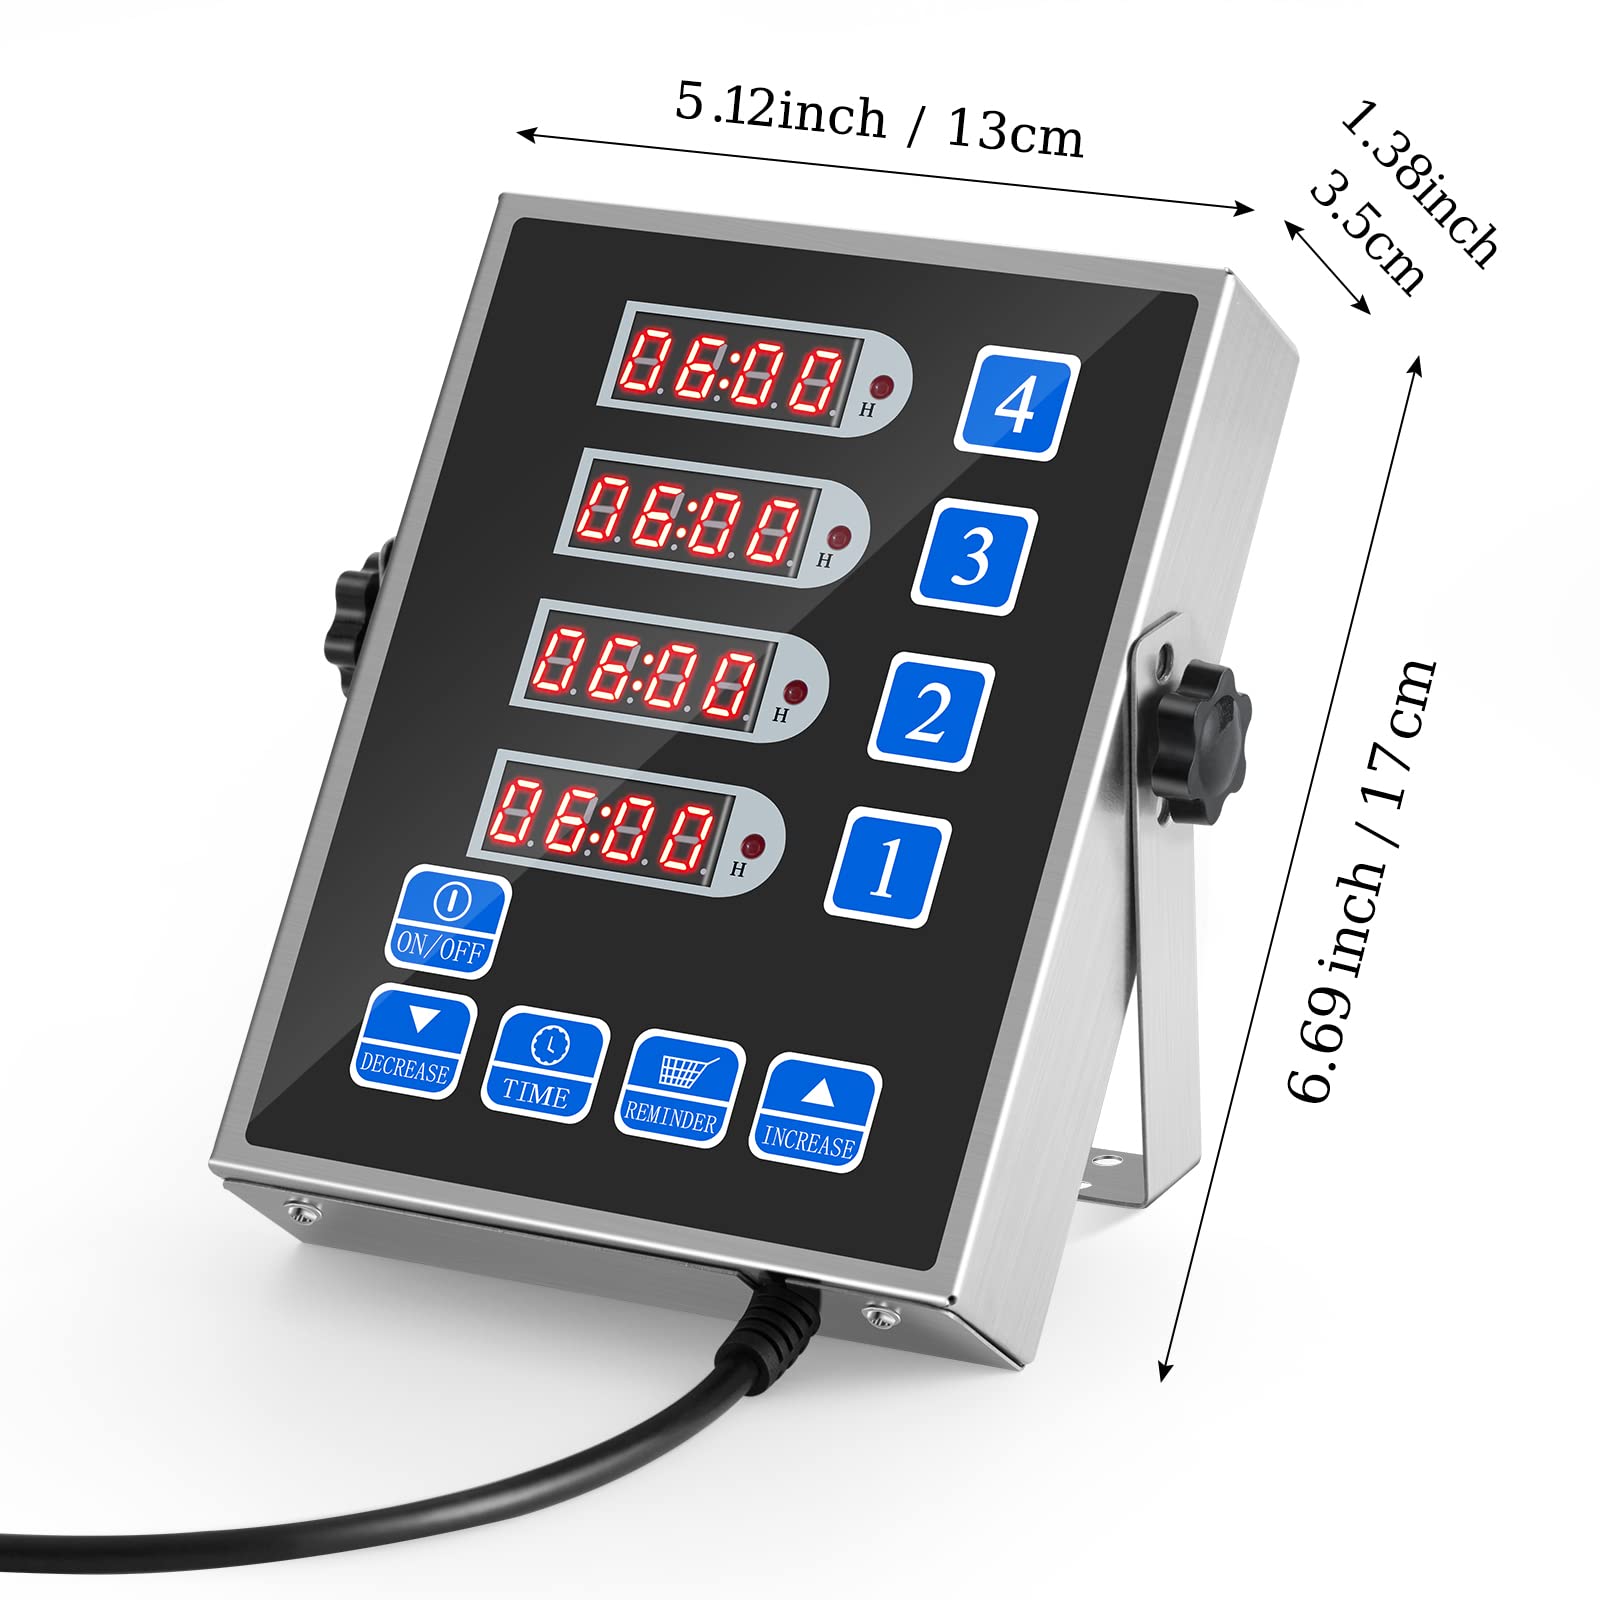
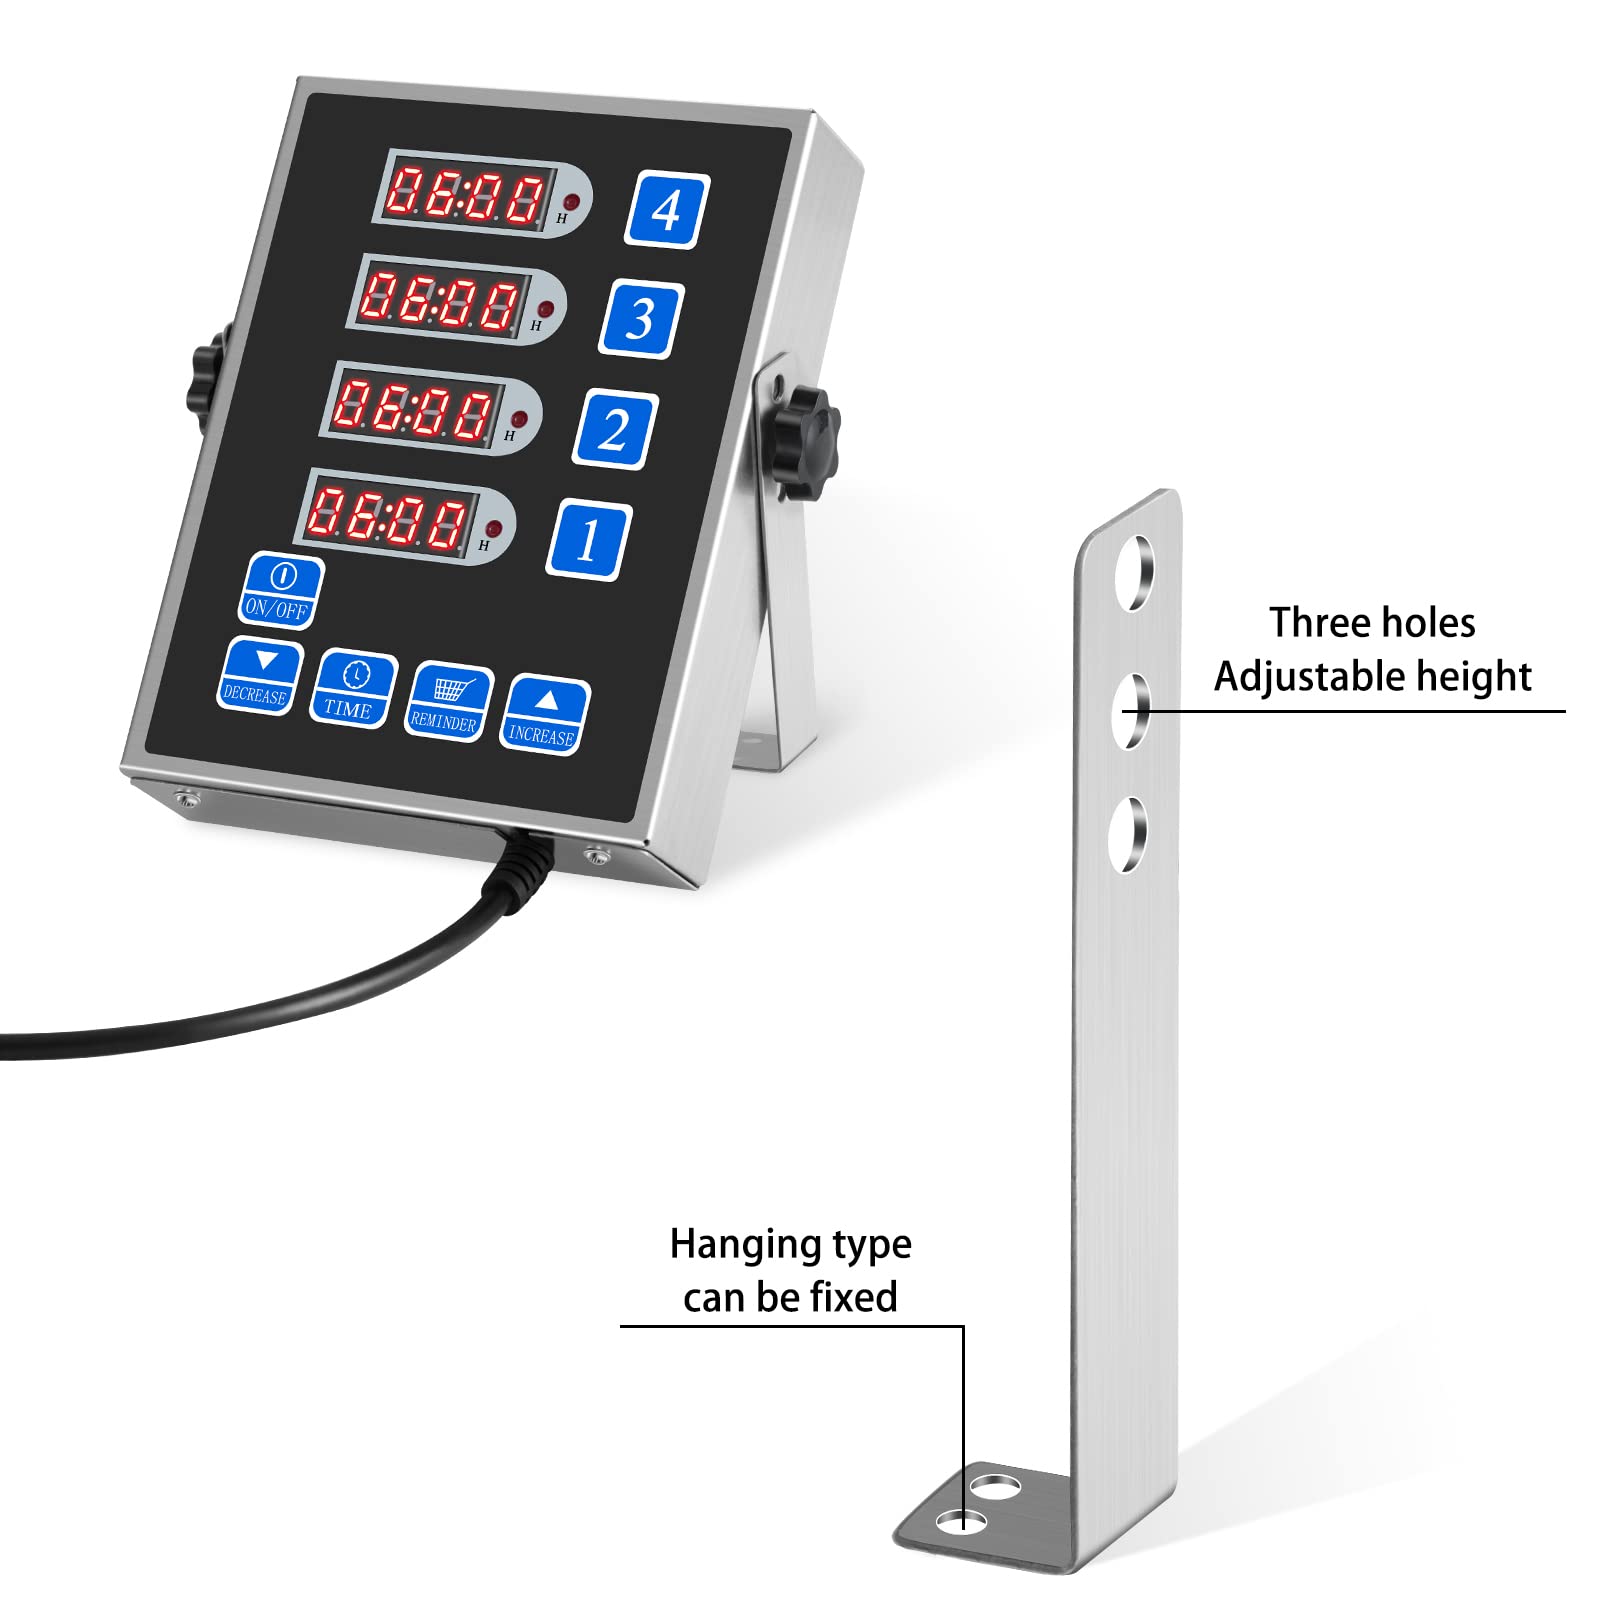
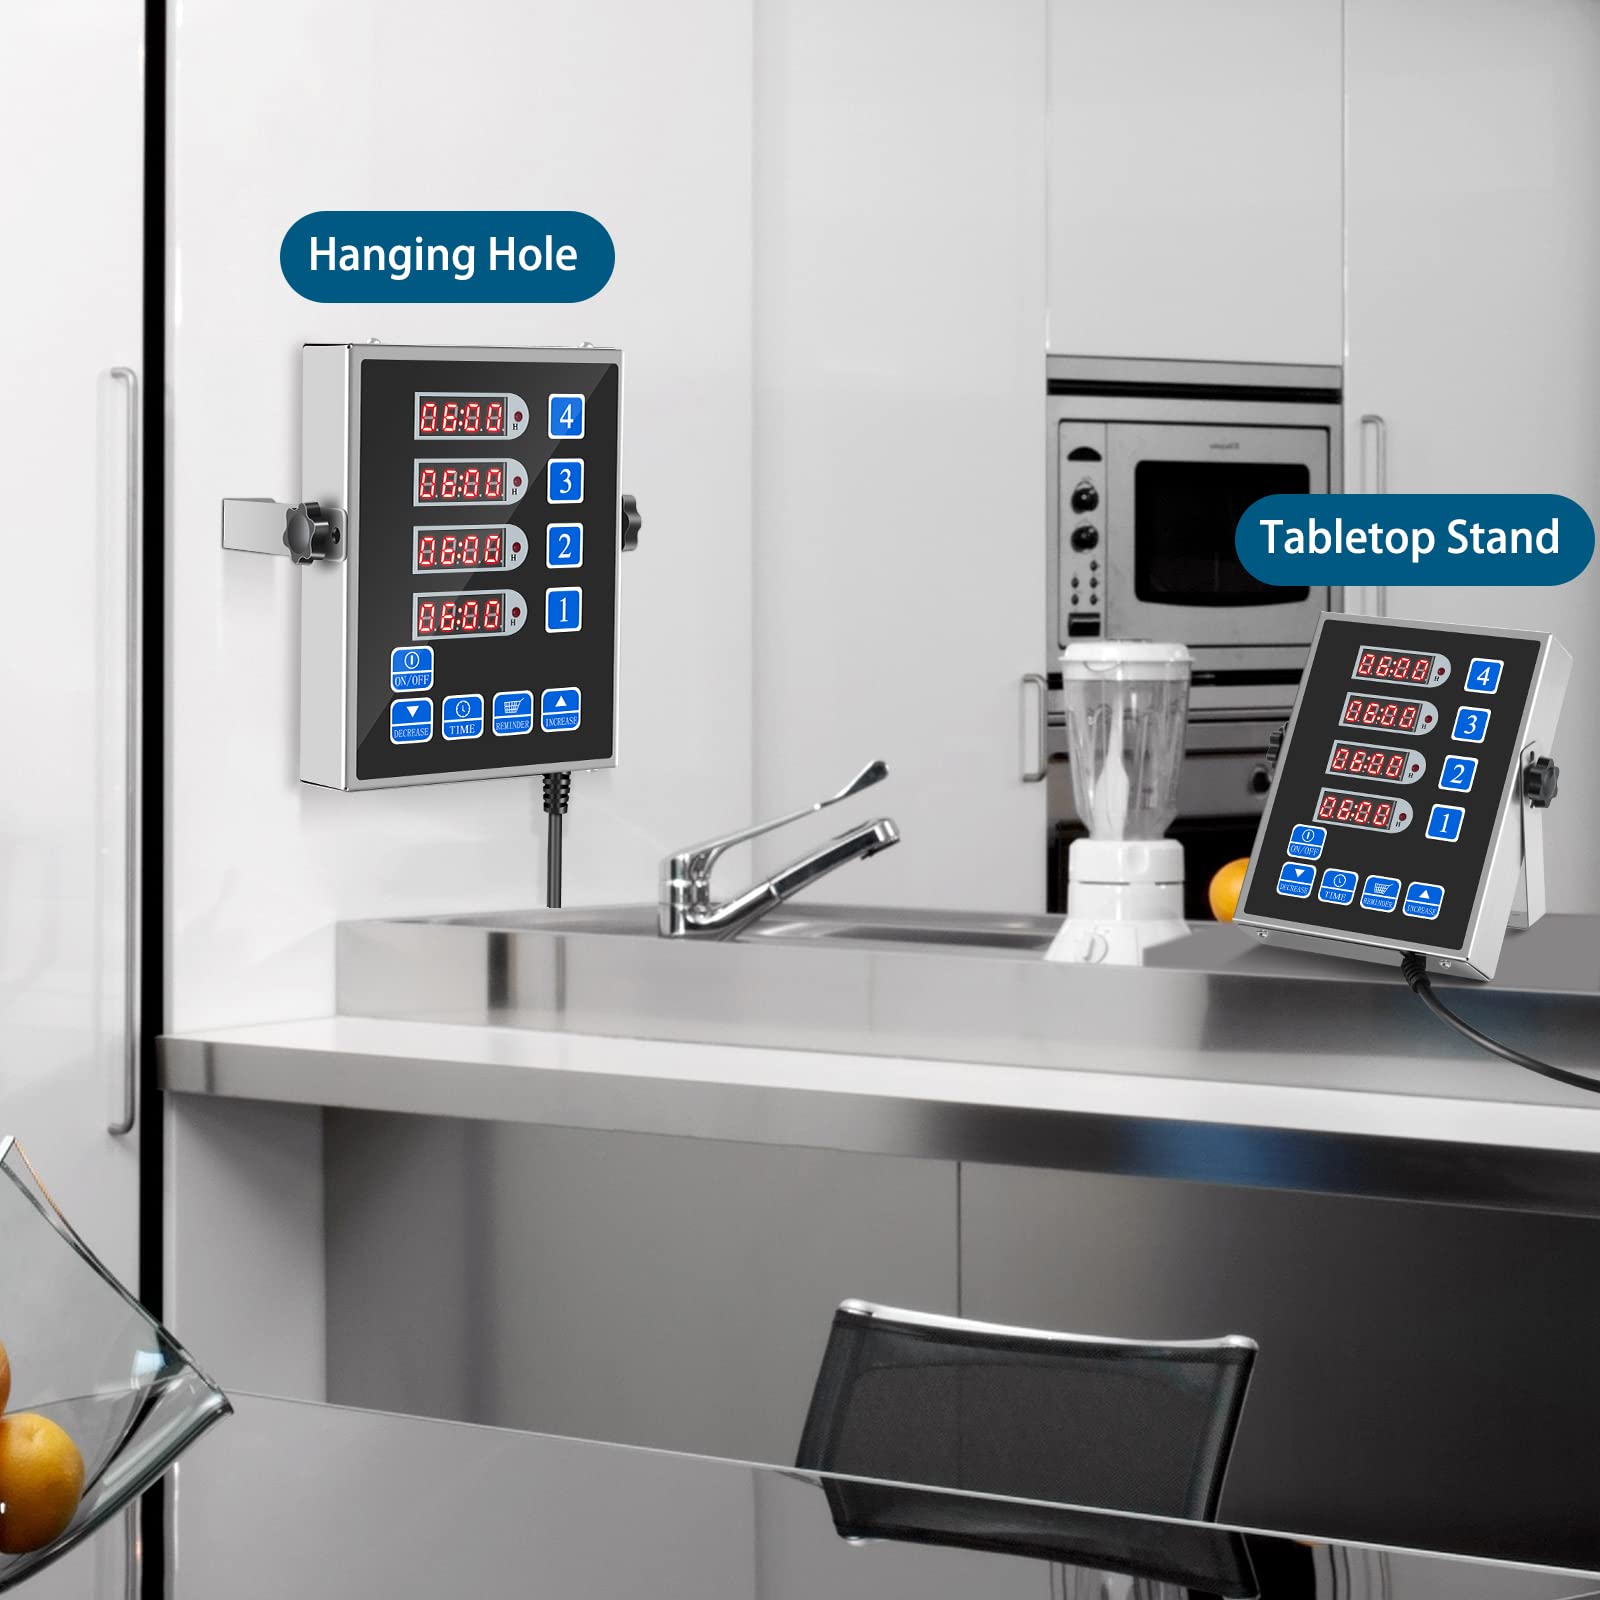
I received a commercial kitchen cooking timer. The device is 5 1/8" wide, 6 3/4" tall, 1 3/8" thick, and it weighs 1 lb. 10 Oz. On each side are two adjustable mounting brackets that can be mounted to a wall or just used as a stand. This takes up a total of 6" width. It comes with mounting screws and wall anchors.The timer is made of steel and feels rock solid. The power cord is 112" long (9' 4"). The face is black, and all the buttons are blue (high contrast). The digital readouts are in bright red LED numbers.For a really good set of detailed instructions, refer to this review: AP VINE VOICE Great for cooking big meals Reviewed in the United States on November 21, 2022 Color: Black-4channel Vine Customer Review of Free ProductI agree with everything they stated in their review.My Reminder time is 6 seconds long.I measured the dBA of several of the beeps and alarms because they are loud. In a commercial kitchen this may be a great thing. In a home kitchen it could drive me nuts.Mute 40 - 45 dBA (background noise level)Low: 81 dBAMedium: 90 - 93 dBAHigh: 103 - 105 dBAButtons: 83 - 101 dBA (just pressing buttons)This will be an awesome addition to my kitchen at home AND for grilling with multiple different products needing way different grilling times. I have spent $7-15 for individual cheap timers. Basically, you get four timers for $8 each, and with better features to boot.I believe all the statements in each of the product’s descriptions are correct and accurate.
T**.
When you're cooking a holiday feast and you don't have enough timers.
Cooking a dozen things at once gets a little daunting, especially in one oven with only your phone, a microwave, and the stove timer. I needed to keep track of pies, a ham, a turkey, sides. I put a sticky note next to what each timer was and stressed just a little less knowing I wouldn't forget something. We still forgot to pull out the cranberry sauce.
A**P
Great for cooking big meals
This is a great timer for the home kitchen, especially if you regularly cook big meals with lots of things baking in the oven at the same time. I love how this has an actual on/off button and the ability to change the volume. Other variants of this timer I have seen did not have those options, and they had to be unplugged to power off and people complained about them being too loud. Being able to plug it into a wall outlet instead of having to charge it or deal with batteries is also nice. This timer does remember your last timer settings whether you use the power button to power off or unplug it.This timer can have the sound adjusted from very loud all the way to silent. The lowest audible level is about the same volume as my oven timer. It has 4 volume settings: Silent, Low, Medium, High. I like to keep it on the Low setting. There is no indicator specifying what level you have it on, so you will need to really make sure you don't have it in silent mode if you want to have an audible alert when the timer goes off.You can set One "Reminder" per timer which will give about a 5 second alert at your specified time when the timer is running. It would be nice if it required a user action to cancel the reminder alert instead of stopping after 5 seconds, just in case you miss it, but you could probably just use a different timer slot as a reminder instead.Another caveat with this timer is you cannot switch from the minute:second (MM:SS) mode to the hour:minute (HH:MM) mode for a specific timer unless all timers are stopped. In general, you are setting timers by the minute, so having all of them in HH:MM mode is logical, but in that mode, you cannot see the seconds counting down if desired. Most things I cook take less than 99 minutes and 59 seconds, so I keep timers 1-3 in MM:SS mode and timer 4 in HH:MM mode.You can use this on the counter or mount it to a wall. I wish the cord came out the back instead of the bottom as I think it would work better that way when using on a counter. I ended up buying a cheap computer monitor desk mount for lightweight monitors and attached it to my counter. It works GREAT and I can swing it around to however I want to use it or swing it out of the way.My timer did not include an instruction manual, but I was able to get the instructions from the seller. Even then, the instructions were a bit vague and one part incorrect. I played around with it quite a bit and created my own instructions/notes for my personal reference, which I have included below. But after a short while of messing with it, it is very easy to set times and get cooking.My Instructions and Notes:### ADJUST VOLUME ###* There are Four volume settings: Silent, Low, Medium, and High.* While NOT in “TIME” or “REMINDER” setting mode, press the [INCREASE] button to increase the volume level and the [DECREASE] button to decrease the volume level.* If you decrease the volume all the way, the [DECREASE] button still makes a beep sound when depressing it, but when the timer goes off, it will not make any sound (Silent alarm).* To ensure the volume is at the minimum level without being “Silent”, press the [DECREASE] button multiple times (around Four to Five times), then immediately press the [INCREASE] button once to set it at the lowest level. Essentially setting it One level up from “Silent” alarm mode.### CHANGING MM:SS/HH:MM MODES ###* Changing this mode can only be done when no timers are currently running.* Press and hold the [DECREASE] button until all 4 digital displays show either “H-N” (HH:MM mode) or “N-S” (MM:SS mode). About Five seconds. NOTE: The manual says to press the [INCREASE] button to get into this mode, but only the [DECREASE] button worked on my device.* Cycle the modes between “H-N” and “N-S” for a specific timer by clicking its respective number button.* Press the [DECREASE] button once to save the settings and 3 quick audible beeps will be heard.* Any timer that is set to HH:MM mode will have the “H” LED indicator lit.* You may have to reset your timer volumes after exiting this mode.### SETTING THE TIMERS ###* Press the [TIME] button to go into timer setting mode. The first timer that is not currently running will have the right 2 digits blinking. You can press the [TIME] button to cycle to the timer you want to begin setting or press the corresponding number button of the timer to set.* If the “H” LED is lit, then the left 2 digits correspond to the hours, and right 2 digits correspond to the minutes (HH:MM). Otherwise the left 2 digits correspond to the minutes, and right 2 digits correspond to the seconds (MM:SS).* Cycle between the left 2 digits and the right 2 digits by pressing the number button of the corresponding timer.* After cycling to the desired digits to set, press the [DECREASE] and [INCREASE] buttons to set your desired time.* The [DECREASE] and [INCREASE] buttons can be held down to rapidly change the value. The speed that the value changes will increase if the buttons are held down for Five seconds or more.* After the times are set, press the [TIME] button until it cycles out of the time setting mode, in which case you will hear 3 rapid beeps.### STARTING/STOPPING THE TIMERS ###* Ensure you are not in “TIME” or “REMINDER” setting mode.* To start a timer, press the number button of the corresponding timer that you want to start. The time will begin counting down and the colon (“:”) for the timer will begin blinking. The blinking colon is particularly helpful to identify the timer is working while in HH:MM mode.* When the timer reaches “00:00”, the alarm will sound and the timer will display “End”. To turn off the timer, press the number button of the corresponding timer. The timer will then reset back to the original start time.* To stop the timer before it reaches “00:00”, press the number button of the corresponding timer that you want to stop. This will stop the timer and reset it to the original timer start setting.### SETTING THE REMINDER TIME ###* Each timer can have One reminder time set, often used to indicate when to shake fries, but can be used for other things.* If a reminder time is set, when the timer is started the reminder timer will start in the background at the same time. When the reminder timer has reached “00:00”, an alarm will sound for approximately Five seconds and the display will show “AL-1”. The regular timer will still be running. The reminder timer will only go off One time.* Setting the reminder times is the same as setting the timer times, except you are using the [REMINDER] button instead of the [TIME] button.### TRICK TO EMULATE A PAUSE ###* There is no timer pause option, but you can do a trick to replicate a pause somewhat.* While the timer is running, press the [TIME] button, then press the number button of the corresponding timer you want to emulate a pause. The timer will still be counting down.* When you want to pause, press the [TIME] button until it cycles out of time setting mode. The timer will still be counting down, but a new time for the timer will be set to where it was at when you first pressed the [TIME] button to begin the process of exiting out of time setting mode.* Finally, press the number button of the corresponding timer you want to emulate a pause again. This stops the timer and resets that timer to the new time it was set to.* This effectively changes the original start time to a new start time and will need to be reset back to the original start time if the original start time is expected for that timer. That may only be necessary in commercial settings though.### TRICK TO ADJUST THE TIME OF ACTIVELY RUNNING TIMER (ADD/REMOVE MORE TIME) ###* Similar to the pause trick, an actively running timer can be adjusted to add or remove more time, but the timer will still be counting down in the process, and it won’t be evident which digits of the timer are active for adjusting the time.* When adjusting the timer while it is running, it is easier to only adjust the hours and minutes. The seconds are changing too fast to effectively make those changes.* Like the pause trick, press the [TIME] button, then press the number button of the corresponding timer you want to adjust. The timer will still be counting down.* At this point, the right 2 digits will initially be active for changing using the [DECREASE] and [INCREASE] buttons, but they will not be blinking. You can hit the number button of the timer again to cycle between the left and right digits, but there are no visual cues of which are active. You will need to remember which ones are active based on how many times you hit the number button.* Adjust the times using the [DECREASE] and [INCREASE] buttons to the desired setting.* Then press the [TIME] button until it cycles out of time setting mode to finalize the adjustment.* This effectively changes the original start time to a new start time and will need to be reset back to the original start time if the original start time is expected for that timer. That may only be necessary in commercial settings though.
Trustpilot
2 weeks ago
1 month ago