


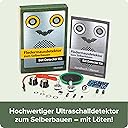


Franzis Make your own Bat Detector Kit & Manual
Product ID: 61102694
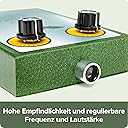
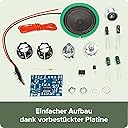
Belauschen Sie die Natur mit moderner Elektronik. Die Rufe von Fledermäusen kann man nicht hören? Mit den richtigen technischen Hilfsmitteln schon - und nicht nur das. Bauen Sie Ihren eigenen hochwertigen Ultraschalldetektor und erleben Sie es selbst! Dieser Bausatz macht daraus eine leichte und fehlersichere Übung: Die Platine ist bereits mit zahlreichen SMD-Bauelementen bestückt. Sie müssen nur noch wenige Teile selbst einlöten und die Platine mit Mikrofon, Lautsprecher und den Einstellreglern verdrahten. Moderne integrierte Schaltungen sorgen für hohe Empfindlichkeit und Lautstärke. Und dann können Sie auf Entdeckungsreise gehen: Mit dem fertigen Detektor lassen sich die Ultraschall-Rufe von Fledermäusen hörbar machen. So können Sie diese faszinierenden Flugkünstler in der Dunkelheit auch dort aufspüren, wo sie sonst völlig unbemerkt auf der Jagd nach Insekten sind. Aber nicht nur Fledermäuse, sondern auch zahlreiche technische Geräte senden Ultraschall aus. Sie werden überrascht sein, von wie vielen unhörbaren Schallquellen wir umgeben sind. Verleihen Sie Ihren Ohren Superkräfte: 20 kHz sind nicht genug! Benötigt werden: Lötkolben für den Aufbau, 9-V-Batterie für bis zu 25 Stunden Beobachtungszeit Für Kinder unter 14 Jahren nicht geeignet! Listen to nature with modern electronics. Human ears cannot hear the cries of bats? With the right equipment, you can - and you can do much more. Make your own premium ultrasound detector and experience it yourself! With this construction kit, this will be an easy exercise that cannot go wrong. The kit contains a circuit board that is already equipped with various SMD components. You only have to solder some elements yourself and wire the circuit board with the microphone, the loudspeaker and the adjusters. Due to modern integrated circuits, the detector will be very sensitive and powerful. Once it is built, you can start exploring and discovering: with the detector, the bat's ultrasounds can become audible for humans. That way, you can trace those little flight artists in complete darkness even at places where they would hunt for insects without being noticed. But not only bats send ultrasounds, there are also many technical devices which do the same. You will be surprised at the number of various inaudible ultrasounds that surround us. Give your ears super powers. 20 kHz are not enough. You will need: soldering iron, 9 V battery Not suitable for children under 14!
| Dimensions | 11.2 x 3 x 16 cm |
| Edition | 14th |
| Isbn 10 | 3645652760 |
| Isbn 13 | 978-3645652766 |
| Item Weight | 150 g |
| Language | German |
| Print Length | 68 pages |
| Publication Date | 30 July 2015 |
| Publisher | Franzis Verlag GmBH |
| Reading Age | 6 years and up |
User
Bats from the belfry
Most summer evenings we get bats flying through our back garden. So I had a sudden desire to be able to hear them as well as see them. After looking at bat detectors, most of which are £100 or much more, I decided this kit at £20 ish, would be adequate. The kit finishes up being built in a thick cardboard box and requires a bit of soldering. Assuming you own a soldering iron (and can use it) , solder, wire cutters and have about an hour to spare, building the kit is fairly straightforward. The instructions are reasonably easy to follow and our detector worked first time, incidentally you will need a PP9 battery. At the risk of patronizing everybody to death: bats use very high pitched squeaks of sound and listen for the sound reflected back to detect objects and insects etc. The sounds bats emit are far beyond the frequency range of human hearing, so the detector essentially converts the bat sounds down to a frequency that humans can hear. In practice, we found that passing pipistrelle bats were easily detectable at about 50 metres. You will hear a series of clicks as the bats find their way about. I have also found that if you flick tiny pea sized pieces of bread into the air in front of passing bats, they will home in on them as they probably look like a tasty treat to the bat, however they will discard them and it probably annoys them so only do it a couple of times out of interest. The volume and frequency of the detector may be changed to suit the type of bat you are observing (as different species of bat emit sounds of different frequencies). However, since there is no way of reading the frequency being detected, it is largely down to trial and error. In conclusion: if like me you just want to hear passing bats and can solder a bit, this kit is probably for you. Perhaps if you are then sufficiently interested, you may then move on to a more advanced device.
User
Good, but has some issues worth mentioning...
**EDIT 23/06/2020**Added a short two minute video of bats at dusk complete with the kit's audio in the background.***********************In a nutshell;Average build skills required, works well at a very good price and allows a cheap introduction into bat ultrasonic detection. Not really suitable for long-term or in the field use.Basics:You can get away with just a standard electronics (30-40w?) soldering iron, solder, ruler, snips / pliers, small flat-head screwdriver and a PP3 9v battery to make this kit, but a few other things that would make it more comfortable and which are worth mentioning to have to hand are;-Wire strippers; you can easily use your nails or teeth, but wouldn't hurt to have some handy.-Pliers / old scissors; to cut off excess component legs after soldering, and holding the control dial nuts when tightening.-Set of small sockets / spanners possibly for the nuts too.-Some sort of spring-clip "Holding" tool, to keep everything in-place as you solder it.-Adhesive / Hot glue gun / velcro pads / tape etc. to hold the battery in securely, and secure other parts as you see fit.Pros:-Very cheap option by comparison to other devices; over 50% cheaper than the cheapest ready-made bat detector available at present, as far as I can see.-Circuit board well made and of good quality.-User build guide was substantial and covers not only the build, but circuit and component theory, as well as aspects such as bat behaviour (but see caveat below)-User guide can live inside the cardboard case, as there's plenty of room.Cons:-Even with some soldering experience, I found completing the kit quite fiddly at times; I'd not build a kit like this for years and everything seemed so much smaller than I remembered to solder.-The guide does have some flaws aka mistakes that are likely to stop some people finishing it; the position of the four capacitors needed to be "worked out" from the images, and the omission of guidance for the transistor fitting process is a bad oversight. That said and with a common-sense approach, these aspects can be overcome.-There are no frequency markings on the box printed graphics, so when the manual and other guide books refer to 40Khz you must make an assumption as to where that "is" on the dial based on the minimum and maximum rated levels. I'd suggest making manual marks as reference points once established.-Being made of cardboard this does come across a device designed for limited use only, where the elements cannot get to it. For me and as I've said below, this isn't an issue as it's not something I intend taking "into the field" regularly and was bought and built more for a one-off curiosity use. If you want something to use season after season, you might want to look elsewhere or consider housing the the kit inside a more sturdy / waterproof plastic container as some other purchasers have done.Background:So, my reason for buying this "bat Detector" kit was because we've a number of bats that have started flying around our house at dusk, and with a curious seven-year old I wanted to see if I could do more than video them for her, especially when I was trying to explain how they fly and navigate by using "noises that humans can't hear".I had an inkling that they were expensive to buy and not really suited to my use, which was likely to be just once or twice and so I didn't want to spend too much money on one. Having found from some quick Internet searches that the cheapest was around £70 and that I could even pay £800 or more should I wish, I decided to look at other options.I tried contacting a few places to see if I could hire one for a short period but that didn't lead anywhere, but in researching that angle I stumbled across this German-made Kit from a company called "Franzis". In some respects, it seemed too good to be true; only £30 for a functioning bat detector, albeit it was part-built kit which just needed some finishing off.Build:Deciding that for £30 I would risk it I was very pleased with the quality of the kit; sold as a book, it comes as a cardboard-sleeved "box", hinged on one side and made of sturdy card (think of the birthday gift boxes you can buy from greetings card shops), pre-printed with some simple graphics. having slid off the matchbox-style sleeve, you open the box and inside find the rest of the components in a selection of plastic bags. Removing those reveals the box has pre-punched holes for the ultrasonic microphone, control dials, and a prebuilt slide-in speaker holder. Along with the parts comes an impressive-looking guide and user manual, which was more than I was expecting; I thought it was likely to be just a single sheet with poorly translated instructions, but this was a lot better, even with the few errors which I'll cover shortly. It went as far as explaining the circuit in use, ultrasonics in general and explained in clear terms what sort of performance to expect, and troubleshooting you could perform.Moving onto the actual kit and assembly, the first action is to push in the microphone, and control dials and get them in-place. The guide suggests you might need some needle-nose pliers to help do up the nuts that hold on the dials, but I found it was satisfactory to just use my fingers. A set of small socket wrenches might be useful too, to have ready. The speaker supplied simply slides into it's housing, and although the guide suggests using some adhesive to fix it in place, I found the fit was snug enough anyway... plus I didn't want to glue anything until I'd not only "dry-fitted" everything but also not until I'd assembled it and tested the unit thoroughly.Once that's done, the job of assembling and soldering the kit proper starts. This is very much a "finish it off"-kit and 95% of the parts are in place already. All you need to do is push one integrated circuit "chip" into place, four capacitors, one resistor, one transistor following the instructions for the correct polarity of the components, and solder some wire connections into place. These wire connections are made up using a large length of wire included which you cut to size as per the instructions. There's a lot given, so you have plenty over to cover mistakes. There's also the request to save any of the component "legs" you clip off as you build, as you'll need these later.Having followed the preparation guide, cut the required wires, tinned all the ends and so on, I started to solder in the parts. The IC was fine, but I hit my first snag with the capacitors; the guide references that there are four; 2 x100uf and 2 x 10uf, and names them one to four, but doesn't guide you to which ones you put where. Looking at the circuit board, it doesn't have the values marked at each capacitor's location, and doesn't use these names either...Overcoming missing manual information:After a bit of head-scratching, I looked more closely at one of the circuit board pictures in the guide (back and white, and not the best reproduction) and realised that you could see the two different sizes of the capacitors and that showed me where to put them; one big, one small, one big, one small, across and then down the board.The second snag came up at this point as I was directed to move on to the board connections to the external parts "now that the components were all installed", but I found I still had a transistor spare, and a clear place for it to go on the board. I re-read the manual a few times, and couldn't see any reference to this component at all. Using the component guide on the board itself for it's orientation, I soldered it where I believed it to go for now, but was disappointed at the oversight.So, with the seven components soldered in place I moved on to the inter-connections. This is where the clipped off legs from the capacitors come into use; You use them to make connections between the rotary controls, the board, and the speaker. Making these connections gives the kit a good level of rigity too. The final steps are to use the 5 lengths of wire you cut to length and tinned to make a few more interconnections and solder the positive and negative wires coming from the 9v battery harness.There are no instructions for fitting the supplied dials to the rotary controls, but this turned out to be a simple matter of loosening a grub screw in each dial, sliding it over the rotary control's post and securing the grub screw, once the correct notch position had been found (for the volume dial, it makes a satisfying "click" when it latches off and on, so I adjusted the dials white line marker to coincide with this point so I should be able to see when it's off at a glance). One grub screw was missing from a dial but I found this loose inside one of the bags, so no worries there.Build time was around 20 minutes in-line with other reviews.Testing:The manual covers testing and troubleshooting very well, and having inserted a battery into the harness, I was able to tune the unit as directed and ran a few simple tests using my fingers to produce ultrasound as guided and the unit performed perfectly; the range of tone changed correctly as I worked through the dial's range and I didn't notice any discernible "hiss" / feedback or anything from the speaker. The volume was fine for me too with no issues.Testing with real bats:**UPDATE 25/06/2019; I finally got a chance to test this when the bats returned recently, and was very pleased indeed by the performance; having seen a bat flying around and above my back garden I grabbed the device, connected the battery, switched on, set the frequency dial to about half-way between the minimum and maximum ranges, and the volume accordingly. Immediately as I pointed the device out of an upstairs window towards the bat I could hear the re-modulated sounds of the bat, and with a slight adjustment to the frequency dial, I "homed in" on the frequency to make it clear and loud.it was fantastic to hear the staccato ultrasonic sounds the bat was making, and hearing them change as the bat flew around and in different patterns... my immediate reaction was to liken it to listening to a "space battle" sequence of a film like say, "Star Wars", where the Tie Fighters zoom in, loose off a salvo of laser shots, then peel away again; as the bat heads towards you; the sound grows in volume, and then changes and eventually dies the bat turns sharply and away... until it's next "run".On another occasion, I'd not seen any bats but decided to leave the device on the window ledge with the window open, switched on and with the volume up. That way I could get on with something else, but still be in earshot in case it "went off". Sure enough, around 15 minutes later, I heard the unmistakable chitter of the device as a bat must have flow past close by.Very impressed with the tone, volume, and overall performance with real bats. ;-)Overall:Pleased with this on price alone for my limited use needs; Only wanted something for a one-off, but didn't want to pay £70+. I've not even bothered to fix anything more securely in place with tape / glue as it doesn't feel like it needs it. Might fit it into a storage container (like for sandwiches) if one comes my way. Even a ready-meal plastic lidded carton might work, giving a level of waterproofing. You could even use hot glue or similar to make it more waterproof. Keeping the detector in a sealed plastic container / tub and adding a packet or two of desiccant would also help guard against moisture ingress.Don't feel able to give it a full five stars due to errors and omissions mentioned above, mainly with the user manual.Worth mentioning that I wouldn't leave the battery connected if the device is to be unused for long period, say over winter; I'd unclip at least.
User
Lots of fun!
My son had great fun putting this together although he bought a plastic casing for it instead of the cardboard one it came with. We have been using it in our garden and it works very well picking up bat sounds from quite a distance away, on a few occasions I think the bats even picked up their own sound as the came right down and flew very near over my head. It doesn’t identify which bat you have spotted but even so a great little starter kit with the added bonus of the price being much less than ones already made up, infact the fact you have to make it up adds to the whole experience and makes it a really satisfying. We have had much fun with this little device this summer. Highly recommended!
User
Brilliant low-cost bat detector kit.
I had no real issue building the kit. I just made sure I read the instruction manual well and got the orientation of each component correct. Having said that I have done some soldering before and can well see that that someone who has no experience could find it intimidating. I'd say watch a few YouTube videos on soldering first, and if you're still intimidated find a friend or relative who has done some soldering before. The kit worked first time for me. It has given myself and family hours of entertainment listening to bats in our garden. It costs a fraction of what a ready-built kit costs. It is not perfect, it is a bit flimsy (contained in a thin cardboard box) but nevertheless its great value if you can build it correctly.
User
It works!
I've given this 5 stars becausea) despite my ham fisted and out of practice soldering with a soldering iron too big for the project, it worked as soon as I connected up battery andb) it is very good value.If I was making it again I would not glue in the speaker until the end. I had the speaker connections in a position where the suggested rigid wires would not reach the circuit board, so ended up using flexible leads and fixed the circuit board to the box with self adhesive sponge pads.Unfortunately I bought this in February, and just got around to assembling it in November, when the bats have all hidden away for the winter. When they come out of hibernation, and if it actually works to detect bats, I might move the electronics into a plastic project box, and perhaps add an earpiece socket.Edited and updated today (8th June 2020) to say that now the bats have come out of hibernation I have had a chance to test it for real, and it really does work. One very happy bat detectorist here!
User
Good once it's built
Instructions could be better, as some steps are just skipped. That said, the instructions existing at all put this item way above most DIY electronics kits. And they're probably still the best instructions I've yet seen, if only because the competition sucks.Assembly itself was straightforward. Pads on the PCB accepted solder very well, and the battery-connector wires were already tinned at the ends. The surface-mount bits are already attached, so this is suitable for inexperienced people. Just pay very careful attention to the instructions, and be sure to cross reference the text descriptions with the components list and the photos. (The photos are black and white, but perfectly adequate for seeing what goes where.)I think they must have changed a supplier since the instruction booklet was printed. One component is described as being impossible to seat incorrectly, as its pins are in a triangular layout, matching the holes in the board. But the pins were actually in a straight row. Luckily, the silk screen showed the shape of the component, so there was no real mystery, but it would certainly be just as possible to insert wrong.I didn't use the included enclosure, as I had a waterproof one lying about. You'd certainly want a chunky rubber band to keep the cardboard enclosure shut.I've just got back from a trial run of the finished device in our nearest park. I was pleasantly surprised that not only did it work (kits from online sellers do sometimes turn out to be bricks) but also that I started hearing the click-click-click of bats almost straight away.On the whole, I'm very pleased, and would recommend.
User
An absolutely brilliant product!
This is a superb product for those of us who want to hear bats! For just £20 the kit has been extremely well thought out. The instructions are clear, but do require very careful reading and a dry run with components so that you understand the orientation and don't confuse any of the parts.This kit requires precise soldering, a narrow point on your iron is a must. I found using thin, cored best, and I adjusted my iron to 250 degrees (you may not have this option). I also recommend getting a small pair of wire snips and long nosed pliers for positioning the wires that hold the board in place and trimming them after soldering.Yes, it is fiddly but a little dexterity and planning and it all goes together beautifully. The box that it comes in becomes the detector's case and is quite sturdy. I held the battery in place with Velcro pads from my local stationer. I also keep it closed with an elastic band.I highly recommend this product, but only to those who possess the ability to make it and appreciate that it only costs £20, so don't expect a Rolls Royce!!!
User
Great and cheap bat detector.
Just finished making mine and it works straight away. Good directions and easy to follow. I did use better quality red wire as I thought that the supplied wire was a little flimsy. Other than that I'm very happy.Bought a 2nd one and fitted it into a small electronics case. Looks the Bees Knees and works as well as the cardboard version. I'll convert the other one too into the second case that I purchased. See pictures of empty case.
User
Value for the price
While the 'kit' form may require soldering skills that some will find too challenging, it also allows a bit of flexibility in the build. Rather than the cardboard box provided, I used a plastic sandwich box, and added a mini phone jack and a switch to select the jack or the provided speaker. I'm quite pleased with the result. Be advised that a soldering jig is almost a necessity for attaching the tiny wires and components.
User
Argh!
I bricked the PCB, so do follow the instructions carefully. Not like me :(
User
Funktioniert gut und die verwendeten Teile sind Hochwertig
Der Detektor funktioniert nach dem Mischerprinzip und das hat der Entwickler sehr clever umgesetzt:Das eigentliche Herz der Schaltung ist ein CD2003 Radio Chip :-DSomit kann man, wenn man das Ultraschallmikrophon durch eine entsprechende Induktivität (Spule) ersetzt Radiosender hören. Auf Youtube gibt es dazu und zu weiteren Experimenten viele Anleitungen vom Autor (der Kanalname "bkelektronik" dürfte für Burkhard Kainka stehen) aber auch von anderen.Ich habe dazu das Mikrophon nicht verklebt, sondern von Außen nur eingesteckt und von innen wird es mittels Lötschuh verbunden, somit kann ich es im Falle des Falls auch in das Gehäuse legen um es beim Transport zu schonen.Die Verbauten Teile sind wirklich Hochwertig: das Gehäuse ist die Schachtel in der der Detektor geliefert wird und besteht aus dicker, lackierter Pappe, die sich nicht verbiegt. Das Mikrophon ist robust und die kleinen Anschlusspins passen ziemlich gut zu den kleinen Lötschuhen.die Potis (aus Metall, nicht Plastik) sind groß und die aufgesetzten Knöpfe werden verschraubt, sodass auch sie leicht abgenommen oder ausgetauscht werden können.Der Lautsprecher ist kein Piezolautsprecher, sondern klassisch mit Spule und Membran, sodass die Töne gut rüberkommen.Die Schaltung wurde so entworfen, dass sehr wenig Rauschen verstärkt wird, das hat mich sehr gewundert und begeistert.Die Anleitung besteht aus Aufbauanleitung, verschiedenen Experimenten und einer Erklärung der Funktion (beinhaltet auch Schalt- und Platinenplan).
User
Excellent introduction to soldering
Great product for the price, works well. An excellent way for a beginner to practice soldering and hobby electronics.It needs to be made more clear in the manual that the hard wires cut off after soldering are crucial to connecting everything afterwards.
User
Kit pas cher et très bien fait
J'ai pas encore eu l'occasion de tester en conditions réelles car les chauve-souris sont un peu absentes à cette période, mais je voulais commenter concernant le kit en lui-même au vu des autres commentaires.Le kit est très bien fait et vraiment très simple à comprendre comment placer les composants et pas compliqué à souder.Evidemment, le fait de parler anglais et de savoir souder aide, mais franchement le rapport qualité/prix de ce kit est top!
Trustpilot
1 week ago
1 month ago