


Illuminate Your Space with Rustic Charm! ✨
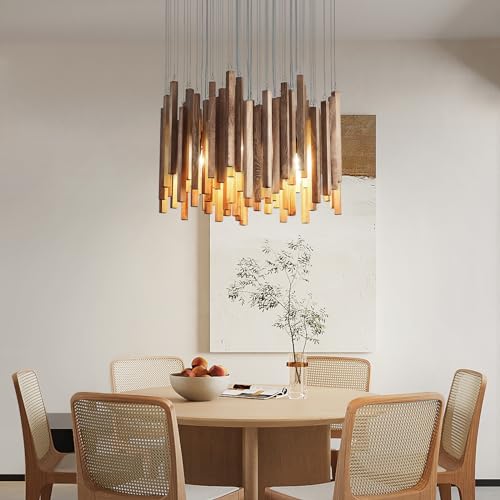
This 8 Light Farmhouse Wood High Ceiling Chandelier combines rustic aesthetics with modern functionality. Crafted from premium solid wood and featuring eight E12 light sockets, it offers adjustable hanging lengths and ample illumination, making it perfect for various indoor settings. With a commitment to customer satisfaction, this chandelier is designed to enhance your home while providing a cozy atmosphere.
| Required Assembly | Yes |
| Installation Type | ceiling-mount installation |
| Light Fixture Form | Chandelier |
| Shade Color | Black |
| Shape | Adjustable |
| Color | Black1 |
| Theme | Rustic |
| Style Name | Rustic |
| Control Method | Touch |
| Light Source Type | LED |
| Power Source | Corded Electric |
| Switch Type | Touch |
| Light Color | White |
| Fixture Type | Non Removable |
| Voltage | 110 Volts |
| Controller Type | Push Button |
| Wattage | 40 watts |
| Mounting Type | Ceiling Mount |
| Indoor Outdoor Usage | Indoor |
| Lighting Method | LED |
| Bulb Base | E12 |
| Specific Uses For Product | Home |
| Number of Light Sources | 8 |
| Additional Features | adjustable hanging length, distinctive natural texture, multi-light design with ample lighting |
| Room Type | Bedroom |
| Finish Types | Lacquered |
| Shade Material | Wood |
| Material Type | Iron |
| Item Dimensions L x W x H | 22.8"L x 22.8"W x 38.2"H |
| Unit Count | 1.0 Count |
T**.
Gorgeous
This is absolutely gorgeous! It took me two weeks to click submit order but I am so glad I did! Beautiful quality and so stunning to look at. Definitely a bit of a project to put together so pack your patience but the end result is so worth it! You NEED this in your house, add to cart, yes please!
M**3
Beautiful PITA to assemble
Firstly, I want to say this chandelier is gorgeous. It casts the most incredible shadows and I love it. I put it in a home we are selling, and I don't know if I could ever assemble another one despite how much I love it and how pretty it is. It was difficult to say the least. If you decide to attempt this, you will be building this from scratch, with the exception of carving the wood and forming the metal.Here are the biggest tips and the order I think you should do things, which is different than how I actually did it, because I learned what I could have done more easily. The directions are worth less than the paper they are printed on. Look at the pictures, but you've been warned.Step 0: Shut off breaker to the fixture before removing old fixture.Step 1:The wood blocks are plastic shrink wrapped, do NOT open them but just open the ends of the plastic to screw in the tiny eye bolts. I found a "monkey hook" to work perfectly as a screwdriver for this task.Step 2: it's tempting to start attaching wires to the blocks, but don't do it! This was my biggest regret later in my process. Step 2 you need to inspect, straighten, and replace many of the silver hooks that are on the metal baseplate. They are easily smashed during shipping. Tiny needle nose pliers help, but be careful as they are delicate.Step 3: Pull the bulb receptacles through the plate to the desired length, shorter than the 60cm wires and longer than the 54cm wires for the wood blocks. Firmly place the set screws on each bulb wire before wiring them all together at the back. There will be plenty of slack. (Twist together all of the 'L' separately from all of the 'N' and include the large fixture wire). I then used the black electric tape sleeves to hold these bundles securely, you can shrink them down to fit with a hair dryer, and it's much better than using the wire nuts on that many wires.Step 4:Attach the large bracket to the ceiling. A very important step that I forgot and turned out to be a huge headache was to first set the distance of the bolts that will hold the metal base plate, and *tighten the nuts* so they don't move! I cannot stress this enough, especially if you made the mistake of attaching all the wood blocks before hanging (yes, I did it the hard way)Step 5:Attach the wires (without the blocks) to the base plate. I recommend starting at the outside circle and going in the pattern around the base, then moving to the next row. Of course the number of attachment points doesn't exactly align to the suggested pattern evenly, so when you move in a row, shift the length of wire you started with over one spot so you don't have all the same length wires in a concentric row. I used the suggested pattern and it worked out pretty nicely. If I did mix it up it was in the center and so you can't even notice.Step 6: Wire the fixture in, white to white, black to black, ground to ground. Then attach the base plate to the ceiling bracket using those pre-spaced bolts that you remembered to set. (It won't be very heavy without the blocks because you followed my instructions and not the useless included ones!)Step 7-100: Attach your blocks to your wires that already have the perfect pattern you chose. Install bulbs.Step 101: Reset the breaker and admire your hard work and the money you saved on this DIY project.
S**R
I love it.
Took forever to put together but I love it! Prob 350 pieces total but with two of us, we got it put together in about 2 hours.
K**R
Beautiful chandalier
Completed the room and is beautiful. Expect to assemble it with care.
L**R
Worth the work
To start off with I'd like to say that this piece is high-quality and the wood is solid wood. The entire assembly is heavy. You can tell a lot of thought was put into it.With that, do not attempt this if you do not have a great deal of patience. I am very mechanically inclined. Overall I would say I am very competent. This took me approximately 3 1/2 hours to get installed. Every single wire that is holding up a block has to be threaded into the wood. It's kind of like Putting line to a bunch of fishhooks.I love the end result.Rating it four stars instead of five stars just do to the extreme amount of labor.
C**A
Preciosa
Trustpilot
2 months ago
3 weeks ago
