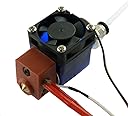
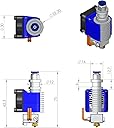
![[Gulfcoast Robotics] All Metal V6 Bowden Extruder Hotend for 12V 3D Printer 1.75mm Filament / 0.4mm Nozzle](https://m.media-amazon.com/images/I/71W2mAU1iqL._AC_SL3840_.jpg)




[Gulfcoast Robotics] All Metal V6 Bowden Extruder Hotend for 12V 3D Printer 1.75mm Filament / 0.4mm Nozzle: desertcart.com: Industrial & Scientific Review: Good & Cheap but NOT drop in replacement for Prusa - Received today and replaced my Prusa i3 Mk2S hot end which was ruined by a 12hr blob. An important note to other buyers for intending on a prusa replacement is that the top of this heatsink is not geometrically compatible with the Prusa line. Fortunately I was able to use the stock heaksink along with this purchased hot end and make it all work. Another note is that after the change the filament seems more prone to stringing at the same print temps as before. I believe this is due to the addition of the silicone sock which is preventing some heatloss at the nozzle. All in all the heatsock is a good addition for keeping stuff from sticking to the nozzle & preventing major blobs. A final note is that this cooling fan uses 0.13A @12V while the stock prusa MK2S cooling fan uses 0.1A @12V so I think this fan is better. BUT in either case the Noctura fan that comes on the prusa Mk3 is better than both cooling fans. Other than that everything works well and my machine is once again happily chugging away. Review: Seems okay! Using the heatsink and heatbreak with a genuine E3D heatblock. - I'm glad the bowden coupler can be unscrewed for replacement. I actually prefer that over integrated couplers like E3D uses. I chose not to use the heater cartridge, thermistor, heatblock and nozzle because I had a genuine heatblock, good quality nozzle, Trianglelab heater cartridge and FYSETC cartridge thermistor. I do like the old bead-style thermistors though so I have no aversion to using the supplied block. I ordered this because I bent and broke my previous E3D heatbreak which left part of it in my heatsink. THE MOST IMPORTANT THING TO REMEMBER with V6 style hotends is that the heatbreak should be just barely tightened into the heatsink by hand during initial assembly. Do NOT prematurely install the heatblock and attempt to tighten the heatbreak into the heatsink using it. NEVER apply twisting force by grabbing the heatblock and heatsink. The nozzle should be tightened WHILE holding on to the heatblock with an adjustable wrench, which will push the nozzle against the heatbreak inside. The heatbreak should never be gripped directly with a tool. Second most important thing is, heat the hotend to 260-285c after assembly and tighten the nozzle. Otherwise the filament will gush out the gaps around the heatbreak and you'll have a bad day. You should also rotate the heatsink extremely carefully while warm to insure it will not spin free from the heatbreak. Finally, when first screwing the heatsink into the heatbreak by hand, use thermal paste on the upper threads to improve thermal contact.
| Customer Reviews | 4.3 out of 5 stars 164 Reviews |
M**E
Good & Cheap but NOT drop in replacement for Prusa
Received today and replaced my Prusa i3 Mk2S hot end which was ruined by a 12hr blob. An important note to other buyers for intending on a prusa replacement is that the top of this heatsink is not geometrically compatible with the Prusa line. Fortunately I was able to use the stock heaksink along with this purchased hot end and make it all work. Another note is that after the change the filament seems more prone to stringing at the same print temps as before. I believe this is due to the addition of the silicone sock which is preventing some heatloss at the nozzle. All in all the heatsock is a good addition for keeping stuff from sticking to the nozzle & preventing major blobs. A final note is that this cooling fan uses 0.13A @12V while the stock prusa MK2S cooling fan uses 0.1A @12V so I think this fan is better. BUT in either case the Noctura fan that comes on the prusa Mk3 is better than both cooling fans. Other than that everything works well and my machine is once again happily chugging away.
T**O
Seems okay! Using the heatsink and heatbreak with a genuine E3D heatblock.
I'm glad the bowden coupler can be unscrewed for replacement. I actually prefer that over integrated couplers like E3D uses. I chose not to use the heater cartridge, thermistor, heatblock and nozzle because I had a genuine heatblock, good quality nozzle, Trianglelab heater cartridge and FYSETC cartridge thermistor. I do like the old bead-style thermistors though so I have no aversion to using the supplied block. I ordered this because I bent and broke my previous E3D heatbreak which left part of it in my heatsink. THE MOST IMPORTANT THING TO REMEMBER with V6 style hotends is that the heatbreak should be just barely tightened into the heatsink by hand during initial assembly. Do NOT prematurely install the heatblock and attempt to tighten the heatbreak into the heatsink using it. NEVER apply twisting force by grabbing the heatblock and heatsink. The nozzle should be tightened WHILE holding on to the heatblock with an adjustable wrench, which will push the nozzle against the heatbreak inside. The heatbreak should never be gripped directly with a tool. Second most important thing is, heat the hotend to 260-285c after assembly and tighten the nozzle. Otherwise the filament will gush out the gaps around the heatbreak and you'll have a bad day. You should also rotate the heatsink extremely carefully while warm to insure it will not spin free from the heatbreak. Finally, when first screwing the heatsink into the heatbreak by hand, use thermal paste on the upper threads to improve thermal contact.
E**N
So far, so good.
I'll update this as needed. This review is on the product + some minor modifications. I did not test the hotend completely stock. Ok, so I just got this hotend and I immediately replaced the heat break with a stainless one from E3D. Upon inspection, the Gulfcoast heat break is , to the eye, nearly identical the the E3D one. Next I replaced the nozzle with a brass .8mm from E3D. The goal of this printer is to print fast on an Anycubic Chiron, who's stock hotend was having problems keeping up with the new nozzle and new Bondtech extruder. So far, it is working very well. I was able to reuse the cables from the Chiron's hotend, so installation was a breeze. The silicone sock fits very well and is doing its job. For a V6 on a budget, you can't go wrong with this hotend.
L**R
Great deal for a quality part
I bought this hot end as a hopeful not super cheap upgrade for my 3D printer. So far the quality of all the parts are holding up nicely and producing quality prints. The thermistor and heater cartridge are working properly but i have had a small clogged nozzle from a improper nozzle stick out from the heater block(my bad). The PTFE tubing and fittings work nicely and aren't causing any problems with snagging when i have to remove the tubing from the printer for any reason. The heater sock fits really nicly on the heater block and definantly helps keep the hot end at printing temps. I replaced the fan shroud and fan with a 40 mm fan with printed can shroud since the fan became kinda noisy and distracting. So far nothing would keep me from purchasing this product again.
J**K
A very good clone.
I've had quite a few cloned V6 hotends over the years, and this one takes the cake. No issues. It's actually all metal (not just claiming to be like others). With the PTFE tube end flat, it goes all the way to the bottom of the shaft and makes filament installation a breeze. I would (just as with any bowden setup) suggest using Capricorn or another limited ID tube to make the filament slide in smooth as butter. The fins are evenly spaced and the fan clips on snug and actually keeps the shaft cool. No melted plastic working its way up the tube and not one jam in many hours of prints.
A**F
Read This For Help
It is what it is. A cheap v6 clone. It works for about 10-20 hours of printing but then you start hearing the extruder popping. Its not the extruder that has problems. It is the heat break throat. I found the heat break throat to be the determining factor on how well a clone can print. You can still get a cheap clone like this one which is not bad but you need to upgrade the clone to save yourself an immense amount of frustration. No clone will supply a quality heat throat. Get the micro swiss heat throat for e3d v6 and you may possibly have a better clone than the actual original as the micro swiss heat break throat is suppose to be superior to the original e3d v6 heat break throat. Do this combo and you should be good. ALSO, remember that it is not exactly plug and play. All the pieces in the v6 need to be assemble correctly ALWAYS. Each part needs to be butted up against each other with NO gaps. There is a process to doing this, just look up youtube and there are many vids on showing how to do this right. If you dont, you will have problems. For the ender 3 I did not have to use the thermostat or the heater that came with this kit as the factory ones already on the ender 3 plugged right in and snug. Do Not Forget to adjust your retraction settings (this also contributes to clogs). Good luck!
A**R
Junk
Total junk, surface finish of throat tube face and inner diameter are so poor that a seal cannot be made against the nozzle. which as everyone knows, inevitably causes clogs and filament jams. This is also not like the e3d by design, if you look inside of it you can see gaps from poor design, which also cause problems. The best part about this kit is the heater cartridge ๐
R**.
Much needed parts for my anycubic kossel
I got this to replace the hotend on my anycubic kossel linear plus. All the pieces were there, except the thermistor has a bare wired end. You'll have to get the metal nodes and black clip to attach them to your board, or do what I did and just splice in the ones from my old one. If your effector is the original from anycubic you'll also need to use your old heatsink for the hotend as this one is smaller. The heat block is also longer so expect to maneuver it around to get you cooling nozzle and auto level to fit, but it's a small price to pay to be able to change out your thermistor and heat node. Damaged thermistor is the reason I had to order this in the first place and the anycubic stock one seems to be soldered or glued to their heat block. Very happy with the results I'm seeing from this heat block and I didn't have to edit anything in my firmware it was plug and play. It did take a while to get it level but that was expected on my part. I'm fairly new to 3d printing and putting this together helped me understand the machine quite a bit more. Almost half way into a 7 hour print and no issues yet.
Trustpilot
5 days ago
1 month ago