🔄 Refresh Your Tech Game!
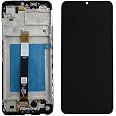
TheCoolCubeDigitizer Touch Screen Panel Glass Replacement is a high-quality digitizer designed specifically for the Asus Transformer Book T100. This replacement part allows you to repair or replace old, broken, or unresponsive touch screens, ensuring a seamless and responsive user experience. Note that this product does not include the LCD display and requires professional installation.
J**M
I replaced my Asus Transformer T100 screen and it works perfect.
Worked perfectly. I'm writing this review from my new screen!I accidentally pushed the tablet too far apart from the keyboard and my screen shattered from the bottom to the top all over. I've never tried a screen replacement but decided I had nothing to lose and a youtube video as a manual.I started by putting strips of packaging tape to cover the broken screen. Cover it all. This will help keep glass from flying and to help get leverage to remove the entire screen at once. Remove the back cover. Start with a razor blade to separate and then use a pic or credit card to work in and remove the back.Unplug the battery on the circuit board. Unplug the screen on the circuit boards.A heat gun (and protective eye-ware) is an absolute necessity here. You need to heat the tablet on the glass at a corner to begin the screen removal. The idea is to heat the glass to loosen the adhesive under it and to soften the plastic computer border. Don't get it too hot because the plastic computer border will become deformed. Use a razor blade to gently get under the glass screen by sticking it down between the glass and plastic computer border and gently bending the plastic computer border down and away slightly. This only works if warmed. There will be clear separation if done correctly. You do not want to pry the glass up as it will crack and send small glass shards at your face. Keep using the heat gun and razor blade to create a large enough separation for the credit card to fit under. Once you get the credit card under the glass, heat as you go around and separate the glass from the computer. I did jam the credit card too far under the screen so it picked up the adhesive tape and got some on the computer receptor part behind the screen. I cleaned it with a microfiber towel and glass cleaner. I also made sure the receptor was completely clean form dust and gunk.Remove the 4 plastic strips on the back of the new screen to expose the new adhesive tape. I did not clean the old adhesive tape off but I did cut off parts with the razor blade that bunched up so there would not be any bumps. Remove the plastic covering on the back of the new screen. Fit the screen attachments thru the computer at the bottom and make sure they come out the other side. Center the glass starting at the bottom, since the screen attachments go thru there, and press and fold the glass and the computer into place. Gently squeeze the outer parts of the tablet to ensure the adhesive is attached. Plug in the screen connector. Plug in the battery connector. Replace the back cover. Cross fingers. Turn on. Mine works perfectly so far, touchscreen and keyboard. The plastic computer border has a couple nicks in it and isn't perfect but it's really good.Yes, Asus logo but dark instead of gold.No tools provided.Adhesive is pre-installed on back of screen.You will need:Eye protectionPackaging tapeRazor bladePlastic separator, such as guitar pic or credit card.Heat gun, at worst a hair dryer.Patience.
L**N
Perfect Replacement for Asus T100
This replacement panel for my daughter's Asus tablet is great. Once I got it on the tablet, everything worked like a charm.The screen had been busted for almost a year - I think she had it about 10 months before breaking it - and everything still worked except the screen. At the time, I couldn't find a reasonably-cost replacement so I left it as-is. On a lark, I looked up screens again and I found this one. It arrived on-time, as always, and I waited a few days to get started. I did watch a youtube video ahead of time, and while I don't think one would have to watch it perform this operation, it definitely helped. I took about 90 minutes to do it, because like a previous reviewer, I placed the screws carefully on a cardboard outline, and removing the screen took about 30 minutes. As others have mentioned, a heat gun - or a blow dryer (what I used) - is a must to remove the screen from the bezel. THAT is what took the longest, and it didn't help that the screen had multiple cracks in it. With a cracked screen, it was hard to get enough leverage to pull the screen off the adhesive.Note: The screen does have the Asus logo on the top, but does not have the Windows logo in the bottom center.I highly recommend this replacement screen. It now works like new. For those that have teenagers that break everything: these screens are priced just right!
E**S
and was almost sure it was a bad touch screen or defective
It works. I had problems similar to other people here at first, and was almost sure it was a bad touch screen or defective. It got phantom touches all over the place, swiping didn't work, and the touch resolution was really, really small, there was basically no interpolation between sensors. I noticed that there was a tiny curled up hair on the inside side of the touch glass. I took it apart again, made sure the inside of the touch screen glass was completely clean (as well as the LCD), put it back together, and it worked fine. Maybe it's because I made sure the inside of the touch surface was clean, maybe it's because the touch ribbon cable is more securely inserted into its connector. I've noticed that -all- the connectors need to be extremely firmly and deeply pressed in, as far as they can go, and it's a bit finicky -- so maybe plugging in the connectors again helped.So for anyone experiencing problems, I'd suggest you take it apart again, make sure the inside surface is clean, and then put it back together again, making sure the connectors are all absolutely snug. Another thing -- the little white parts at the very top of the connectors need to be laid down fully, they shouldn't be lifted. I didn't realize this at first and it was causing me problems with the display.My one criticism of this product is that it comes with absolutely no adhesive, which is probably necessary. The touch screen is held to the bezel of the T100 using an adhesive. I would suggest a double sided tape specifically made for LCD screen repair. I used this, and it works great: http://www.amazon.com/gp/product/B00BXYWXY8/ref=oh_aui_detailpage_o00_s00?ie=UTF8&psc=1Hope this helps anyone.
Trustpilot
1 month ago
5 days ago