Desert Online General Trading LLC
Dubai, United Arab Emirates
Desert Online General Trading LLC
Dubai, United Arab Emirates

⏳ Upgrade your airflow game with Honeywell’s smart fan timer!
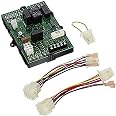
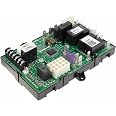
The Honeywell ST9120U1011 Fan Timer Control is a genuine, compact HVAC replacement part featuring three timer settings and low 12-watt power consumption. Designed for easy installation and reliable performance, it optimizes fan operation to enhance energy efficiency and comfort in your space.
| Color | Multicolor |
| Brand | Honeywell |
| Product Dimensions | 3.5"D x 7.6"W x 3.5"H |
| Item Weight | 0.88 Pounds |
| Number of settings | 3 |
| UPC | 784497944442 783961808112 696742508746 703765995085 085267719582 787732658418 |
| Global Trade Identification Number | 00085267719582 |
| Screen Size | 3.5 Inches |
| Manufacturer | CE Sundberg |
| Part Number | ST9120U1011 |
| Item Weight | 14.1 ounces |
| Item model number | ST9120U1011 |
| Is Discontinued By Manufacturer | No |
| Power Source | Ac/dc |
| Wattage | 12 watts |
| Item Package Quantity | 1 |
| Batteries Included? | No |
| Batteries Required? | No |
J**S
Worked perfect in an old Armstrong Mark V unit with a bad board
I bought this to replace an older Honeywell ST9160B1068 control board. The instructions were busy but once I figured out which section to follow (based on the board model I was replacing) it was very simple. It was a pretty simple effort of moving one wire (or connector) from the old board to the corresponding pin on the new board. The new Honeywell board also comes with 3 different wire-conversion pigtail connectors depending on which board and HVAC unit you are using. My particular board required the jumper pigtail connector that came with the new board (with very simple instructions saying "if you are replacing board model #### then you need to use adapter ####"). The total amount of time to swap out the boards was about 30 minutes. Luckily, our HVAC/furnace unit is easily accessed through a closet and the control board is right in front (not buried behind other components.)
S**P
Worked great for Armstrong Tech 80 Ultra V
I have a 15 year old Armstrong Tech 80 ultra V and driving it with an Ecobee wifi thermostat. When a call for heat was sent to the furnace, the burners would come on but the blower never started....no forced air. The OEM control board is the honeywell ST9160b-1068 and this board replaces it perfectly. The included manual makes it very easy to set the delay dip switches and all wiring and nomenclature is very easy go follow. I did not need to drill any mounting holes...the oem board uses 4 corner screws and new one uses two center screws on the long side...the mounting panel had unused holes that lined up well.If you have a horizontal furnace like mine, it is very hard to work on while finding a seating position on the ceiling joists in the attic...i installed a floor at the front face of the furnace and it made the install and previous diagnosis much much easier.This new control board is recommended also because of the diagnostic LED which is helpful.
D**D
Even a girl can fix adead furnace with amazon and YouTube
Have an older furnace and when I had a no heat situation the HVAC companies all said I needed to replace my fan control unit because the high voltage relay on the board that turns on the fan was fried. Quotes were $800 and up. I work IT problems at my company before we pay to have the expensive techs come in. I thought hmmmmm, this sounds suspiciously expensive considering how cheap electronics are these days. Did my Google, YouTube and Amazon-fu like a good girl, while using my fireplaces to keep my house warm. Lots of wood laying around from storm cleanups and it was nice to get it cleared off the property.Anyway, found out that the reason the fan control relay fried was that the actual fan motor that blows air into the house was going bad, pulling too much electricity through it as it degraded and resistance skyrocketed and my power bill started creeping up from a normal heating season.Told the company techs that they were going to just fry a new board and the fan was the culprit. They replied that they always try a board first and then move onto the fan since it is labor intensive to remove and replace and instead recommend a complete new furnace (Quotes were 4 thousand dollars to 6 thousand dollars because it was an 'emergency no heat job') so that they can fully warranty the work. Again sounded fishy. Researched removing the fan motor and it is stupid easy. Take out two little screws and the whole fan assembly slides out on rails built into the furnace. Got the part number off the fan and ordered one up with next day air shipping after the one on here ended up not being in stock when the company said it was and had to cancel the order here.So just yesterday I installed the new electric motor that was $275, a new start run capacitor (cheap and all installers recommend using a new capacitor with a new motor) for $10 and the fan control board here for $90 and with a simple follow the manual to adapt the wiring to the new style board, voila I have heat and the motor is rated at a 40+ year lifespan at normal heat and ac seasonal usage. Mentioned what I did on the subs I frequent on reddit.com and they all said, 'Yup you basically got a new furnace and it is what we HVAC techs do with our own home, no need to change out all the big sheet metal parts when it is just the fan motor, board and cap that you needed. The burner control unit when it goes is cheap and easy to change out too."I feel so relieved that I now know how to work on a furnace and how simple and cheap they are to repair compared to the high pressure sales tactics the HVAC companies use to get you agree to all new everything for the price of a decent used car. Nope, I will do it myself for under $500 please and thank you!
A**R
Day late on shipping, but board is good and documentaion is well done.
Easy install for first timer. I never worked on my furnace before, but watch videos and gave it a shot this time. I was getting different issues. Inducer running, but igniter would only stay on for a few seconds. If i shut the breaker off for a few hours furnace would run fine for 8-10 hours then we would hear inducer motor cycling again. I checed other things and decided to order this board. While waiting for the board all of a sudden my furnace blower would run and nothing else would happen. Board arrived a day late and it was an updated board to te pool replace mine. Because of this there was a wiring coversion that is well documentes in the manual. I went through the conversion and fired the furnace up. Has been running great for 4 days now.
L**N
Works Great saved me 15K
My old circuit board went out when I changed the wiring outside and had to turn off the breaker, when I turned it back on my blower would not work. AC guy told me the entire system was fried but he made the mistake of turning on the blower doing his troubleshooting so I knew the entire system was not gone. They quoted 15k for new units, I jumped on youtube and someone showed how to bypass the circuit board and I tried that and it worked so I knew it was the circuit board. This new circuit board was pretty easy to swap out using the colors and guides. tricky part is when you dont have enough space for the wires - great product so far no issues. AC works good as new.
M**E
a little confusing but works
the board works. No way to tell how long it will last. the original board lasted 15+ years. If you buy this board, caution. the jumper wire is necessary to produce 27v. Only a small tiny printed spot indicated it was needed. I was disappointed when the thermostat would not work when I powered up the furnace.the other thing to be careful with is the labeling of the wires. A couple of my wires were not labled the same from the old to the new. We figured it out and I now have a working furnace and a/c. If this card lasts half as long as the orig, I'll be happy.
Trustpilot
1 month ago
1 month ago