🌪️ Elevate your kitchen vibe with silent power and sleek style!
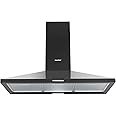
The SIA INT60BL is a 60cm black integrated cooker hood featuring a powerful yet energy-efficient 49W motor, 3 variable speeds for tailored ventilation, and a quiet 62 dB noise level. Designed for built-in mounting with flexible top or back venting, it combines modern LED lighting and a charcoal filter for effective air purification, all backed by a 2-year parts and labour guarantee.


| Noise level | 62 dB |
| Mounting type | Built-In Mount |
| Controls type | Rocker |
| Number of speeds | 3 |
| Light source type | LED |
| Wattage | 49 watts |
| Filter type | Charcoal |
| Item form | Pyramid |
| Ventilation type | Recirculation or Exhaust |
| Manufacturer | SIA |
| Package Dimensions | 66 x 45 x 33 cm; 10.3 kg |
| Energy Efficiency | B |
| Efficiency (10 classes) | A to G |
| Part Number | INT60BL |
| Special Features | 3 Variable Speeds |
| Item Weight | 10.3 kg |
D**S
Excellent Customer Service
This extractor fan arrived within one day, I had a couple of questions about the model as it was slightly different from my previous one, and I contacted the seller. The customer service was excellent and answered all my questions within a day. This product was excellent value for money, and is a replacement for an older model, same size, easy enough to install, works well. Thank you to Lewis for all your assistance!
H**L
Not as good quality as the one it replaced
This product claimed to have three power settings - only two work - II and III. The switch will not push back to I or O.
A**K
Great but
Great but don’t buy the disc filters Amazon suggests to buy with it, they don’t fit and it costs to send them back. It’s a rectangle sheet filter and comes included
M**D
Packaging Issues
This extractor fan is cheap and cheerful, does the job, but the packaging let it down as it arrived dented. It took a couple of hours to strip it back and straighten out the side panel.
M**D
Ideal extractor
I like the light on this kit. It looks like led and not the yellow one which we normally get.
B**L
Realy good value not worth fixing old unit. Highly recommend this unit.
Motor on old extract worn out new motor over £100 bought this complete new extract for just under £70 a cable for connecting to mains was supplied had to cut this off and fit new plug and socket as i already had a power supply would have been easier to screw supply cable to a joint box in the extractor. Drilled new fixing holes on cabinet to use existing fixing holes in wall.
A**R
easy fit and install.
Almost identical to the old one and slotted straight in. good value for money particularly when compared to other alternatives.
P**R
Wall mounting shambles : No access to tighten bracket adjustment mechanism.
This was bought to replace a Whirlpool 2000 integrated hood which has lasted 18 years.Existing Installation description:-Above the existing unit is a small integrated kitchen cupboard which sits between the extractor and the ceiling. Through this goes the extracted air, via a boxed in section (see picture), and the extracted air recirculates out via the gap between the top of the cabinet and the ceiling.Fitting new unit:I am often suspicious when the installation "manual" is a few pages of small print - such is the case here, and the actual fitting instructions are 6 sentences and 5 diagrams. However, I consider myself experienced enough to get on with it. The fit (pre measured) is good to a standard 600mm width gap.I was concerned that there was not a diagram that included which way around the wall brackets actually "slot" into the corresponding horizontal adjustable brackets on the unit. See the picture. It is easy to get that wrong.Once you have the brackets onto the wall, and then hang the unit onto them, there is no possible way to tighten the screws with which you can set how far out from the wall the unit sits. This is because the 4 screws that are loosened to allow pull out / push in are vertical, and if like me you have a cupboard already above there is no access at all. see the "star" marks in the picture. That is where the screws will be and the heads face straight up (towards the celing). If you have a new installation, then that porably will not be an issue because you can install the extractor first, set the adjustment, then install the integrated cupboard on top.In my case though you are then into guessing where the correct position is, getting the unit back down, tightening the screws, putting it back on the brackets, and so on until the front is flush with where you want it to be (as in aligned flat with anyunits either side).**** Having said that you then have your own kitchen woodwork front panel to mount onto the front of this unit, that means then that you need to allow for the thickness of that panel it attempting to work out where the adjustment is set in the first place. The alternative is that you fit your own front panel to the extractor beforehand and then take the whole thing on and off until you get the flush front position necessary,. This though makes the whole unit a good deal heavier.Three other disappointments:-1, There is no ducting pipe included. I had to find something in the garage whilst everything was in pieces in the kitchen.2. The Knock out panel. Yes you do have to knock out a ciurcular panel (either in the top or back) to allow fitting of a duct. You need to be brave here as the metal generally is flimsy enough that you can imagine the whole area collapsing instead of the panel popping out.3. The predrilled holes in the base of the unit do not match the position of the holes in the bottom panel. I had to drill out 2 more - being careful not to drill up into anything inside.Finally the last sentence of the "manual" says it all for me: "Secure the extractor to the adjacent units through the holes in the side of the product, to ensure that it cannot be accidentally knocked off the hanging brackets"What does this tell us about the effectiveness of these brackets in the first place?You may be wondering how I hvae pictures here of the brackets having finished the installation. I have not installed them at all, but used the the units either side - which are very sturdy as the basis of mounting the extractor.
Trustpilot
5 days ago
2 months ago