♻️ Upgrade your green game with zero hassle worm composting!
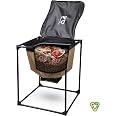
The Urban Worm Bag Worm Composting Bin Version 2 (2021) features a patent-pending design that eliminates the bottom zipper, allowing easy collection of worm castings without manual sorting. Made from durable 900D oxford fabric, it offers a spacious 5.2 cubic feet capacity and a continuous flow system that keeps worms thriving. Quick to assemble in under 5 minutes without tools, it also includes a detachable bottom for precise moisture control, making it the ultimate hassle-free composting solution for eco-conscious professionals.
| Color | Brown/Black |
| Height | 31.75 inches |
| Length | 26.75 inches |
| Weight | 7.5 Pounds |
| Width | 26.75 inches |
| Shape | Square |
| Material Type | 900D oxford fabric |
| Volume Capacity | 5.2 Cubic Feet |
| Batteries Included? | No |
| Brand | Urban Worm |
| Manufacturer | Urban Worm |
| Item model number | 4335523781 |
| Product Dimensions | 67.95 x 67.95 x 80.65 cm; 4.81 kg |
| ASIN | B078RHPWZ4 |
Trustpilot
1 day ago
2 days ago