✂️ Elevate your windows, no tools required—style meets simplicity!
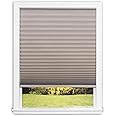
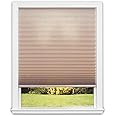
The Redi Shade No Tools Easy Lift Cordless Pleated Shade offers a customizable, cordless window covering solution that installs in minutes without tools. Featuring energy-efficient fabric and UV-blocking pleats, it enhances privacy and reduces heat gain, making it perfect for modern, safety-conscious homes. Sized to fit windows 19 to 30 inches wide, this natural-colored shade combines sleek design with practical functionality.


| Material | Polyester |
| Product Dimensions | 64"L x 30"W |
| Brand | Redi Shade |
| Color | Natural |
| Recommended Uses For Product | Home decor |
| Specific Uses For Product | Window |
| Room Type | Kitchen |
| Operation Mode | Manual |
| Special Feature | Cordless |
| Included Components | (1) Shade, (1) Patented Trimming Scale and Guide, (1) Instructions |
| Shape | Rectangular |
| Number of Items | 1 |
| Pattern | Solid |
| Item Weight | 1.4 Pounds |
| Product Care Instructions | Spot Clean |
| Closure Type | Cordless |
| Size | 30 inch x 64 inch |
| Mounting Type | Inside Mount |
| Number Of Panels | 1 |
| Water Resistance Level | Waterproof |
| Manufacturer | Redi Shade |
| Part Number | 3512462 |
| Item Weight | 1.41 pounds |
| Country of Origin | USA |
| Item model number | 3512462 |
| Is Discontinued By Manufacturer | No |
| Style | Pleated Shade |
| Item Package Quantity | 1 |
| Number Of Pieces | 1 |
| Special Features | Cordless |
| Batteries Included? | No |
| Batteries Required? | No |
R**S
Exactly as expected
Easy to install and looks great. Perfectly as expected.
N**N
Does what it is supposed to do
Looks great so easy to put up goes up and down with no problem
Z**G
Worthwhile if you need no-drill solutions
Tips for installing below!!These work great for what we needed. We’re renters and didn’t want to spend a ton of money on blinds when we might move. Also, we didn’t want to have to deal with restoring any drill holes on the window frame later when we move out eventually because of how hard it is to repair an old window. Our window frames are ancient, living in San Francisco. They are an awkward size (43” width) that aren’t standardized measurements for most blind and curtain manufacturers (it’s either up to 38” and then restarts usually at 48”+). We couldn’t find anywhere online affordable options - real blinds or curtain on the cheaper side was going to be $100/window at least to be custom made and for not that much better quality than these either. This is why we went with these cut-to-fit blinds.The core of the blinds is made with foam as well as soft plastic (see photos) and the blinds themselves are paper. They suggest using a knife to cut the blinds, which is largely because if you using a hacksaw the edge won’t be a super clean cut. We didn’t even bother with trying the knives though since we don’t own any cheap knives to risk damaging them. Besides, when using the hacksaw it was super hard to cut through the material with the extra cutting leverage, so I’m not sure how one could cut this with a knife anyway. Seems very infeasible.We had the added challenge of layers and layers of sticky and glossy paint over our window frames for 85 years since the building was erected in 1937. So we had to spend extra time prepping our windows.1. Clean your windows!! Don’t be lazy, use this time to clean all the dust and dirt off your windows. If I can do it hanging out of a 3-story building using paper towels and spray…you can, too!2. Sand paper, sand paper, sand paper - unless you have metal window frames, make sure you rough up the surface before you try to stick these to it.3. Clean surface you want to stick it to off with isopropyl (aka rubbing alcohol), especially if you sanded. Let it dry while you cut your blinds.4. Measure and cut to your window size. This isn’t mentioned anywhere in the packaging, but they intentionally set the ruler on the blinds .5 inches shorter on both sides (we measured the blinds after the fact and discovered the cut marks at 43” meant 42”). This is so that when you measure your windows, the blinds will fit in the window frame. You don’t want the blinds to be too tight and flush with the window sides at exactly what you measured.5) Cut slowly and methodically from top down in a straight line. No cutting from an angle. Don’t press down on the top of the plastic foam casing with your non-cutting hand or it will damage it.6) Stick the blinds up and hold them there for a minute pressing in the middle section out to the edges. Don’t try to touch the blinds or roll them down for at least 10 minutes so the adhesive can set.7) When your first pull down the blinds, hold the base of the blinds up with your fingers and roll down slowly just in case the stickiness isn’t fully set.Downsides:1. So far so good, but we expect that we might have to restick them later. Since our couch is under the windows, we have the ability to stand up and reach the top of our blinds. In order to preserve the adhesive, our plan is to always hold the base of the blinds when we go to unroll them to take pressure off the blinds. We also aren’t going to open the windows with the blinds down because the wind will risk them swinging back and forth and further which could weaken the adhesive.2. They aren’t easy to cut even if you use a hacksaw so if you only have kitchen knives…good luck. But once cut they are very easy to install!3. If you use a hacksaw though, the edges won’t be clean (see photos). We didn’t care about this since you can’t see it unless you are staring at it up close.4. The paper will be thin in places where you can see through the middle of the blinds (see photos). Again, we don’t care because at this price point we expected it.Don’t expect this to be a 1:1 placement for real actually blinds. There’s a reason they’re only $30 (on sale) - if you want quality, go buy real blinds!!!
M**D
EDIT>>>>JUNK NOW they block light, easy to install/operate and look nice and clean.
These are cheap quick ways to cover your windows. If you want stunningly beautiful window treatments, these are not it. They look okay but that's it. They absolutely block the light. How tight you cut them to the side window jambs and stick the head piece tight to the window on the head jamb will reduce the amount of light that "sneaks" around the sides. Some light will get past. I've seen talk of cutting these to size with a kitchen knife, I found that very difficult and it left a poor/jagged edge. I used a cut-off or chop saw. I sandwiched the blind between 2 wood blocks to prevent it from fraying and it worked great just cut slowly. The honey-comb pleats seamed to get stuck/melted together slightly from this cutting method but once they were hung it was easy to slowly release them while pulling the shade down. When it is hot or cold outside and I open these I can feel that the air between the back of the blind and the window is much hotter/colder in relation to the room temp. That tells me that these actually do help to insulate against the outdoor temps. We had these for about 4 years in our old house and bought them for our new house now. We only had one that began to develop a crack in the bottom plastic rail but I chalk that up to my kids being a little rough with them on the pull down. They do not have any exposed strings to endanger kids/pets or annoy adults. EDIT March 2017; These used to be a 5 star! The ones we had in our old house were great for at least 4 years. I bought the same thing I thought. They look the same but haven't lasted 1.5 years. They won't retract. We really don't even use them that much so it's not overuse or abuse. They just will not retract and stay up anymore. So then when you hold it up so you can open the window for some breeze a little wind comes along and shreds them and twists them all up. They changed something and they are junk now. I still say they are easy to install and look pretty clean and nice when first installed but do not waste your time and hassle...it's not worth the low price. On top of it I ordered a couple more to complete the rest of the windows and they came out looking different...it's not really honey comb anymore so they are not as insulating and you can see these annoying little dots of sunlight coming through the creases where the string tracks down through the shade pleats. Even these do not function anymore. When I have the money I will rip down the the ones that are not already gone and buy a more quality shade. Not sure what happened but shame on Shades Unlimited for lowering their quality.
P**D
Cheap!
This is very cheaply made. Nothing like the others I’ve replaced in camper. Does not say stuck, and feels like a paper bag material. If I hadn’t of opened and torn the paper off, it would of been returned..
Trustpilot
1 day ago
1 month ago