Description
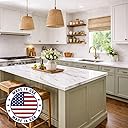
✨ Elevate your kitchen game with Carrara White elegance! 🏡
- SAFE LOW ODOR - Zero VOC and very low odor formula keeps your indoor space fresh and safe during application.
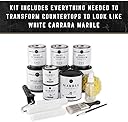
- ALL INCLUSIVE KIT - Includes every tool and material needed—no extra trips to the store required.
- FLAWLESS MARBLE FINISH - Mineral colors and primer hide stains, burns, and scratches for a pristine Carrara White look.
- QUARTZ LEVEL DURABILITY - New epoxy resin topcoat offers stain and water resistance as tough as engineered quartz.
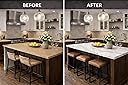
- WEEKEND KITCHEN MAKEOVER - Transform your countertops in just one weekend with a simple 3-step process.
The Giani Marble Easy Epoxy Countertop Paint Kit in Carrara White offers a professional-grade, 3-step epoxy and acrylic system that transforms laminate and other surfaces into stunning marble-look countertops. Covering 35 square feet, it features a new ultra-durable, high-gloss epoxy topcoat that resists stains and water, while the primer conceals imperfections. Safe for indoor use with zero VOCs, this all-in-one kit includes all necessary tools for a weekend DIY upgrade that rivals engineered quartz durability.