Desert Online General Trading LLC
Dubai, United Arab Emirates
Desert Online General Trading LLC
Dubai, United Arab Emirates
![eXtremeRate Cherry Blossoms Pink DIY Replacement Shell for Nintendo Switch Lite, NSL Handheld Controller Housing with Screen Protector, Custom Cover for Nintendo Switch Lite [Console NOT Included]](https://m.media-amazon.com/images/I/61IrKVvZGdL.jpg)


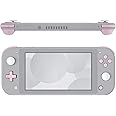
🌸 Level up your Switch Lite style with cherry blossom vibes!
The eXtremeRate Cherry Blossoms Pink DIY Replacement Shell is a precision-cut, durable ABS plastic housing designed exclusively for the Nintendo Switch Lite. This all-in-one kit includes a vibrant pink shell, matching buttons, a screen protector, and essential tools, empowering experienced users to customize and protect their console with a professional finish.


| Compatible Devices | For Nintendo Switch Lite |
| Hardware Platform | Nintendo Switch |
| Material Type | Plastic, Acrylonitrile Butadiene Styrene |
| Item Dimensions | 2.76 x 2.36 x 0.59 inches |
| Color | Cherry Blossoms Pink |
M**A
Great quality and clear instructions for replacing
It's even prettier in person and it was an easy replacement for my switch. I've only switched the back plate for now since my original plate broke by the game slot, but I plan on switching the front plate once I have more time to work on it
H**D
Best bang for your buck
This shell is awesome it's above and beyond in quality yes it takes time to install but when you have a DIY to do you will take your time and plus the tools and screws all there .Honestly this has been the best purchase I could have made to fix my kids switch and when I have to fix my switch I'm coming back for the transparent ones to bring back my childhood
L**E
Just as described.
It was a hassle, but I was blessed with an amazing husband who likes to do stuff like this.
K**D
Beautiful shell but wish it included tweezers and a spudger
I’m not super experienced with messing around in little tech things. The most I’ve done was replace the battery in my 6s successfully, but that’s about it. This kit was fairly easy to use and the process was enjoyable except for a few times but those things didn’t have much to do with this shell. I really like the result but I wish they’d included a little bit more for the tools.— For one, tweezers and a fine spudger would’ve been a great addition. They’re very much essential and I wouldn’t recommend messing around with the delicate parts without a decent pair. I was able to get mine all together without having the righy tweezers and using my fingers in place of a spudger, but that is a little risky considering you could easily mess something up. I’m planning on buying a full Switch when I can anyway, so I decided to simply work with what I had. Would not recommend this method if you have a Lite you plan to keep.— I would’ve liked to see the included screws separated into labelled bags or something like that. This isn’t a negative, just something that would’ve been nice.— The screen protector wet wipe may need to be packaged differently or something. When I opened mine, both wipes were totally dry. I didn’t have any other wipes because I used my only alcohol pad to clean up the thermal paste. Maybe mine was just old? I’m not sure.Note to anyone that isn’t a God at not stripping tiny screws: You may need a screw extractor, a small dremel and a tiny flathead, or a cold heart for this. The project took longer than expected because I stripped a screw in my headphone jack board and couldn’t remove it no matter what I tried. Had to cut that corner of the PCB with my Xacto knife and take the loss. Thankfully, the system works fine either way, but I didn’t realize Switch screws were so soft. The mangled bit of the board caused a little issue with space so my Switch isn’t closed as tightly as it could be but I’m tired and I don’t care anymore. I’d recommend looking at removal videos before purchasing this kit just in case.Overall, I’m pleased with the outcome. My switch is pretty and I’ve fallen in love with it all over again. It feels silky and I love looking at it. Would certainly purchase again!
M**N
extremeRate Switch lite Shell- Great price, great project, great result!
The media could not be loaded. This was my first time doing a major shell swap like this on a console, and extremeRate killed it! The video guide that goes along with the shell installation was super helpful, and I was able to do it in under 3 hours. I used my own tools, but the included screwdrivers felt super nice, especially for the price. Installing the shell with all the internals fit just right. The case feels sturdy and has a soft texture to the back, which feels awesome to hold, especially for longer sessions. I didn’t use the white buttons that came with the white shell (I bought a black set also from extremeRate), but both button sets feel nice over the stock rubber membranes. Super worth the effort and the price!
J**A
Looked great, but it stained after months. That is very bad on something permanent...
UPDATE: After some time mine has begun to stain. On the front it's getting a sort of reddish stain wherever my hands are most (so I guess caused by skin oils or something.) On the back it's getting big gray stains I guess from the official Nintendo (so not some generic third party) case I like to keep it in sometimes to protect it. So far nothing I've tried to use to clean it off will remove the stains either. Given that this is supposed to be at least somewhat permanent of a modification, this is actually a pretty serious problem... While initially I really loved it, I have to pretty much deduct all the stars in that it effectively doesn't seem to be made to be permanent, yet it basically has to be. At the very least I must say don't buy the white version because you'll ultimately regret it.As others have said, it is an involved process to do the actual installation. I was quite leery for obvious reasons. Particularly about dealing with the screen, but also ribbon cables are not fun to deal with ever. However, if you follow the instructions properly and pretty much just do it as you watch the video (pausing when necessary to stay with it) the process really isn't too bad. I would suggest that having a phone repair kit handy can help with a few points of the process, but it isn't required. You do need some sort of tweezers though and the long thin kind used in those kits is generally best for dealing with ribbon cables. The screwdrivers they included work just great though. I'm actually glad they didn't include a replacement digitizer because that would add considerably to the cost (and I'm not very confident about replacing a digitizer properly anyway.) Rather than a screen protector, perhaps they could have kept it simpler by just including a simple sticker to put on top of any normal screen protector. I didn't get it right and had to toss it due to dust and such getting in there, but the included protector felt way too thick and I suspect wasn't as sturdy as a good one (though I haven't tested that much I admit.) I had the gray Switch Lite so it doesn't look bad to leave it off on mine, but that may be troublesome for some of the more colorful systems.Overall it looks just amazing and works great. I do worry about the screen potentially being able to come loose and they didn't include any extra tape so you have to be very very careful on the removal process since you have to reuse the old tape (particularly you need to keep it flat without any bunching or misshaping.) Pull it very slowly as you go. It would have been nice if they had at least included one just in case. It seems to be a fairly typical double-sided tape, so I think they could have included one easily enough. Particularly at this pricerange. But if you are careful enough it should probably be ok. I do also want to say that towards the end of the video in the reassembly process I felt like the order of a few parts of reassembly was wrong, including one part where the board should have been secured and everything properly routed through first before attaching a ribbon cable, but overall it was very easy to follow and did do a good job. (Also, it had music all the way through but it wasn't obnoxious. Some are, so I was grateful for that.)I do have to say the "soft plastic" thing doesn't seem to have worked out exactly as described. It actually had less of a grip than the original Switch Lite's plastic did. It's not a deal-breaker though. It's not actually slippery or anything, just with less grip in comparison. Far better than the 3DS XL with its almost glassy smooth surface just for instance. (Thank goodness Nintendo learned from that. It may be shiny to look at, but it's not actually good for use.) I was also a bit annoyed that they didn't include any buttons they didn't absolutely have to. At the overall cost of the whole thing I really don't think it would have added anything significant to include the duplicate buttons, particularly for some of the harder to deal with ones like the screenshot and home buttons. In comparison, they included a full set of duplicate screws and even springs in case any were lost in the process which likely costs more than buttons would have. (It's good to allow for some potential for loss, but I don't think they needed to include a full set and the buttons or membranes can also be lost.)By the way, when you use the heat gun on your original case it will most likely warp -- particularly as you separate the screen. Putting the metal frame back might help straighten it out again, but consider this to be a mostly one-way process.
Trustpilot
2 weeks ago
1 month ago
2 weeks ago
1 week ago
![eXtremeRate Cherry Blossoms Pink DIY Replacement Shell for Nintendo Switch Lite, NSL Handheld Controller Housing with Screen Protector, Custom Cover for Nintendo Switch Lite [Console NOT Included]](https://images-na.ssl-images-amazon.com/images/I/61IrKVvZGdL._AC_UL116_SR116,116_.jpg)