
Desert Online General Trading LLC
Dubai, United Arab Emirates
Desert Online General Trading LLC
Dubai, United Arab Emirates


Transform Your Space with Style! 🏡
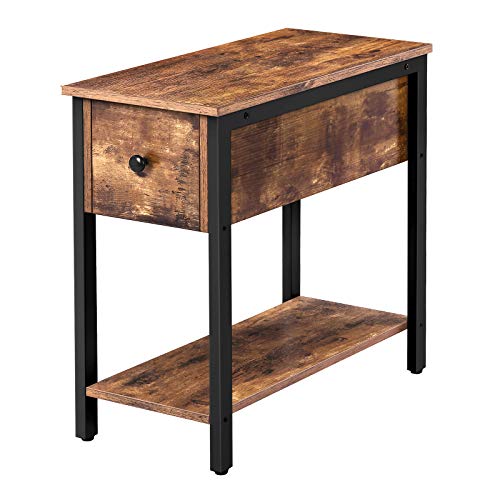
The HOOBRO Set of 2 Side Tables combines a vintage-industrial aesthetic with practical functionality. Measuring 23.6”L x 11.8”W x 24”H, these narrow end tables are perfect for small spaces, featuring a compact drawer for storage and adjustable feet for stability. Easy to assemble with included tools, they are designed to enhance any room while providing a sturdy surface for your decorative items.
L**S
SIMPLY PITIFUL
I needed a narrow yet somewhat deep storage table w/drawer for under my office desk.This side table seemed like the perfect item. Unfortunately, it came with scratches in EVERY PANEL, especially the top board.I’m only keeping it because it’s for under my desk so it’s not going to be visible.Design: seriously, why on earth would anyone design a drawer so much shorter than the length of the drawer compartment and top board??The answer is likely to be “to save money hence to profit”. However, all things considered, that’s not acceptable as it doesn’t make any sense since manufacturers can always charge more and according to their own business expenses. They’re definitely not in business to loose money…but to me, it makes more sense to charge a bit more than to compromise by creating senseless designs while wasting space, which compromises functionality hence it compromises quality which in turn compromises sales!!!This manufacturer gets “zero stars” for this side table drawer design and finish quality.Assembly: let’s just say that most reviewers here are absolutely correct in their negative feedbacks!Assembly this side table could and should be far easier than they made it out to be. Notice that the guy in the assembly video uses an electrical screw driver right from the “get go”? He then uses the included allen ranch later in the video but obviously, those parts are cut short and for a very good reason that’s not just about wasting our time rather to hide how bad the included allen ranch actually is!Instructions: I have no issues with visual instructions that ARE CLEAR! This side table visual instructions and mostly okay, except that it gets confusing on certain parts, such as attaching the screws to secure the plastic “rails” to the drawer compartment side boards. The black plastic parts act like a “rail” for the drawer…it’s how it goes in “cheap” furniture construction…and by “cheap” I don’t mean “inexpensive”!There were no drilled holes for the screws that attach the plastic “rails” to the two drawer compartment side boards, which made it rather difficult to attach those 4 screws into the boards (2 for each plastic piece).Also the paper instructions show the screws going on the ends of each black plastic attachment, which is a very different position shown in the assembly video, where the person drills those screws right in the middle of the plastic attachment! Talk about confusing…and it doesn’t help that they didn’t pre-drill screw holes there. However, each plastic attachment came with two tiny holes, which appear to be where the paper instructions show to drill such screws. So in this instance, I followed my “own instinct” but since there now pre-drilled screw holes, I had to ask my husband to do that part for me. I simply have no strength to drill screws through hard pressed particle boards…and I don’t feel comfortable using electrical screw drivers. My husband didn’t use an electrical screw driver…only a very good “mechanical” one. Still, it took him putting a whole lot of force (and yes, he’s a very strong guy!)…so that’s not acceptable as there should’ve been predrilled holes for those 4 screws!!Instructions also fail to make it clear which side to attach the metal legs to the U-shaped metal base. Only one side of each leg extends longer than the others, which is the side that has the hole but since there are two holes in which that part can be attached to (the side board or the U-shaped metal base, I didn’t quite know where to turn that extension to. The assembly video shows the person attaching and aligning the leg extension hole to the hole in the U-shaped metal base…so that’s what I did…but that part isn’t clear in the instructions. Nevertheless, just to try if it’d work, I also turned the leg extension hole towards the side board and attached one of the legs that way, which made absolutely no difference.In any case, I feel instructions and the assembly video itself could and should be far clearer than it is!PACKAGE:It came in the manufacturer box ONLY. There was no Amazon box.Only the two largest boards were separated by styrofoam. Other panels only had very thin fiber sheets” between it and some had nothing.The metal pieces were wrapped in plastic.The smaller parts were in alphabetic tagged plastic bags. Some of the plastic bags had to consecutive letters, which didn’t make sense, except that they were careful enough to assign each letter to a particular type of screw, which is shown in the first pages of the assembly instruction book. While that was no big deal for me, I still feel it makes more sense to separate all the different types of screws rather than mix it up in the same bags.Board Finish: It’s the worst I’ve ever seen and gotten!This isn’t just about the scratches. While the finish luster (brilliance) is acceptable and color shade is accurately portrayed by the ad pictures, many of the parts where they applied the black paint/tint looked as though someone had smudged black ink all over it as a “two-year old” would. It looks absolutely terrible!Last year, I purchased two night stands in the same “rustic brown” finish and black metal frames from another manufacturer for $62 a piece.Those were absolutely beautiful and the finish came without any scratches. It also had “visual instructions” but far clearer than this one…so needless to say, it was a lot easier to assemble it. I put both night stands (one drawer + two shelves each!) faster than I put this side table.The finish on these boards were scratched everywhere, including on the edges. The outlining finish is the poorest I’ve seen and had in brand new furniture! Most of our old furniture (some are almost 30 years old!) have better finish and perfect outlining compared to this side table!I often use furniture markers to correct scratches and small dents but this finish is so lustrous that it’s hard to adhere furniture markers’ ink. Also the color is mixed and unless I apply black marker ink to it, which makes it look worse, there’s simply not a good matching furniture marker color to remedy the scratches and other finish damages on this side table. Some parts worked “so so” but it’s pretty obvious to the “naked eye” so it’s really not a solvable issue. Besides, I don’t feel we should be putting tons of work and invest time and money in order to fix BRAND NEW FURNITURE!Parts: yes, this company does provide one extra of every screw and an extra wooden pin. While I appreciate such thing, that’s standard.Allen ranch: seriously?? This side table came with a very sad case for an “L-shaped allen ranch”. No matter how careful I was, it kept coming off the hexa screws. Though it got the job done (painfully though!) it simply doesn’t work well, especially for the larger hexa screws, which are the last part to be attached between the bottom of the leg metal base and the top board. In other words, it goes “upside down” under the drawer compartment chamber and since the leg metal base is right next to the side boards, unless we care to damage the side boards, it’s utterly impossible for an L-shaped allen ranch to get a clear and complete 360 rotation. Again, it can be done with the provided allen ranch but it made the job tediously and painfully long and far more difficult than it should be, especially for folks who suffer from any type of physical impairment, such as myself.It seems like a sturdy piece of furniture for somewhat reasonable price but as far as sturdiness and longevity goes, only time can tell…Whatever the price we pay, I expect new furniture to come with decent finishes, which unfortunately, wasn’t the case for this side table.I had to call Amazon customer service to inform them that while I’m keeping this side table, it’s simply pitiful that it came poorly packaged and all scratched up with peeling edges and dented corners!Amazon issued a $15 refund and I put on a note to the seller. Depending on the seller response, I might update this review.In any case, if I had bought this side table for anywhere else other than under my office desk, I would’ve returned it!No. I don’t recommend this side table.UPDATE: The seller contacted me and told me that they issued a $20 partial refund.While I still don’t recommend this table, this is definitely a trustworthy seller. They were easy to communicate with and very polite but still asked for pictures of the side table, which obviously, I had no issues sharing with them. Not a good item but very good customer service!
R**M
A tale of two tables
I ordered two of these for a small room where I spend much of my time (it has the fireplace in it). The first one I assembled went very smoothly — other than attaching the top of the table to the base. If you're not a fan of hand-held allen wrenches, prepare yourself: there's plenty of allen wrench activity in assembly, and attaching the top to the base requires you to use the short end of the allen wrench which, if you have arthritis in your hands, is going to be frustrating, slow, and somewhat painful. The first table took me (a 73 year old widow) about 1.5 hours to put together. It looks beautiful and feels strong.And thus — imagine my surprise — when the second one turned out to be a nightmare. The 4 pre-drilled holes for the (allen wrench) screws were too small on the bottom shelf. Fortunately, I have a drill (albeit without the right size allen wrench bit), so I was able to make the holes larger, and then slightly larger again, and when that didn't work I made them longer. After about an hour of trial-and-error, the screws finally went in as they should have in the first place. The second table took me twice as long to complete as the first. It looks exactly like the first one, but because I had to modify the screw holes, I have no idea how sturdy it will be. For now, it feels strong, but I've only had it together for about an hour.A suggestion for those of you struggling with attached the drawer slides (which have no pre-cut holes in them): I gave up on trying to drill holes for the screws and used Tacky Glue to attach the slides. If I'd had Super Glue on hand, I'd have used that, but the Tacky Glue seems to have worked well.All in all, this is an attractive piece for small spaces, but be prepared for some surprises in putting one together..
S**L
Great Table, just needs addition to instructions
I received this table today. It took about 20 minutes to put it together. It came well packaged, all the pieces intact, no scratches at all on any of the very sturdy wood boards. All ends and sides are covered so you can use the boards any direction they will fit and match all screw holes. It is a very nice sturdy little table worth the money. It fits perfectly beside the recline and since the drawer opens on the end, it works out great for a recliner side table. After returning numerous tables the past few weeks, I have become a pro at putting furniture together. However, A few things I would change or state on the directions would be:*Don't do Step 1 until after Step 2. You can attach the bottom of the leg to Piece 3 easier if you don't have the top part wobblin around. Just make sure when you put the bottom of the leg on Piece 3, that the opening of the top of the leg is facing inward. After putting the leg bottoms on, then stand it up and slide on the pieces in Step 1.*On Step 3, when you are putting the screws in Part E, do not tighten them until both are in so that it is straight. Do the bottom screw first. If you tighten it before putting in the top screw, the holes will not line up.*Also on Step 3: Parts 4 and 5 go on the INSIDE of the arms you screw them to. Do not overtighten or you could dent the metal legs. Part 7 goes on the end that does not have Part E. Make sure you have Part 7 on the opposite end. Again, it goes INSIDE the metal leg. Do not tighten the screws until all 4 are in so that you can pull it out slightly to make sure you are getting the screws in the predrilled holes.*On Step 5, the plastic part appears on the picture to be attached to the wooden piece (8) but it is not. It just goes beside it. Make sure you have the little edges pointing down towards the Part 6, this is the stopper for your drawer. The wooden strip (8) you put the narrower side towards Part 6 and the wider side upward. This is the slider for the drawer.*On Step 6: When you turn board 6 over it does not show you which side Part 8 should be on. Make sure that Part 8 is on the end that has Part E brackets as this is for your drawer to slide on. To tighten Screws B, turn the table upside down to make it easier. At this point, you can tighten all the screws you have done so far if you haven't already.*Step 7 starts the Drawer. Make sure you have the drilled out slit on the bottom of all boards when putting it together, this is where the bottom of the drawer slides into. Do not put the C locks in boards 10 and 11 until you have gotten to step 9.*On Step 9: Do the C locks while holding the pieces together with part 13 (the bottom of the drawer first. After the C locks are tightened, it makes it easier then to put in piece 12 and screw it in. Piece 12 goes INSIDE the side pieces.*Step 10, make sure on Part F to put the flat part to the drawer, otherwise the screws won't fit into the board. My side scres were loose, the center one tightened fine, it still works well. Make sure the little lips are on top of the drawer as in the picture because this is what will go on Part 8 you assembled earlier to slide the drawer in and out.*If you need to remove the drawer after putting it in, just reach in and turn the plastic piece you did beside the wooden strip and then the drawer can be pulled completely out, otherwise this is the stopper to keep it from falling out. After you are done make sure to tighten everything.
A**R
Love it
I bought 2 of these tables and they both came earlier than expected which was awesome. Very straightforward instructions and the quality is great and the colour is exactly like it shows in the picture. However one of the boards had a small crack in it but we still put it together and now you can’t tell at all there was a problem and it did not effect building the table. Highly recommend these tables as they work great for small spaces.
M**O
Nice table, exactly what I needed
The table is a bit darker than what's pictured so it turned out to be perfect for my needs, color-wise. Make sure you use the correct screws!! I got a bit too confident about putting it together, not realizing there were two different lengths of screws and I ended up punching through the back of not one but two holes (which, luckily, were the enforced ones so no real harm). Also, the two plastic runners for the drawer didn't have holes punched in them so I had to make my own holes to screw them into the two sides. Otherwise, the table is now put together and in place. Looks great and is perfectly functional for what I needed it for.
L**N
Good enough but not great
It’s sturdy enough and fits the space perfectly. But….there were pilot holes missing and in incorrect positions, boards didn’t line up evenly on both sides and the general preparation of the product was very poor. I was limited in space and it’s in my son’s room so not many will see it otherwise I would have been returning it. If you’re considering this for a main space in your home and are not handy with adding pilot holes I don’t recommend it.
R**C
Wow!
I purchased there begrudgingly because I wanted to buy local and support local trades but I could not find 12 in. wide anywhere. These are actually quite nice! I am guessing because of the price the finish is going to wear off the laminate so I keep my water bottle and the like on coasters. If you are living tiny and need something narrow this is actually a good deal and they look nice as well.
S**N
Bought for main bedroom in small apartment.
For the longest time my husband and I shared a nightstand on his side of the bed. Then with some digging on Amazon I found this gem! I love this product. It's very sturdy, and I (a not so handy person) could figure out the assembly. It even has a lower shelf that I use for a garbage bin. I do not disturb my husband when I open and close the drawer.
Trustpilot
2 weeks ago
3 weeks ago