


🔧 Build Your Vision with Confidence!
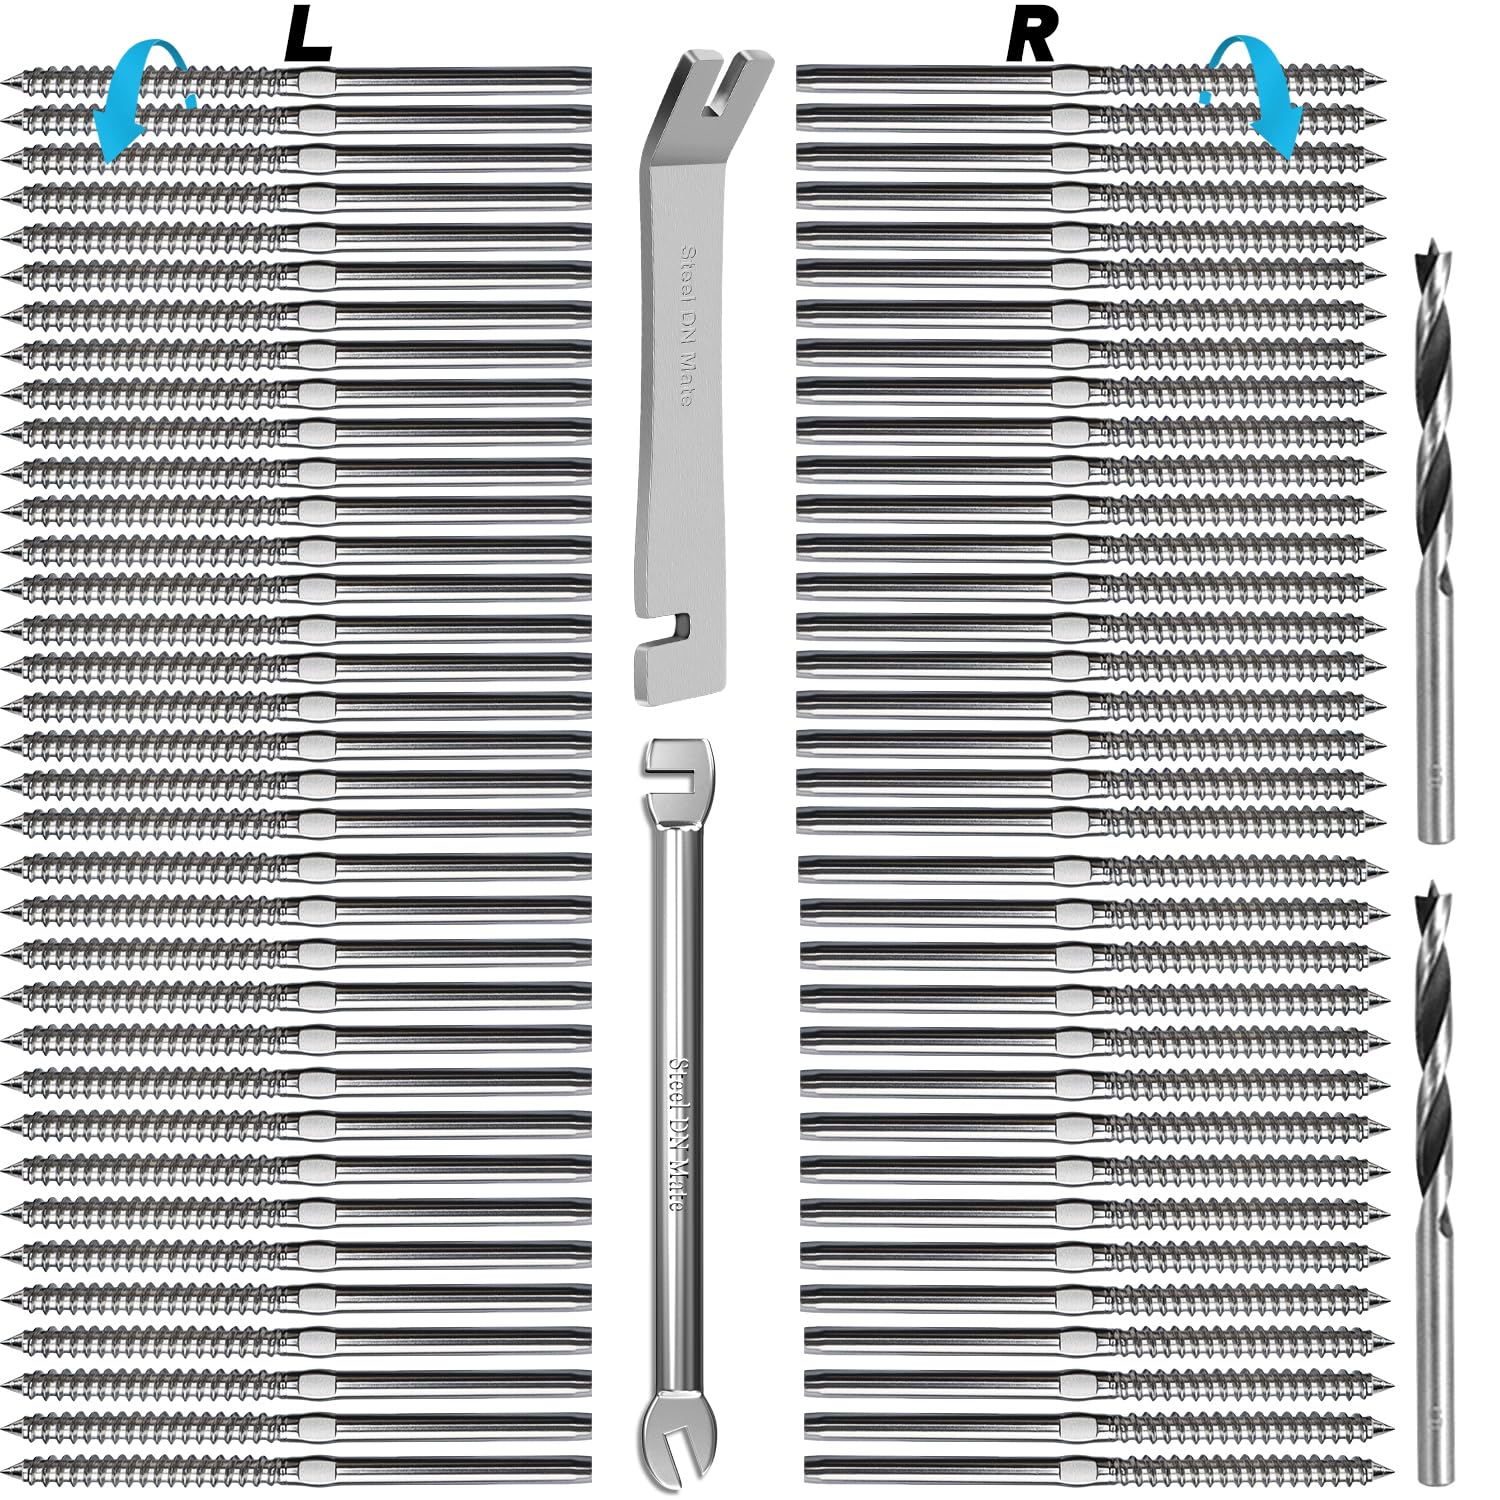
The Steel DN Mate 70 Pack T316 Stainless Steel Right&Left Handed Thread Swage Lag Screws are designed for a seamless DIY cable railing system. Made from marine-grade stainless steel, these screws are resistant to rust and corrosion, making them ideal for both indoor and outdoor use. The kit includes a user-friendly wrench for easy installation, ensuring a secure fit for 1/8" steel cable. With a focus on durability and customer satisfaction, this product comes with a 10-year warranty.


T**T
High Quality (entire kit including cable, cutter, crimper, swage lag screws for wood posts)
Everything I ordered (cable, cutter, crimper, and swage lag screws for wood posts) are super high quality, including the wrenches that come with the swage lag screws. Really great product, couldn't be happier with the results. I built 2 sets of floating stairs for 'mini-lofts' in my new home, the pictures show one set of stairs with the Steel DN Mate cables/swage lag screws. First time using cable railing, so there was a little bit of a learning curve. After installing close to 100 cable runs on my staircases, a couple ideas for installation on wood posts for other potential buyers. Admittedly, my staircases are custom and quite steep, so I had to build a couple custom drill blocks for the screw holes. And I used cedar posts, a relatively soft wood. That being said, my angles being so steep, it was pretty tricky installing the lag screws without scratching the wood post on the angled runs, even with the angled wrench that comes with the screws. In fact, the last few turns after scratching my posts on my initial try at the steep posts, I used small vise grip pliers around the crimps on the screws to turn the lag screw in all the way as the crimps are far enough away from the post while sinking the threads for the pliers not to touch the wood. The angled wrench started scratching the posts with about 2-3 threads remaining to be sunk into the wood due to the wrench slot on the lag screw right up against the threads of the lag screw. However, the vise grips did not leave a mark on the crimps, so it was not a problem. That showed me how well the swage lag screws were made - no scratches even with bare pliers. During the entire project, no parts from Steel DN Mate failed me. I looked at the Steel DN Mate store on Amazon, and didn't see a product like what I wished I had during my installation - a ratchet wrench that would grip the crimp marks to help install the lag screws. That would be awesome, even though the wrenches included with the screws are high quality. Had Steel DN Mate offered such a tool (which would keep the tool away from the wood posts) and just generally help installation I would have purchased it. Since the crimp marks withstood vise grip pliers, I can imagine they could come up with something that like a gripping ratcheting wrench would make installing the lag screws on straight and angled holes a breeze. Another helpful suggestion might be a longer handle on the crimper. It takes a good bit of strength to make the crimps, and such that it's easy to not hold the tool perfectly straight which ends up with slightly bent lag screws. However, once the cables are tensioned, the tension generally straightens out the crimped lag screws fine. So with steep stairs, and soft wood, one must be pretty careful during the install. And doing two staircases which took me about a week of pretty solid work to make up all the cables - all the crimping and tightening of the lag screws can be a good bit tiring. But I can't argue with the results, I recommend the products from Steel DN Mate highly. I hope others might find some of my comments helpful, in no way do my comments criticize the products, I just wanted the information to be helpful to others.
N**H
Cost friendly and looks great
Somewhat easy to install if you’re an intermediate handy man. Helped me to make a jig for perfect drill holes on every post. Hardest part is crimping the wire. Wife was happy, that’s all that matters.
D**M
looks great; easy to install
easy to install
X**X
Perfect for our needs
Perfect for our needs
M**W
Ways to speed up the install.
Let’s be honest, this process is a simple, yet time consuming job. One way to cut down on time spent is to make a cardboard template for where to drill your holes, so you’re not measuring for each post. The longest part of the install is hand tightening the screws… this takes FOREVER. All you need to do is take a standard drill, fit the screws in, tighten and screw in to desired depth (3 quarters of the way for me). Finish off tightening with the hand wrenches once your wire has been crimped in place. This made everything go so much smoother and quicker. Overall, the screws are good quality, but I had to knock off a star due to some of them being bent. I had no issues with the wrenches bending and no issues with the drill bits breaking, as other reviews mentioned. Good luck on your project!
A**T
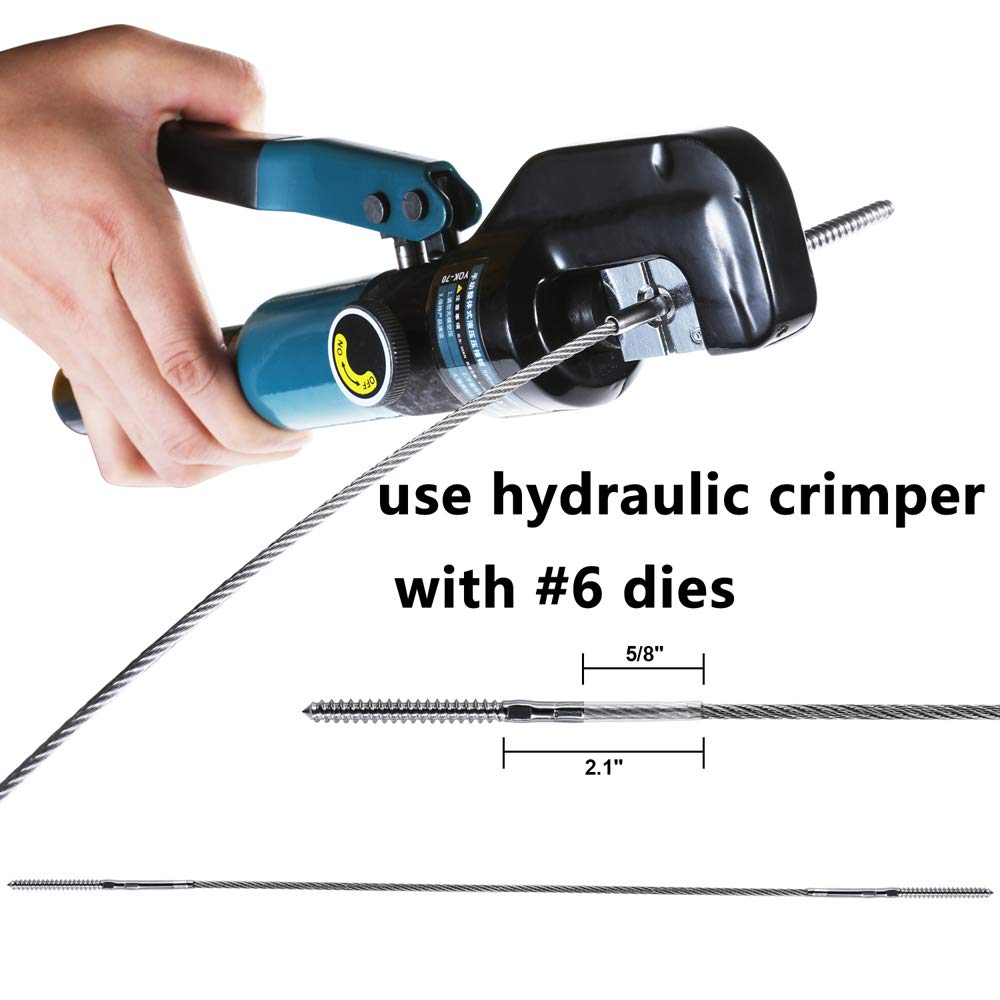
Be sure to use a hydraulic crimp
Installed on my porch two years ago still looks great
A**R
Slick look for the cost
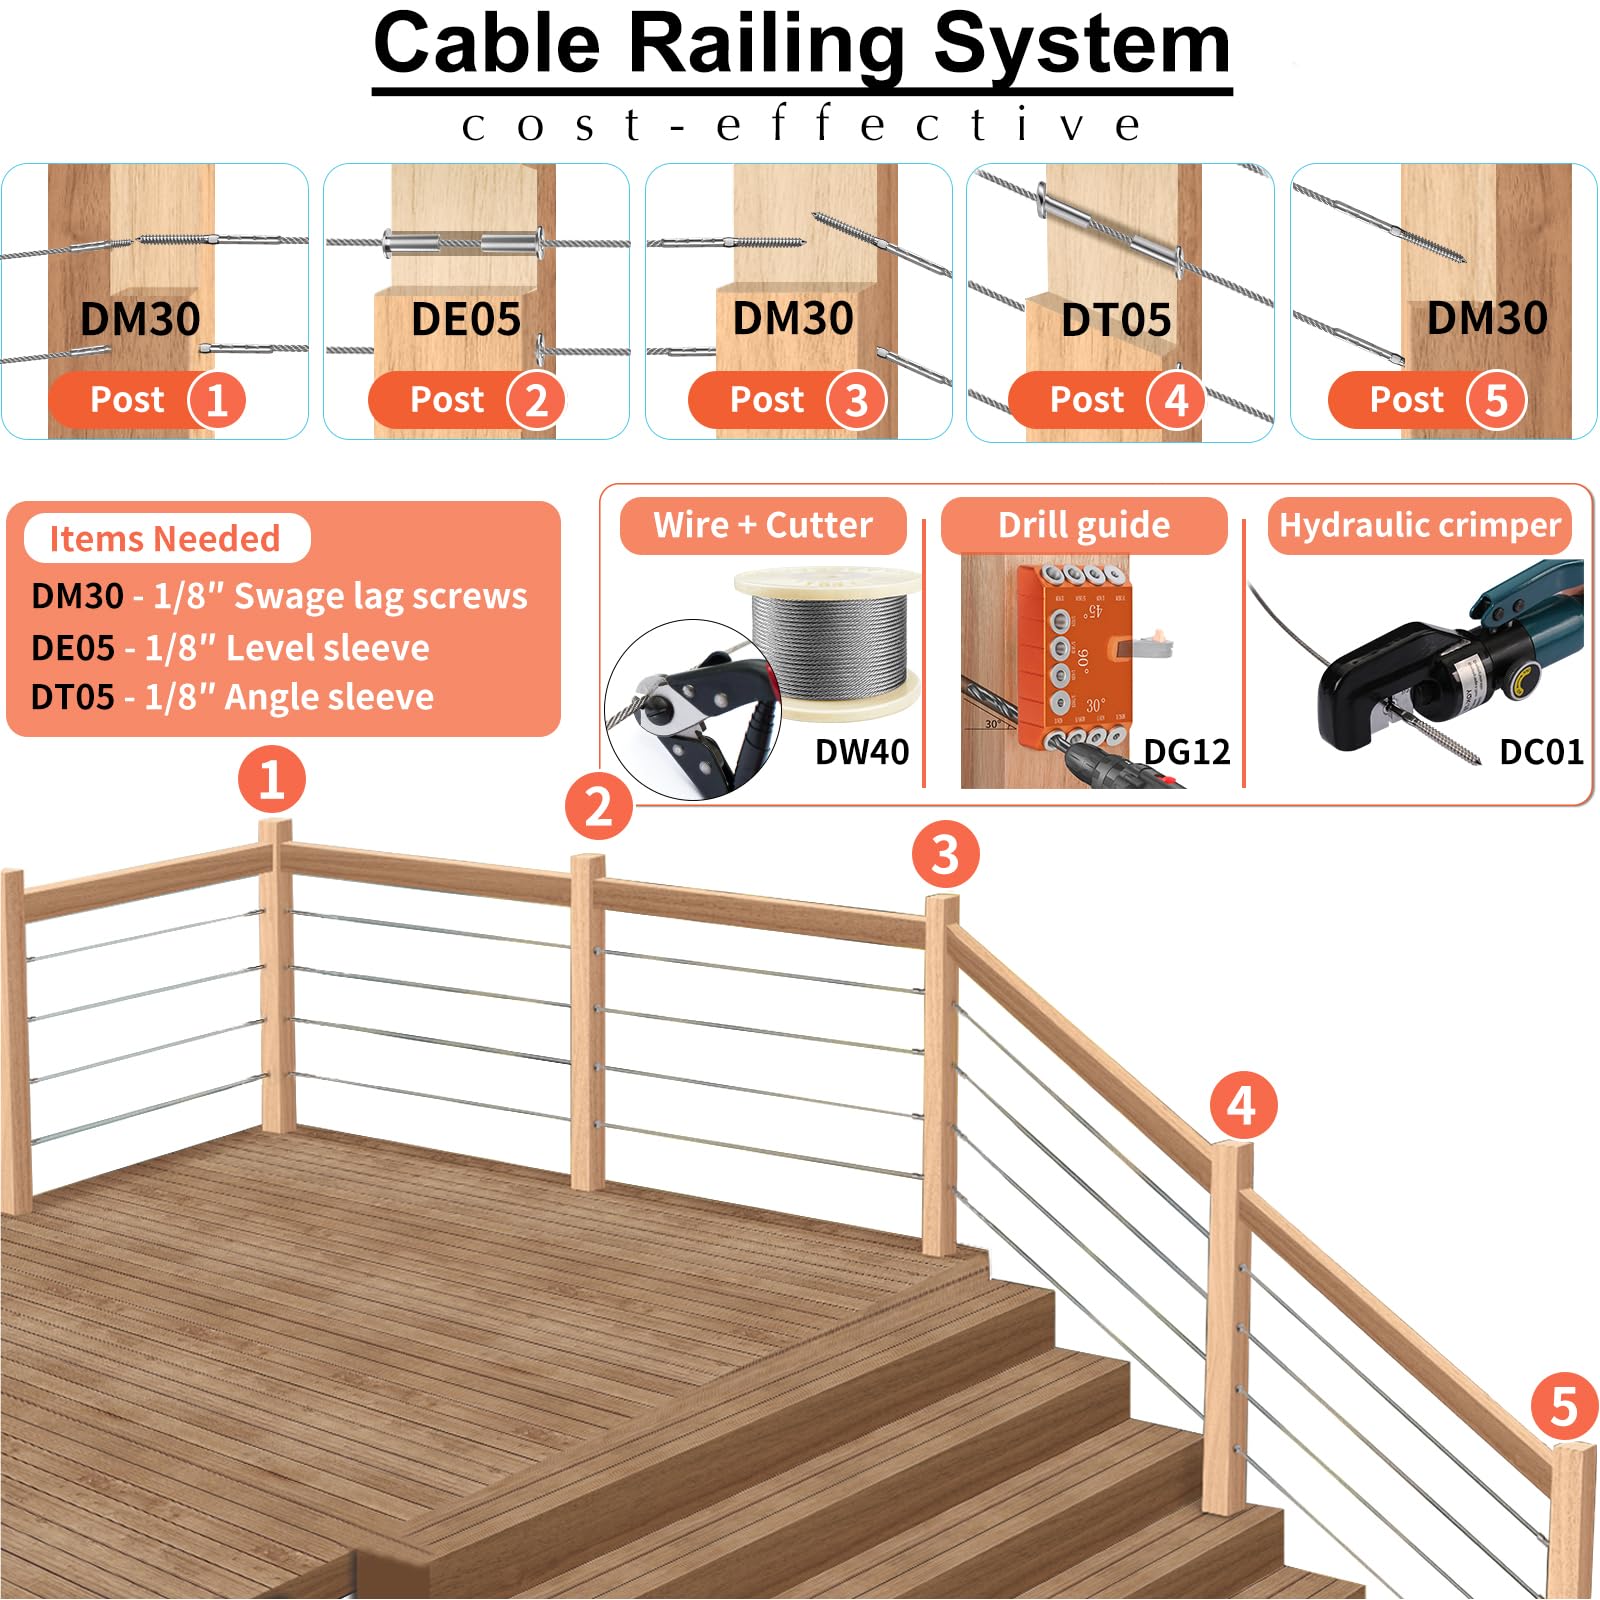
The product looks great after install. But if you want to save time you’ll have to experiment.1. You can measure post to post and subtract the 1.5” for the wire. This will work on a level surface. Except if you did not shoot the drill completely level or straight - the 1.5” will likely be taking “too much”. Always do 1.6” just in case.2. If you cut the wire a bit too long and can’t manually turn the hand tool, grip your hydraulic crimping on the wire screw and manually turn it this way. You could just start over but who would wanna do that?3. When doing the wire cutting, have someone hold the other end of the wire you just cut - to line it up with the second wire you needed for the same posts and cut until you have the needed amount.4. Use a drill to drill the wire screw into the post to get it started. Attempt to get the screw into the post the same depth - do a thread count and get a rough guess/count on proceeding screws.5. Use a cobalt, not supplied, 3/16th drill bit for tapping the wire screw holes.6. On stairs, throw away the directions they gave you on 2” between posts. It would depend on the depth of your stairs for that to make sense anyway. You’ll be in for a rough few hours on one section if you don’t listen to this advice. You need to set the wire screws to a COUNTABLE thread count on each side. You then place the wire into the hole of one wire screw until the wire hits the bottom of the wire screw. Drag some wire to the opposing post’s leading edge and line it up with where the wire would go. Cut the wire approximately 0.25” shorter than the leading edge of the post. If this is too long/short then you will eventually get a feel for where this cut needs to go. Once you get this down it’ll be cake.
O**Z
Does the job
Easy to work with and does the job it's designed to do.
Trustpilot
1 month ago
2 weeks ago


