
DOWNLOAD THE APP


Customer Services
Copyright © 2025 Desertcart Holdings Limited
DOWNLOAD THE APP

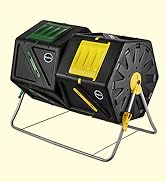
♻️ Transform your garden game with nonstop nutrient-rich compost!
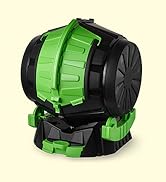
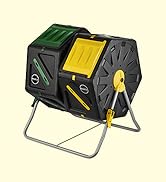
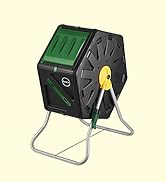
The Miracle-Gro Dual Chamber Compost Tumbler features two 18.5-gallon chambers allowing continuous composting cycles. Its rotating tumbler design accelerates decomposition to produce rich compost in 4-6 weeks, while durable, UV-protected, BPA-free plastic and a galvanized steel base ensure long-lasting, pest-resistant performance. Ideal for millennial gardeners seeking efficient, eco-conscious solutions to boost plant health and harvest yields.


| ASIN | B0785HCXB5 |
| Best Sellers Rank | #62,667 in Patio, Lawn & Garden ( See Top 100 in Patio, Lawn & Garden ) #42 in Outdoor Composting Bins |
| Brand | Miracle-Gro |
| Capacity | 18.5 Gallons |
| Color | Black |
| Customer Reviews | 4.2 4.2 out of 5 stars (4,612) |
| Is Discontinued By Manufacturer | No |
| Item Weight | 17.6 pounds |
| Item model number | 8542019142 |
| Manufacturer | DF OMER |
| Material | Alloy Steel |
| Product Dimensions | 23.5"L x 25"W x 29.5"H |
| Shape | Hexagonal |
| UPC | 899069000706 |
M**R
Good compost container
Ordered this as it seemed to be a pretty good size. It's smaller than I wanted BUT, the 2 separate containers actually will make it more productive compost process. I like that each side can lock into place. I am not sure the door is really strong but we'll see how it does over the winter. The directions were on my phone via a code. It was helpful for me, but I can see some people wanting a hard copy (you do have an option to print). Assembly was smooth and the 2nd barrel went much faster than the 1st. I thought everything was well labeled and straight-forward. After my last one broke, I did not want to spend a lot of $. I think for the value this should last a few years and that works for me!
R**N
Will likely work but poor quality control and questionable design
Update: I’ve used it for one season and obtained compost! This turned out to be a good size for a family of 2.5. Amazingly did not attract vermin despite the fact that I set it out next to our woods. As expected, it does leak “compost tea” so I would recommend against putting this anywhere other than flat ground. While it didn’t attract vermin, it did attract beneficial black soldier fly which are great for compost and largely stayed in the bins. We never noticed a smell, even when I accidentally forgot to tumble the contents for a while and it went anaerobic. Bumping my review up a star as a result of an overall successful season. Ordered this product and it came missing all of the connectors needed to assemble. The manufacturer wouldn’t replace so I had to initiate a return and replacement w/Amazon. When the replacement arrived it came with all the parts but a completely different set of gloves for some reason. Assembly was easy in theory but hard in reality because so many of the pieces have to be brute forced together. Sometimes they would snap in easily, and other times I’d get two pieces that seemed to be manufactured a bit poorly and it took a lot of effort to get them to work. And if you make a mistake at any point have fun trying to disassemble anything. Once assembled, it’s not as smooth or functional as I’d hoped. The locking pieces have already fallen off after less than one week of use. The “aeration holes” let things like coffee grounds, sawdust - and I’m assuming the compost itself - fall through, which means this isn’t suitable on a patio. Overall it’s fine. I think it will do the job. But for the price I’m not sure it’s worth it over the cheaper options.
J**B
Perfect Size for Small Family
When I purchased this unit, I debated between this size and one of the smaller single units. I did not want an oversized bin sitting in my backyard. After using this mid-sized dual bin for 6 weeks, I can say it is the perfect size for our small family. We feed it kitchen scraps daily and both bins still have plenty of space for more. Being able to rotate the bins helps to keep the food scraps composting at a fast rate. We started the compost process with some brown material from our yard and then feed it food scraps daily. You can see and feel the compost process as there is a good amount of heat in the bins. We plan to use the compost in our raised bed garden after composting is complete. Assembly is straight forward and took about 1 hour. The quality and sturdiness is good and I expect to get many years out of it.
M**K
Recommend
Great product. Easy to assemble. Quick delivery!
R**7
Small and difficult
Ok it will work for kitchen scraps. It’s barely waist high. The doors don’t slide without some serious prying ( pinched fingers twice). It tumbles well. But the lock on one side fell multiple times. I think if you want a small composter say for a patio it may be ok. It’s not heavy duty plastic so you cannot put too much in it. Miracle gro could certainly do better. For the price the value is not there. I’d recommend a better purchase. It’s a pain to put together. Once it is together returns are really not an option as you’d most likely break it before it would come apart. It’s too bad I was hoping that this would be great
A**C
Very simple way to compost
Easy way to compost. It’s a compact unit with 2 sides for continuous composting. Will suit a 1-2 person household well to not have any down time.
S**R
Good product but Who to Contact for J-connector parts? Gloves are both left-handed!
UPDATE May2023: The broken J-connectors looseness continued to be an issue so I super-glued the junctions to stabilize the panels... problem solved. I needed the gloves to do work in the yard and discovered they are BOTH LEFTHANDED... sturdy thorn-resistant on the palm surface for one hand! The dual-chamber tumble composter arrived Apr 4 and was put together the next day. Assembly is not too complicated but the J-connectors were really difficult to install. Mine were not solid as shown, but actually toothed on the ends, so theoretically they should compress a little. I bent & stretched them as directed, but they barely fit into the slots.There were two extra but several broke off an end tooth which means everything held together well enough for assembly. but the junctions wiggle. I'm concerned the panels may separate when there is actually the weight of compost material in the chambers. I've contacted the Miracle-Gro support to purchase more J-connectors but no one has replied. I can't even find a mention of a "composter" product on any Miracle-Gro website so unsure how this product is supported. I may have to just secure the connections with super-glue if the company does not respond. Otherwise, the dual chamber composter is just about what I wanted. Each chamber should hold enough kitchen waste for several weeks so alternating sides would give enough time for the compost to mature. The construction material is plastic but seems solid. The drums spin easily and doors are secure. I would purchase this item again if the construction issue can be solved.... maybe use hot water or a heat gun to make the connectors pliable during installation.
V**I
It’s a basic tumbler with two chambers so you can start your compost at different times. To be honest, composting in the ground by burying the scraps works faster for me but I don’t have space in the garden to bury anything anymore. I don’t know how resistant the plastic to UV since I cover the whole thing all the time anyway. It also helps with keeping the compost warm. It comes in an unassuming flat box and the online instructions were easy to follow. I was able to put it together in less than half hour. The turning mechanism is smooth. Even at full capacity, it’s easy to turn the chambers to tumble the contains. The flaps aren’t easy to open so small children or animals wouldn’t be able to open them. I have no use for the lock mechanism that prevents the chambers from rolling but I tried it and it works. The holes in the chambers allow for air circulation but it also means that the compost juices will leak out. I put it on a patch of soil anyway so it’s not a problem for me but if you’ll do this on a patio or a balcony, put something under to catch the liquid. If you’re new to composting, just don’t forget to add some browns (cardboard, packing paper, dried grass or leaves) in there to prevent any smell.
L**N
Got a few reviews mentioning this is a bit small, but after using it for 1 month, I have not filled up half of one of the bin. So far, I am loving it. Ps. we are 2 person household, cooking daily.
S**N
Great composter easy to put together and does a great job.
K**.
I really love this composter but it has caused an ongoing war between me and the neighborhood raccoons. It’s so easy to slide the door open and they arrogantly throw the door into my garden bed as it is not attached at all! I’m going to get some baby drawer locks and see if I can thwart the little monsters! Aside from how convenient the composter is for the raccoons I love it. I’m learning how to properly compost and this unit has some great benefits. It rotates so it mixes the compost well and is able to break things down faster. I can close one side and let it cook but still be able to add more scraps to the second drum. I’m sure the baby locks will help but the manufacturer should consider the additional locks in the manufacturing process. I give this composter 5/10 without the baby locks but I think it will be 9/10 later today when the locks are installed. Addendum- I got the baby locks and the raccoons have been out maneuvered! I put 2 strap locks on each door and the raccoons are no longer a problem!! This is a great little composter with the addition of the baby locks
G**.
This is really a great help to start composting. It was easy to assemble and is really sturdy once done. I love the fact that you can spin it easily and open the window panels to check on it. The only thing I do not like is the fact that it is dripping through the little air holes when you put water in it. It looks messy on my terrasse. I would advice to put it on a grassy patch if you can. Otherwise so far so good, I like it a lot.
Trustpilot
3 weeks ago
2 days ago