Desert Online General Trading LLC
Dubai, United Arab Emirates
Desert Online General Trading LLC
Dubai, United Arab Emirates


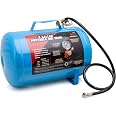
💨 Power Up Your Projects with Portable Precision!
The TOOLUXE 30010L is a rugged, portable 5-gallon air tank delivering up to 125 PSI max pressure. Featuring a 40-inch industrial hose with quick-connect chuck, dual pressure gauge, and a 140 PSI safety valve, it combines convenience, safety, and durability for professionals and enthusiasts on the move.


| Manufacturer | Ridgerock Tool, Inc. |
| Part Number | 30010L |
| Item Weight | 13.57 pounds |
| Package Dimensions | 16.8 x 12.4 x 10.4 inches |
| Item model number | 30010L |
| Size | Portable Air Tank |
| Color | Blue |
| Style | Portable |
| Voltage | 120 Volts |
| Item Package Quantity | 1 |
| Maximum Pressure | 125 |
| Hose Length | 40 Inches |
| Special Features | Heavy Duty, Portable, Pressure Detection |
| Included Components | Portable Air Tank |
| Batteries Required? | No |
J**L
good
good
M**C
Looks Like a Good Deal
Received this today and it appears to be well-constructed and a good deal. People have complained of lack of instructions, but they are now included. So, I have included them for reference. Note that this does not come with any kind of cement. Instead there is a grease lubricant used to make insertion of the plugs easier.I noticed that the setscrews holding the tools to the handle were not quite as tight as they should be, so I tightened them using the enclosed Allen wrench.If I get even a single repair out of this kit, it will pay for itself. But I am expecting many uses.I will update this review as I use it.Update 7-8-2020Today I used the kit for the first time to repair a leak caused by a small sheet metal screw on a pretty large tire on a Kia Van. This hex-headed screw neatly screwed itself into the tire resulting in a small leak. It still had the 1/4" hex head on it, so it was easy to just back out, leaving a very small hole.I've never done one of these - only watched the gas station attendant do a few for me. The biggest part of the job was removing the rear wheel from the van. If this had been a front wheel, I would have turned it facing out and tried doing the repair with the wheel on the car. But that would have been too awkward for the rear wheel. Because the hole was so small, using the enclosed reamer from the start was just too hard, even with lube. This reamer is pretty smooth with very non-aggressive cutting action, so I put a 3/16" bit in a portable drill and used that first to enlarge and smooth the hole. I then used the reamer to finish, which was very manageable. Once an open hole is made in the tire, it will deflate pretty rapidly, so you need to keep your finger on the hole and work quickly. You need to have the plug preinstalled in the insertion tool before starting. Being an amateur, I did make a user error, by inserting the initial plug too far it, so not enough was showing when I was done. So, I did a second plug pushing the first one into the tire, leaving about 1/2" showing. I off the excess flush with the tire with a razor. It was all very easy. I did position the retainer part of the insertion tool on top of the plug to prevent pulling the plug out, but that really was not necessary. The enclosed lube in the package is indicated as being for use with the plug, to make insertion easy. After I was done, I inflated the tire to full pressure and checked for leaks with a soap bubble solution. Will need to keep an eye on it for a few days just to be sure it is sealing.I think the tools are well made and pretty sturdy, maybe not professional shop sturdy, but plenty good enough for the backyard mechanic. The t-handles on both tools are fairly heavy cast pot metal. They would only break through abuse or some kind of incorrect use. The reamer is quite robust while the plug insertion tool is a bit on the light side. I see one picture of someone who bent an insertion tool, but I am relatively sure that was caused by either not using the lube when installing the plug or not reaming out the hole sufficiently.I feel like I paid for this kit with this one leak repoair and still rate it as a good deal.
E**R
Works as I expected
Well built, easy to use. No complaints.
D**.
Worked great.
I was impressed that all I had to do was screw on the black pipe. Everything was ready to go right out of the box. I didn’t even have to put on an air fitting - already installed. Within 3 minutes of pulling it out of the box I used it successfully.
D**N
Not good quality - Find another Option
Bought this tank for use around my home/pole barn. Haven't had good luck. It will not hold pressure consistently. The shut off dial is made of plastic and is cheap. Sometimes it will work sometimes not. The nozzle on the end of the hose for filling tires is cheap also and many times gets stuck and releases air until you can either get it unstuck or the air runs out of the tank completely.I really want to return it but the return window ran out after 30 days. That about how long it worked properly.
T**.
How to plug a tire. With a Professional kit !
This is the most professional kit you can buy.Everything has a professional feel about it. The first thing I did, was use one of the supplied Allen wrench to make certain all four Allen screws were tight on both metal T handles.I have used it at least ten times already.Easy to use and here's how:Step 1: Make certain you have at least 20psi of air in the tire because it will work easier and then locate the nail, screw or object and verify that it is leaking as shown in photo #1.Step 2: Before removing the object put some of the provided lube on the tip of the spiral probe saw tool and set it aside so it is ready and you don't lose much air trying to lube it later as shown in photo #2. This tool is used to basically clean and widen the hole.Step 3: Remove the screw or object and quickly insert the spiral saw into the hole pushing it all the way in and then pull and twist the saw in and out about 4 times without actually allowing the tool to come all the way out of the tire and then stop and leave it in the hole so that you won't loose much air while preparing the t handle inserting tool as show in photo #3Step 4: Put one of the string plugs through the tip of the insert tool and pull half way through until both ends are equal distance away from the tip and pull both ends down towards the Handle. Then apply some lube to allow for a smooth and easy insertion as shown in photo #4.Step 5: Push the string plug into the hole with the T- handle insertion tool until about 1/4" of the sting plug remaining and then pull the insertion tool out with one swift pull as shown in photo #5."The round metal part on the insertion tool is to use if your having a problem with the plug wanting to come out when you pull the tool out but I've never had to use that yet."Step 6: Use Diaganal wire cutters, knife or a razor blade to trim off the remaining plug as close to the tire as possible as shown in photo #6 and #7.Photo # 8 is a view of everything that comes in the kit. I love the case so I can keep everything organized.
F**R
Light and extremely handy
I bought this for a friend and she uses it all the time. Easy to use as long as you buy the right compressor kit so you can fill this with your compressor. Nice because you can fill it up and bring it in the house or in your car to fill up a low tire and don't have to worry about the noise and hassle of carrying the compressor. The little plastic knob that rotates to open the valve broke so I had to put a cable tie on it to temp fix. The manufacturer should make a better knob out of metal. That is my only complaint about this little unit. Otherwise, I would give it five stars
Trustpilot
3 days ago
2 weeks ago
2 months ago
4 days ago